Camera 摄像头
1.实验目的
学习K230上如何使用摄像头。
2.实验硬件
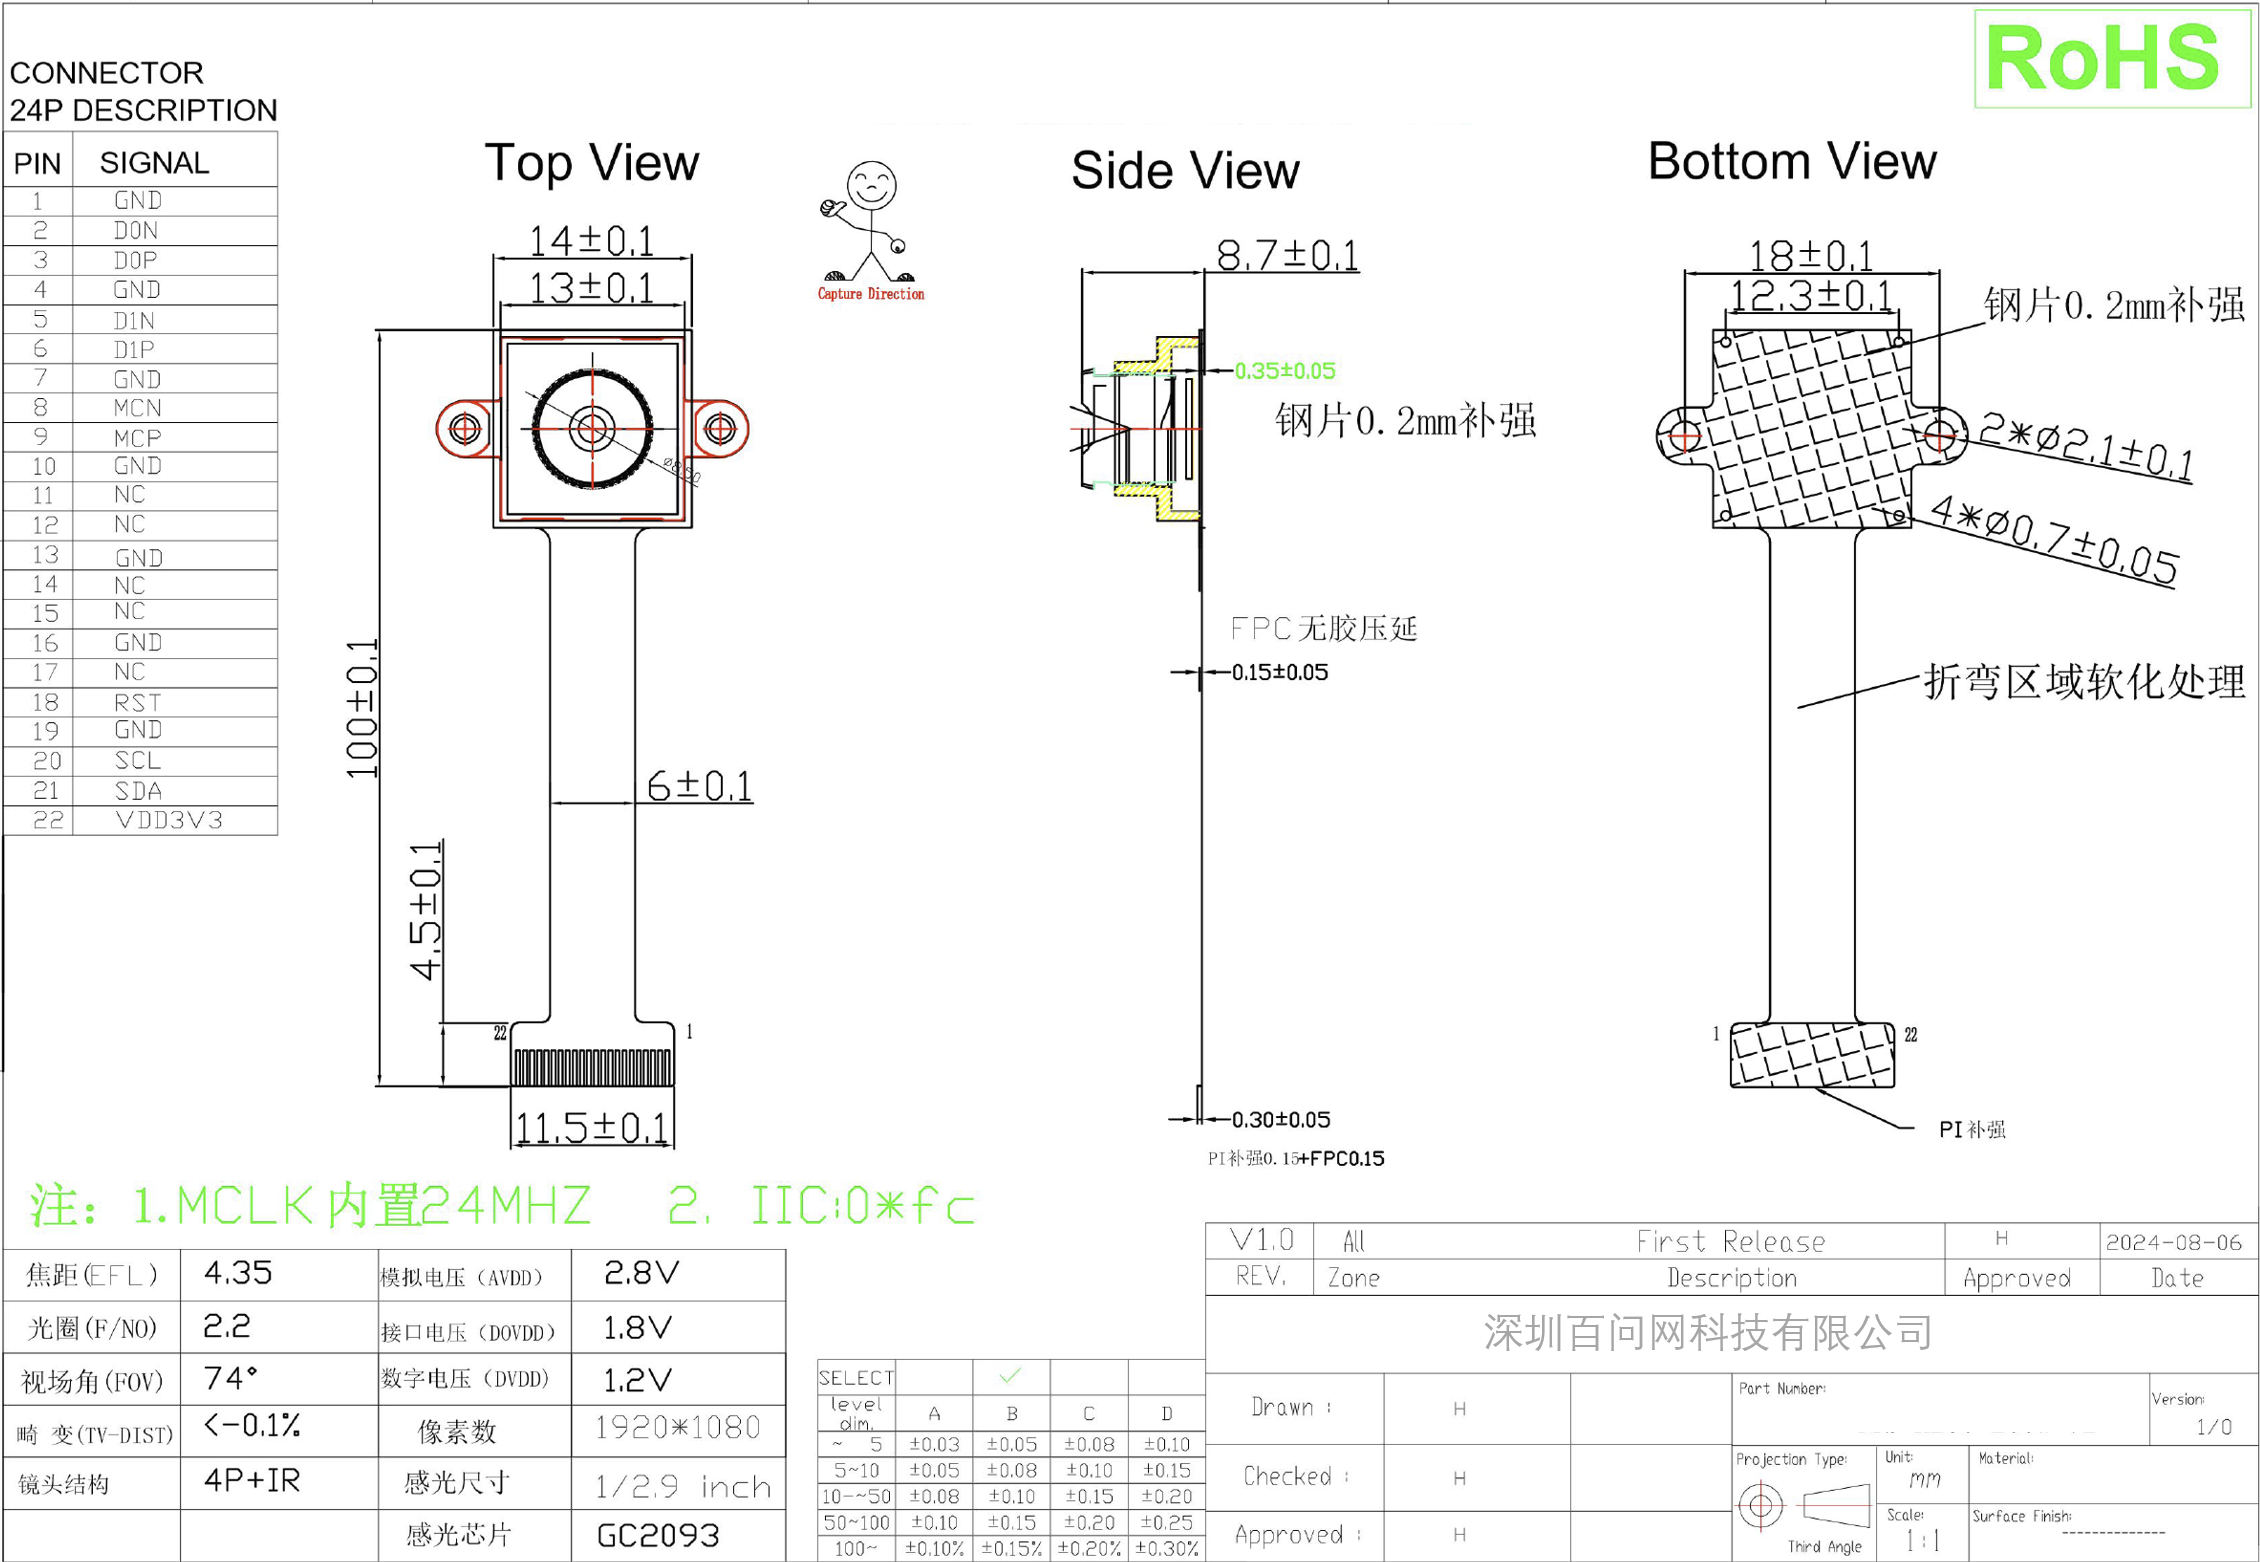
目前我们提供的摄像头为GC2093,镜头参数为:
- 感光元件:GC2093
- 最大分辨率:1920x1080
- 最大帧率:60fps
- 感光尺寸:1/2.9
机械尺寸及引脚定义:
3.实验原理
板子上提供了三路摄像头接口,其中CSI2为22p-0.5mm的FPC接口,CSI0和CSI1为二合一接口,这一小节我们先讲解CSI2的使用。
在DshanPI-K230-CanMV开发板中,Sensor模块的主要作用是负责获取图像数据。这个模块将光信号转化为数字信号,供后续图像处理算法使用。
K230的Sensor模块API提供了对这些硬件的底层控制,模块负责图像采集与数据处理。该模块提供了一套高级 API,开发��者可以利用这些接口轻松获取不同格式与尺寸的图像,而无需了解底层硬件的具体实现。其架构如下图所示:
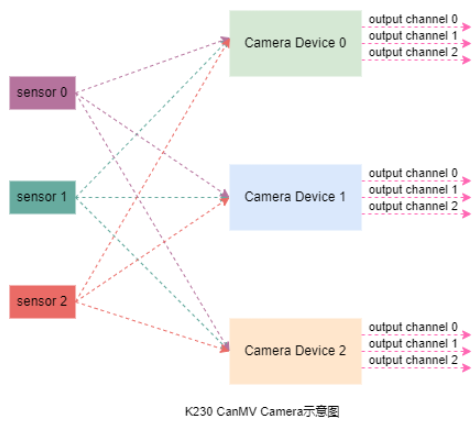
K230 平台支持最多 三路图像传感器(Sensor 0/1/2) 同时接入,每个传感器可独立完成图像采集与信号转换。这些传感器可安装于不同位置,用于捕捉不同视角或区域的图像,例如:
- 自动驾驶场景:车前、车后及车内的三路摄像头;
- 安防监控:覆盖多个区域;
- 工业检测:多面或多角度图像获取。
每个图像传感器可灵活映射到任一 Camera Device(Camera Device 0/1/2)。Camera Device 是图像数据处理的核心单元,负责完成图像采集、格式转换及预处理等操作。Sensor 与 Camera Device 之间支持多对多映射,提供更高的配置灵活性。
每个 Camera Device 提供 三路输出通道(Output Channel 0/1/2),支持并行输出不同格式、分辨率的图像数据,可分别用于:
- 实时显示;
- AI 算法推理;
- 视频存储或回放。
K230 也支持通过 CSI0+CSI1 合并为一个 4-lane 接口,从而连接高分辨率摄像头,扩展单路带宽以满足更高质量图像需求。
4.代码解析
导入模块
import time, os, sys

from media.sensor import *
from media.display import *
from media.media import *
引入 time, os, sys 是为了时间控制、系统接口等通用功能;
media.sensor, media.display, media.media 是K230平台自带的摄像头、显示和媒体资源管理模块。
保存图像函数
def save_img(img, chn):
    if img.format() == image.YUV420:
        suffix = "yuv420sp"
    elif img.format() == image.RGB888:
        suffix = "rgb888"
    elif img.format() == image.RGBP888:
        suffix = "rgb888p"
    else:
        suffix = "unkown"
判断图像格式,选择合适的文件后缀名。
    filename = f"/sdcard/camera_chn_{chn:02d}_{img.width()}x{img.height()}.{suffix}"
    print("save capture image to file:", filename)
    img.save(filename)
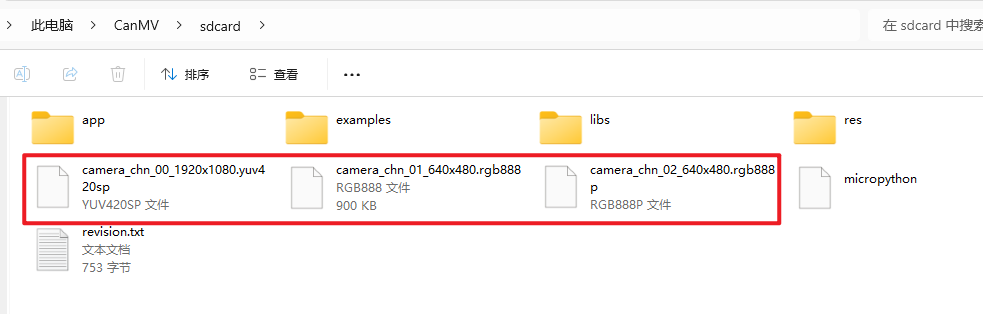
构造图像文件保存路径,例如 /sdcard/camera_chn_00_1920x1080.yuv420sp
使用 img.save() 将图像原始数据保存到 SD 卡中。
摄像头初始化和配置
try:
    print("camera_test")
    sensor = Sensor()           # 创建 Sensor 对象,默认使用 sensor0
    sensor.reset()              # 重置sensor,加载默认配置
设置默认通道输出参数
    sensor.set_framesize(Sensor.FHD)        # 设置分辨率为 Full HD 1920x1080
    sensor.set_pixformat(Sensor.YUV420SP)   # 设置输出图像格式为 YUV420SP
摄像头通道绑定到显示层
    bind_info = sensor.bind_info()
    Display.bind_layer(**bind_info, layer = Display.LAYER_VIDEO1)
bind_info() 获取绑定信息(比如buffer、宽高等)
Display.bind_layer() 将通道0图像显示到视频层 VIDEO1(通常用于 HDMI 显示)
设置通道的输出格式
    sensor.set_framesize(width = 640, height = 480, chn = CAM_CHN_ID_1)
    sensor.set_pixformat(Sensor.RGB888, chn = CAM_CHN_ID_1)

    sensor.set_framesize(width = 640, height = 480, chn = CAM_CHN_ID_2)
    sensor.set_pixformat(Sensor.RGBP888, chn = CAM_CHN_ID_2)
配置通道1和通道2为 VGA 分辨率 (640x480),格式分别为 RGB888 和 RGB888P(Planar)。
初始化显示模块+媒体管理器
    Display.init(Display.VIRT, sensor.width(), sensor.height(), to_ide = True)
    MediaManager.init()
显示初始化,设置显示区域为虚拟显示(VIRT)并输出到 IDE(一般是 HDMI 屏幕);
媒体管理器�初始化,申请内部 buffer,做视频资源统一管理。
启动摄像头采集
sensor.run() # 开始运行摄像头
丢弃前100帧图像
    for i in range(100):
        sensor.snapshot()
用于预热、去抖。
抓拍图像并保存到SD卡
    img = sensor.snapshot(chn = CAM_CHN_ID_0)
    save_img(img, 0)

    img = sensor.snapshot(chn = CAM_CHN_ID_1)
    save_img(img, 1)

    img = sensor.snapshot(chn = CAM_CHN_ID_2)
    save_img(img, 2)
分别从三个通道抓拍图像并保存。
异常处理
except KeyboardInterrupt as e:
    print(f"user stop")
except BaseException as e:
    print(f"Exception '{e}'")
捕捉中断(Ctrl+C)和其他异常,避免程序崩溃。
资源清理
finally:
    if isinstance(sensor, Sensor):
        sensor.stop()               # 停止摄像头
    Display.deinit()                # 关闭显示
    os.exitpoint(os.EXITPOINT_ENABLE_SLEEP)  # 允许休眠
    time.sleep_ms(100)             # 延迟一会儿,等待硬件稳定
    MediaManager.deinit()          # 释放媒体资源
确保资源被正确释放,避免系统崩溃或下次初始化失败。
5.示例代码
下面的代码保存摄像头图像数据:
'''
本程序遵循GPL V3协议, 请遵循协议
实验平台: DshanPI CanMV
开发板文档站点	: https://eai.100ask.net/
百问网学习平台   : https://www.100ask.net
百问网官方B站    : https://space.bilibili.com/275908810
百问网官方淘宝   : https://100ask.taobao.com
'''
import time, os, sys

from media.sensor import *
from media.display import *
from media.media import *

# save image raw data, use 7yuv to preview

def save_img(img, chn):
    if img.format() == image.YUV420:
        suffix = "yuv420sp"
    elif img.format() == image.RGB888:
        suffix = "rgb888"
    elif img.format() == image.RGBP888:
        suffix = "rgb888p"
    else:
        suffix = "unkown"

    filename = f"/sdcard/camera_chn_{chn:02d}_{img.width()}x{img.height()}.{suffix}"
    print("save capture image to file:", filename)
    img.save(filename)

try:
    print("camera_test")
    # construct a Sensor object with default configure
    sensor = Sensor()
    # sensor reset
    sensor.reset()
    # set hmirror
    # sensor.set_hmirror(False)
    # sensor vflip
    # sensor.set_vflip(False)

    # set chn0 output size, 1920x1080
    sensor.set_framesize(Sensor.FHD)
    # set chn0 output format
    sensor.set_pixformat(Sensor.YUV420SP)
    # bind sensor chn0 to display layer video 1
    bind_info = sensor.bind_info()
    Display.bind_layer(**bind_info, layer = Display.LAYER_VIDEO1)

    # set chn1 output format
    sensor.set_framesize(width = 640, height = 480, chn = CAM_CHN_ID_1)
    sensor.set_pixformat(Sensor.RGB888, chn = CAM_CHN_ID_1)

    # set chn2 output format
    sensor.set_framesize(width = 640, height = 480, chn = CAM_CHN_ID_2)
    sensor.set_pixformat(Sensor.RGBP888, chn = CAM_CHN_ID_2)

    # use hdmi as display output
    Display.init(Display.VIRT, sensor.width(), sensor.height(), to_ide = True)
    # init media manager
    MediaManager.init()
    # sensor start run
    sensor.run()

    # drop 100 frames
    for i in range(100):
        sensor.snapshot()

    # snapshot and save
    img = sensor.snapshot(chn = CAM_CHN_ID_0)
    save_img(img, 0)

    img = sensor.snapshot(chn = CAM_CHN_ID_1)
    save_img(img, 1)

    img = sensor.snapshot(chn = CAM_CHN_ID_2)
    save_img(img, 2)

except KeyboardInterrupt as e:
    print(f"user stop")
except BaseException as e:
    print(f"Exception '{e}'")
finally:
    # sensor stop run
    if isinstance(sensor, Sensor):
        sensor.stop()
    # deinit display
    Display.deinit()

    os.exitpoint(os.EXITPOINT_ENABLE_SLEEP)
    time.sleep_ms(100)

    # release media buffer
    MediaManager.deinit()
6.实验结果
在开发板上电前,提前连接好摄像头:
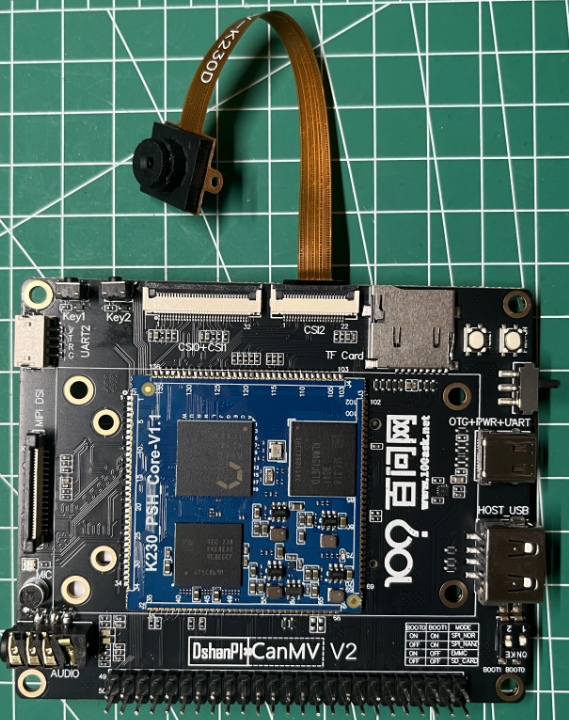
连接后上电运行上述示例代码后,会调用摄像头,拍摄图片,拍摄完成后保存的sdcard目录下: