RT-Smart 基础
本文档根据《嘉楠K230开发手册》V1.0(2024-11-30)整理。正文、表格、示例代码与插图均来自原始手册。
第1个Hello程序
本文将讲解如果在pc端使用交叉编译工具编译一个hello world的基础程序,并在大核rt-smart或小核linux上运行。
工具链
k230_sdk中提供了工具链,分别在如下路径:
- 大核rt-samrt工具链
k230_sdk/toolchain/riscv64-linux-musleabi_for_x86_64-pc-linux-gnu
- 小核linux工具链
k230_sdk/toolchain/Xuantie-900-gcc-linux-5.10.4-glibc-x86_64-V2.6.0
也可通过以下链接下载工具链:
wget https://download.rt-thread.org/rt-smart/riscv64/riscv64-unknown-linux-musl-rv64imafdcv-lp64d-20230222.tar.bz2
wget https://occ-oss-prod.oss-cn-hangzhou.aliyuncs.com/resource//1659325511536/Xuantie-900-gcc-linux-5.10.4-glibc-x86_64-V2.6.0-20220715.tar.gz
编写代码
在ubuntu上创建一个C文件hello.c并加入如下代码:
#include <stdio.h>
int main (void)
{
printf("hello world\n");
return 0;
}
将hello.c放到与k230_sdk同一级目录下:
canaan@develop:~/work$ ls
hello.c   k230_sdk
编译程序
- 编译适用于小核linux的可执行程序
k230_sdk/toolchain/Xuantie-900-gcc-linux-5.10.4-glibc-x86_64-V2.6.0/bin/riscv64-unknown-linux-gnu-gcc hello.c -o hello
- 编译适用于大核rt-smart的可执行程序
k230_sdk/toolchain/riscv64-linux-musleabi_for_x86_64-pc-linux-gnu/bin/riscv64-unknown-linux-musl-gcc -o hello.o -c -mcmodel=medany -march=rv64imafdcv -mabi=lp64d hello.c
k230_sdk/toolchain/riscv64-linux-musleabi_for_x86_64-pc-linux-gnu/bin/riscv64-unknown-linux-musl-gcc -o hello.elf -mcmodel=medany -march=rv64imafdcv -mabi=lp64d -T k230_sdk/src/big/mpp/userapps/sample/linker_scripts/riscv64/link.lds  -Lk230_sdk/src/big/rt-smart/userapps/sdk/rt-thread/lib -Wl,--whole-archive -lrtthread -Wl,--no-whole-archive -n --static hello.o -Lk230_sdk/src/big/rt-smart/userapps/sdk/lib/risc-v/rv64 -Lk230_sdk/src/big/rt-smart/userapps/sdk/rt-thread/lib/risc-v/rv64 -Wl,--start-group -lrtthread -Wl,--end-group
运行程序
将编译好的hello以及hello.elf拷贝到sd卡的vfat分区内(sd卡烧写完镜像后可以在pc端看到一个可用的盘符),或通过其他方式(参考sdk使用说明文档)将可执行程序拷贝到小核的/sharefs目录下。
- 开发板启动后,在小核端运行测试程序,小核启动后输入“root”进入控制台
Welcome to Buildroot
canaan login: root
[root@canaan ~ ]#cd /sharefs
[root@canaan /sharefs ]#./hello
hello world
- 在大核端运行测试程序
msh /sharefs>hello.elf
hello world
大核程序编译进阶
大核如果用musl-gcc直接编译的话,编译参数是比较多的,对于初学者来说很不方便,也不太好理解,当前sdk中提供了两种用于编译大核程序的方式,分别是scons和Makefile,这里我们介绍scons的编译方式,Makefile的编译构建较为复杂,不是rt-smart官方提供的编译方式,感兴趣的读者可参考`src/big/mpp/userapps/sample`中的Makefile结构来编译。
到“k230_sdk/src/big/rt-smart/userapps”目录下创建一个文件夹,命名为hello
cd k230_sdk/src/big/rt-smart/userapps
mkdir hello
cd hello
创建以下三个文件
- hello.c
- SConscript
# RT-Thread building script for component
from building import *
cwd = GetCurrentDir()
src = Glob('*.c')
CPPPATH = [cwd]
CPPDEFINES = [
'HAVE_CCONFIG_H',
]
group = DefineGroup('hello', src, depend=[''], CPPPATH=CPPPATH, CPPDEFINES=CPPDEFINES)
Return('group')
- SConstruct
import os
import sys
# add building.py path
sys.path = sys.path + [os.path.join('..','..','tools')]
from building import *
BuildApplication('hello', 'SConscript', usr_root = '../')
之后回到“k230_sdk/src/big/rt-smart/”目录,配置环境变量
canaan@develop:~/k230_sdk/src/big/rt-smart$ source smart-env.sh riscv64
Arch         => riscv64
CC           => gcc
PREFIX       => riscv64-unknown-linux-musl-
EXEC_PATH    => /home/canaan/k230_sdk/src/big/rt-smart/../../../toolchain/riscv64-linux-musleabi_for_x86_64-pc-linux-gnu/bin
进入“k230_sdk/src/big/rt-smart/userapps”目录,编译程序
canaan@develop:~/k230_sdk/src/big/rt-smart/userapps$ scons --directory=hello
scons: Entering directory `/home/canaan/k230_sdk/src/big/rt-smart/userapps/hello'
scons: Reading SConscript files ...
scons: done reading SConscript files.
scons: Building targets ...
scons: building associated VariantDir targets: build/hello
CC build/hello/hello.o
LINK hello.elf
/home/canaan/k230_sdk/toolchain/riscv64-linux-musleabi_for_x86_64-pc-linux-gnu/bin/../lib/gcc/riscv64-unknown-linux-musl/12.0.1/../../../../riscv64-unknown-linux-musl/bin/ld: warning: hello.elf has a LOAD segment with RWX permissions
scons: done building targets.
编译好的程序在hello文件夹下
canaan@develop:~/k230_sdk/src/big/rt-smart/userapps$ ls hello/
build  cconfig.h  hello.c  hello.elf  SConscript  SConstruct
之后即可使用ADB将hello.elf push到小核linux上,然后大核rt-smart通过/sharefs即可运行该程序
注意:使用ADB的前提时提前安装ADB,详情请见**“3.4开发板文件传输”**章节!
系统启动流程
系统启动流程
rt-smart是一个小而美的操作系统,我们有能力从上电第一条指令开始理解它的启动过程。这对于理解操作系统、解决日常技术问题很有用处。
rt-smart官网有如下启动流程图:
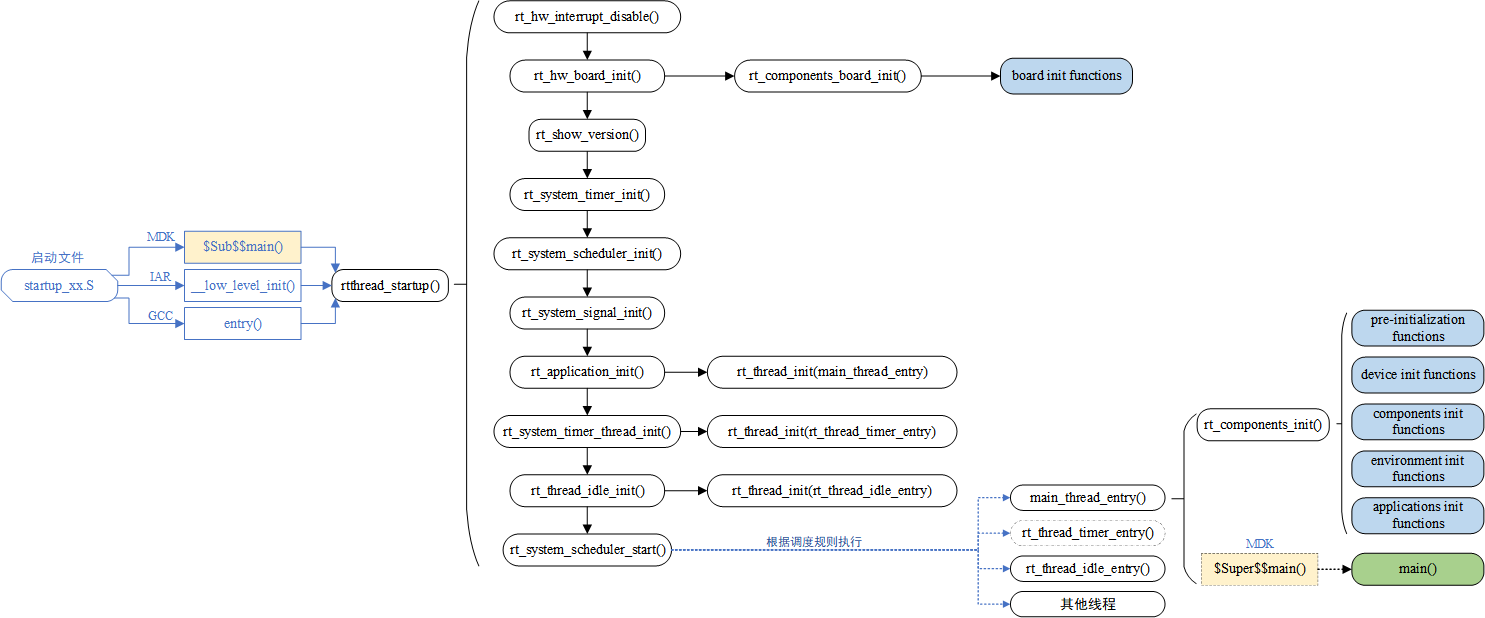
启动流程里涉及的文件及功能如下:
- 系统启动的第1条指令
源码:src\big\rt-smart\kernel\bsp\maix3\c908\startup_gcc.S
作用:使能浮点单元、设置物理内存保护(Physical Memory Protection,PMP)、设置cache、中断控制器等。
然后调用“primary_cpu_entry”函数。
- 系统启动的第1个C函数
源码:src\big\rt-smart\kernel\bsp\maix3\board\board.c
函数为“primary_cpu_entry”,代码如下:
//BSP的C入口
void primary_cpu_entry(void)
{
extern void entry(void);
//初始化BSS
init_bss();
//关中断
rt_hw_interrupt_disable();
rt_assert_set_hook(__rt_assert_handler);
//启动RT-Thread Smart内核
entry();
}
功能如下:初始化BSS、关闭中断,然后调用entry函数进一步处理。
- 系统入口函数
源码:src\big\rt-smart\kernel\rt-thread\src\components.c
函数为“entry”,代码如下:
int entry(void)
{
rtthread_startup();
return 0;
}
“rtthread_startup”函数里,调用的各个函数如下:
rtthread_startup
rt_hw_interrupt_disable
    rt_hw_mmu_map_init
    rt_page_init
    rt_hw_mmu_kernel_map_init
    rt_hw_mmu_switch
    rt_system_heap_init
    rt_components_board_init  // 调用使用“INIT_BOARD_EXPORT”描述的函数
rt_hw_board_init
rt_show_version
rt_system_timer_init
rt_system_scheduler_init
rt_system_signal_init
rt_application_init
rt_system_timer_thread_init
rt_thread_idle_init
rt_system_scheduler_start
- 启动main线程
源码:src\big\rt-smart\kernel\rt-thread\src\components.c
函数为“rt_application_init”,代码如下:
void rt_application_init(void)
{
rt_thread_t tid;
#ifdef RT_USING_HEAP
tid = rt_thread_create("main", main_thread_entry, RT_NULL,
                           RT_MAIN_THREAD_STACK_SIZE, RT_MAIN_THREAD_PRIORITY, 20);
RT_ASSERT(tid != RT_NULL);
#else
rt_err_t result;
tid = &main_thread;
result = rt_thread_init(tid, "main", main_thread_entry, RT_NULL,
                            main_stack, sizeof(main_stack), RT_MAIN_THREAD_PRIORITY, 20);
RT_ASSERT(result == RT_EOK);
/* if not define RT_USING_HEAP, using to eliminate the warning */
(void)result;
#endif
rt_thread_startup(tid);
}
它创建了“main线程”,当rt-smart启动后就会在“main线程”里运行“main函数”:
/* the system main thread */
void main_thread_entry(void *parameter)
{
extern int main(void);
extern int $Super$$main(void);
#ifdef RT_USING_COMPONENTS_INIT
/* RT-Thread components initialization */
rt_components_init();
#endif
#ifdef RT_USING_SMP
rt_hw_secondary_cpu_up();
#endif
/* invoke system main function */
#if defined(__CC_ARM) || defined(__CLANG_ARM)
$Super$$main(); /* for ARMCC. */
#elif defined(__ICCARM__) || defined(__GNUC__)
main();
#endif
}
- main线程
main线程的入口函数为“main_thread_entry”,它不仅仅是调用main函数。函数调用关系如下:
main_thread_entry
rt_components_init // 调用各类驱动程序(使用INIT_DEVICE_EXPORT描述的函数)
// 调用各类APP(使用INIT_APP_EXPORT描述的函数)
main
- main函数
源码: src\big\rt-smart\kernel\bsp\maix3\applications\main.c
作用:启动第1个进程“/bin/init.sh”,这也意味着我们可以修改“/bin/init.sh”,在里面添加需要自动运行的程序。
代码如下:
#ifndef RT_SHELL_PATH
#define RT_SHELL_PATH "/bin/init.sh"
#endif
int main(void)
{
int result;
struct statfs buffer;
printf("RT-SMART Hello RISC-V.\n");
char path[64];
strcpy(path, RT_SHELL_PATH);
strrchr(path, '/')[0] = 0;
if(!strcmp(path, "/sdcard") || !strcmp(path, "/sharefs"))
{
    while(dfs_statfs(path, &buffer) != 0)
    {
        rt_thread_delay(RT_TICK_PER_SECOND);
    }
}
msh_exec(RT_SHELL_PATH, strlen(RT_SHELL_PATH)+1);
return 0;
}
tshell线程的启动
在rt-smart里,会有各类使用“INIT_APP_EXPORT”描述的函数,比如“src\big\rt-smart\kernel\rt-thread\components\finsh\shell.c”里面的如下代码:
INIT_APP_EXPORT(finsh_system_init);
在main线程里调用“rt_components_init”是,它会调用“INIT_APP_EXPORT描述的函数”,比如调用“finsh_system_init”。
在“finsh_system_init”函数里,它创建了一个线程:tshell线程。
在tshell线程里,我们可以输入、执行各类命令。
在tshell线程里启动APP
当我们在命令行输入命令,处理流程是:
① tshell线程根据这个命令(它是字符串),尝试找到内嵌的命令,然后调用命令对应的函数。
比如“ls”命令,它是一个内嵌的命令,代码在src\big\rt-smart\kernel\rt-thread\components\finsh\msh_file.c中,如下:
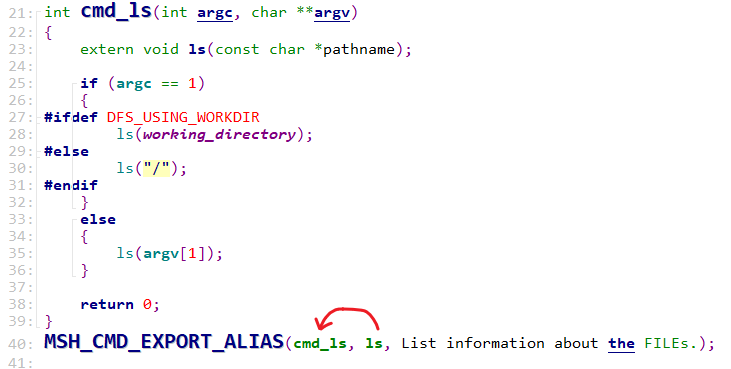
当执行ls命令时,tshell线程就直接调用“cmd_ls”函数。
② 如果不是内嵌的命令,就在文件系统里找到程序,创建进程来启动它:
具体代码在“src\big\rt-smart\kernel\rt-thread\components\finsh\msh.c”的“_msh_exec_lwp”函数里。
“_msh_exec_lwp”函数尝试在如下目录找到可执行程序:
a. 工作目录
b. /bin目录
c. PATH环境变量指定的目录
如果找到了,就使用exec接口创建、运行进程。
进程与内存管理单元
rt-smart跟一般RTOS的不同
在嵌入式系统中,MCU(Microcontroller Unit,微控制器单元)和MPU(Microprocessor Unit,微处理器单元)是两种常见的计算单元,它们在功能、设计和应用场景上有所不同。
简单地说,MCU就是单片机,一个芯片里集成了处理器、内存、Flash、GPIO模块等外设备。相比于MPU,MCU功能弱,开发简单。在MCU上,通常运行裸机程序,也可以运行操作系统,比如FreeRTOS、RT-Thread。
MPU性能更强大,一般能外接更大的内存、更大的Flash。当然有些MPU也把内存、Flash集成在一个芯片里。在软件开发的角度,MPU和MCU的最主要差别在于:MPU里面有MMU(Memory Management Unit),MCU里没有MMU。
MMU是用于内存管理的硬件,它允许操作系统将物理内存扩展到更大的地址空间,实现虚拟内存、虚拟地址到物理地址的转换以及内存保护等功能。MPU通过MMU支持多任务处理,允许多个程序同时运行,每个程序都拥有自己的内存空间和执行环境。
有了MMU之后,我们才能实现多进程,进程间隔离,进程和内核隔离等操作。rt-smart就是一个能发挥MMU作用的RTOS,相比与传统的RTOS,它支持:进程、内存隔离、内存权限管理。使得程序更健壮:在传统RTOS里,一个任务出错了整个系统就会崩溃;在rt-smart里,进程崩溃了不会影响到其他进程,也不会影响到整个系统。
所谓进程,术语上称之为“资源的管理者”。简单地说,我们运行一个程序时,就要把程序读入内存——分配内存,它运行时会打开磁盘文件、打开驱动程序,这些都是“资源”。这个程序运行时,一般至少有一个循环——它就是一个线程。线程被称为“调度的基本单位”,可以简单认为就是一个执行流程、一个循环。一个程序里可以创建多个线程,就是可以有多个执行流程、多个循环。所以:我们可以在一个进程里创建多个线程,这些线程共享进程的资源。比如进程A里定义了全局变量g_val,并且创建了线程t1、线程t2,那么线程t1、t2都可以访问g_val——它是属于进程A的(进程是资源的管理者),不是独属于某个线程的。线程t1、t2可以同时运行、可以你运行我不运行——线程是调度的最小单元。
进程隔离
如下程序,让它在后台启动2次,就是创建了2个进程,假设为进程A、B:
#include <stdio.h>
int main(int argc, char **argv)
{
int a = 0 ;

while (1)
{
    printf("a's address = 0x%x, a' value = %d\n", &a, a++);
    sleep(1);
}

return 0;
}
输出信息如下:100ASK。
这2个进程打印的变量a的地址相同,但是运行一段时间后变量a的值不同了。地址相同,值不同:怎么解释这个现象?
① 值不同,那么必定在内存里不同的位置:物理地址不同,假设物理地址分别为P1、P2
② 地址相同:这是虚拟地址,假设为V。运行进程A时,这个虚拟地址V对应物理地址P1;运行进程B时,这个虚拟地址V对应物理地址P2。
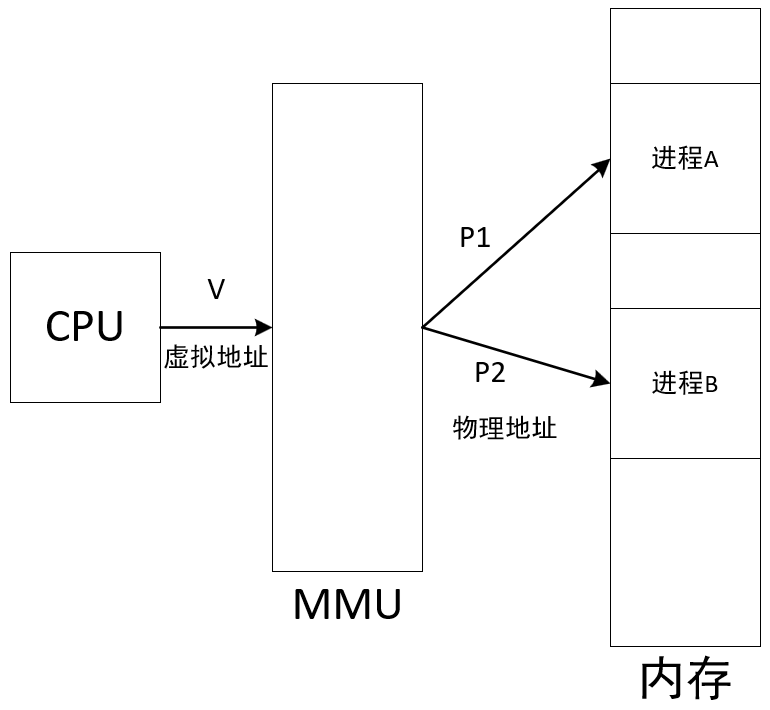
这就是进程隔离的概念:进程A、B分别有自己的物理内存,进程A无法访问、破坏进程B的数据。
进程和内核隔离
在传统的RTOS里,用户程序和内核(包括驱动)之间没有严格的界限:用户程序也可以直接读写硬件寄存器。如果编写用户程序的人对硬件的理解不到位,错误的操作可能导致大问题。所以,具备MMU的硬件上运行的操作系统,通常支持用户态、内核态隔离,就是进程和内核隔离:用户程序无法直接读写硬件寄存器,用户程序无法读写内核的变量,用户程序无法直接运行内核的函数。
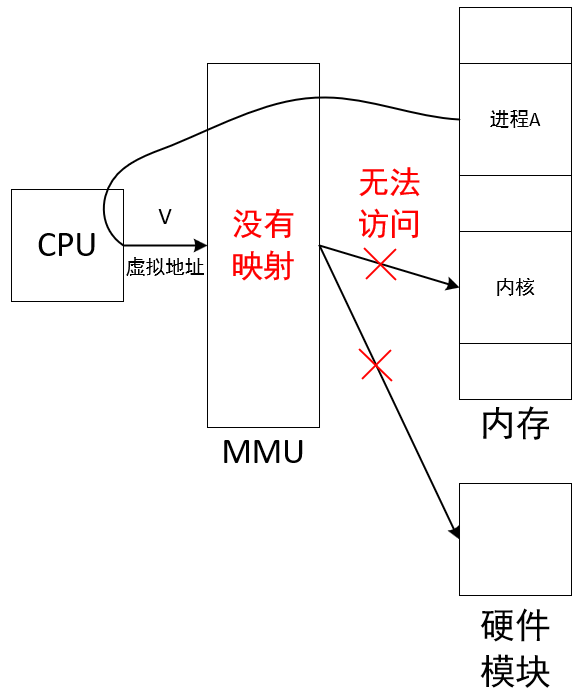
进程和内核的交互
进程无法直接调用内核的函数,它通过“系统调用”触发异常,导致内核的异常处理函数被执行,异常处理函数再去调用其他内核函数。
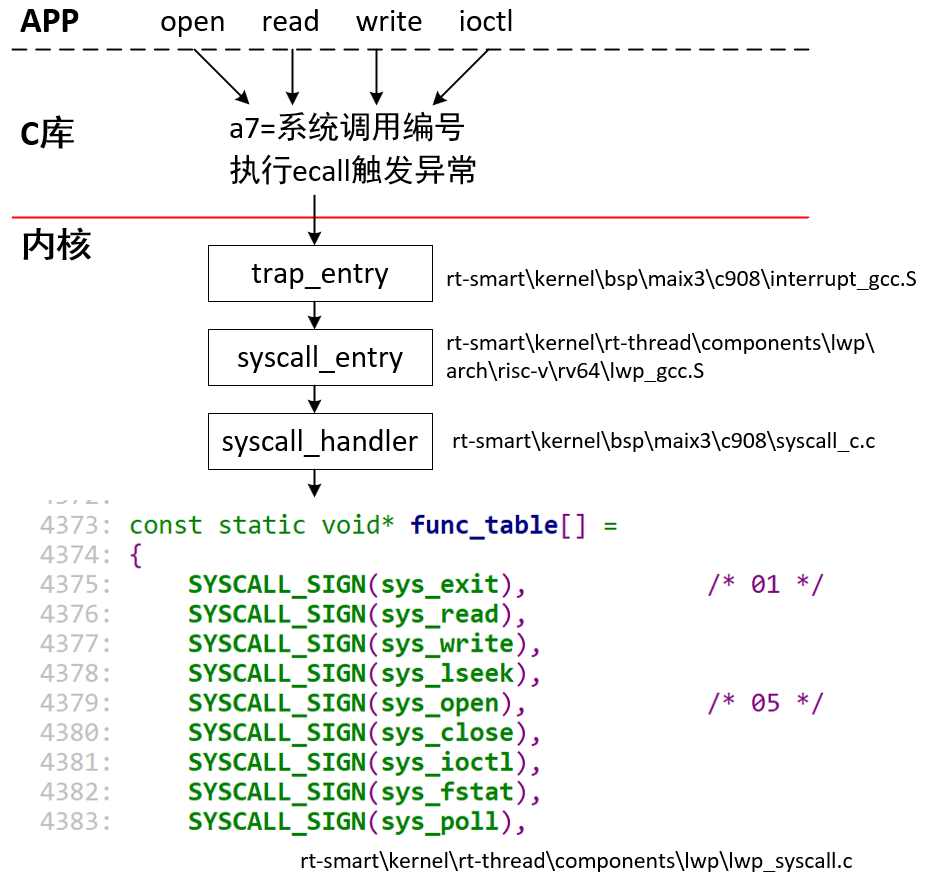
忽略复杂的调用过程,可以简单地认为APP调用open/read/write/ioctl/poll等系统调用接口时,会导致内核里sys_open/sys_read/sys_write/sys_ioctl/sys_poll等函数被调用。
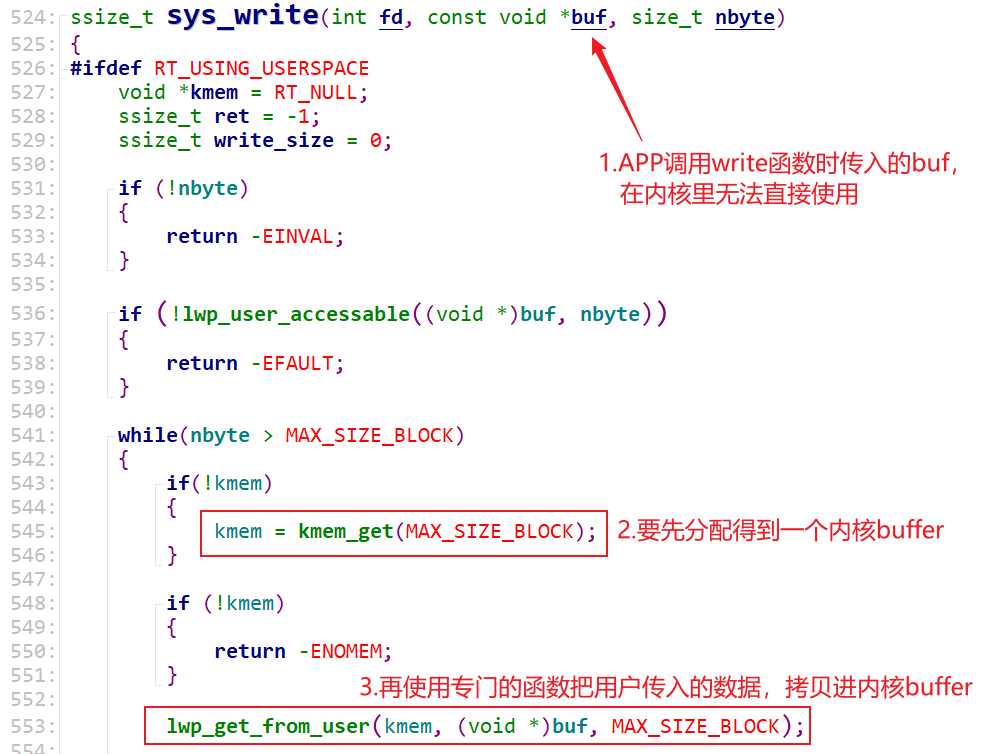
要注意的是,APP传入内核的缓冲区地址,在内核里无法直接使用,比如:
进程如何调用驱动程序
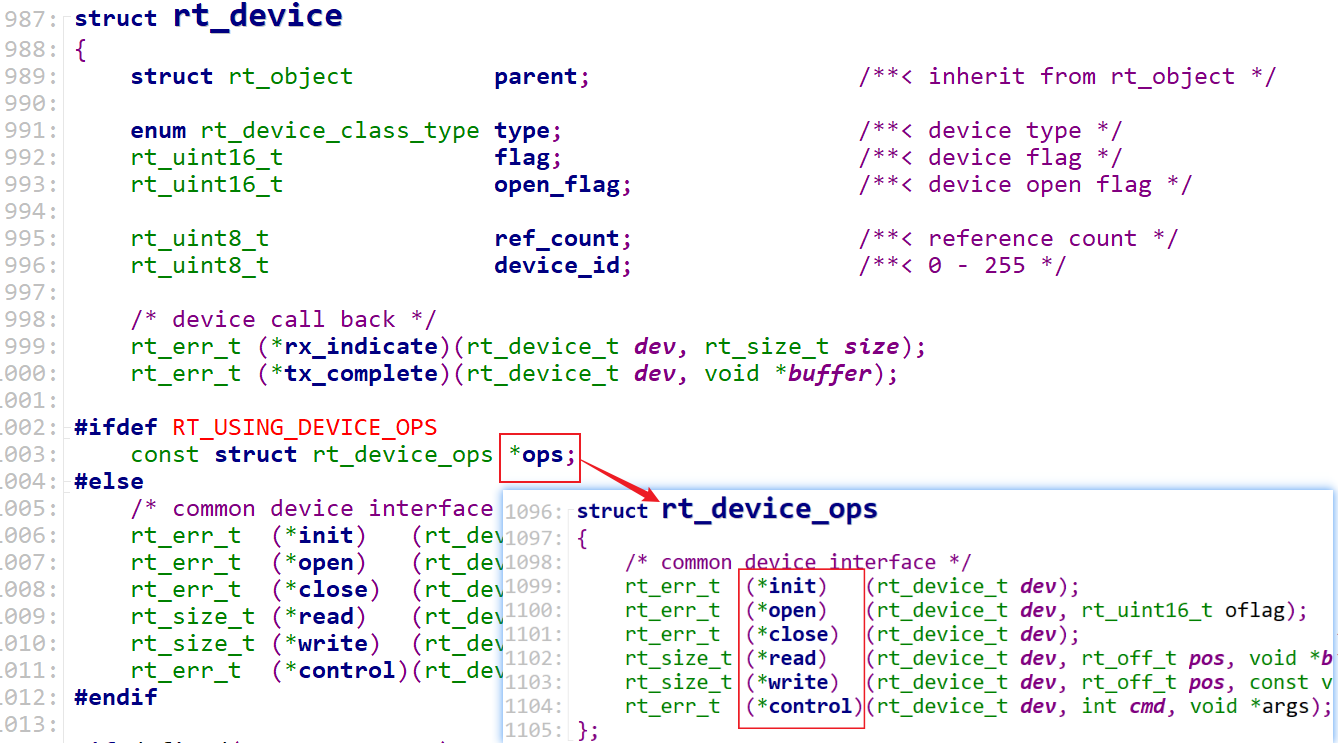
可以认为驱动程序时内核的一部分,所以进程访问驱动的方法也是通过系统调用:open/read/write/ioctl/poll等。驱动程序也提供了对应的open/read/write/ioctl/poll函数,这些函数存在一个rt_device结构体里:
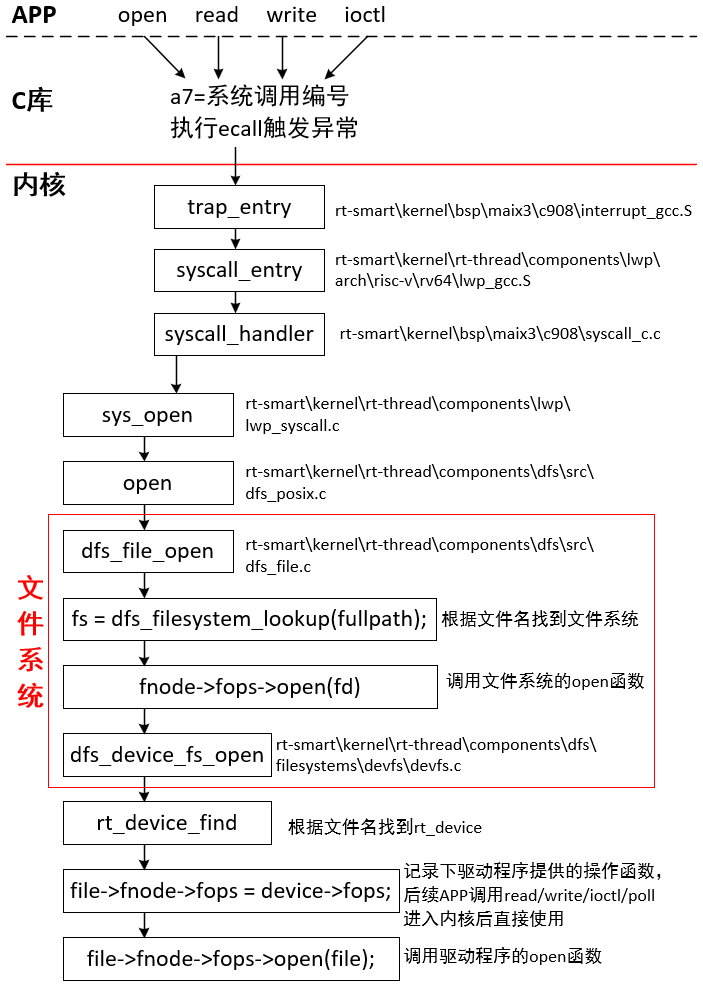
所以,APP能调用驱动程序的前提是找到指定驱动的rt_device结构体。这在APP调用open函数进而间接调用sys_open时实现。流程如下:
版权所有:深圳百问网科技有限公司 未经授权不得拷贝、复制、修改、传播本文档,否则将追究法律责任。