目标检测模型部署
本文档根据《嘉楠K230开发手册》V1.0(2024-11-30)整理。正文、表格、示例代码与插图均来自原始手册。
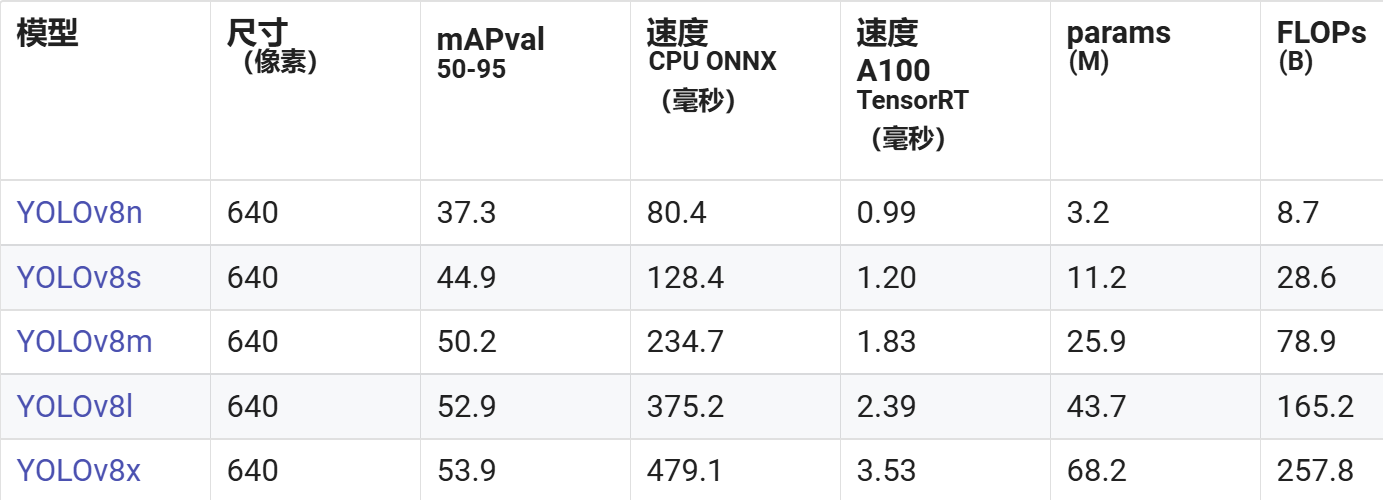
YOLOv8 是YOLO 系列实时物体检测器的最新迭代产品,在精度和速度方面都具有尖端性能。在之前YOLO 版本的基础上,YOLOv8 引入了新的功能和优化,使其成为广泛应用中各种目标检测任务的理想选择。
主要功能:
- 先进的骨干和颈部架构: YOLOv8 采用了最先进的骨干和颈部架构,从而提高了特征提取和物体检测性能。
- 无锚分裂Ultralytics 头: YOLOv8 采用无锚分裂Ultralytics 头,与基于锚的方法相比,它有助于提高检测过程的准确性和效率。
- 优化精度与速度之间的权衡: YOLOv8 专注于保持精度与速度之间的最佳平衡,适用于各种应用领域的实时目标检测任务。
- 各种预训练模型: YOLOv8 提供一系列预训练模型,以满足各种任务和性能要求,从而更容易为您的特定用例找到合适的模型。
YOLOv8 系列提供多种模型,每种模型都专门用于计算机视觉中的特定任务。这些模型旨在满足从物体检测到实例分割、姿态/关键点检测、定向物体检测和分类等更复杂任务的各种要求。
YOLOv8 系列的每个变体都针对各自的任务进行了优化,以确保高性能和高精确度。此外,这些模型还兼容各种操作模式,包括推理、验证、训练和输出,便于在部署和开发的不同阶段使用。
PyTorch到ONNX转换
- 流程分析
选择目标检测模型时,一般应选择轻量化的模型。因此我们选择基于YOLO的yolov8n 作为目标检测模型,该模型参数量较小,更适合在嵌入式设备上进行部署。
- 加载pth或ckpt模型到cpu
- 构建随机模型输入
- 导出onnx模型
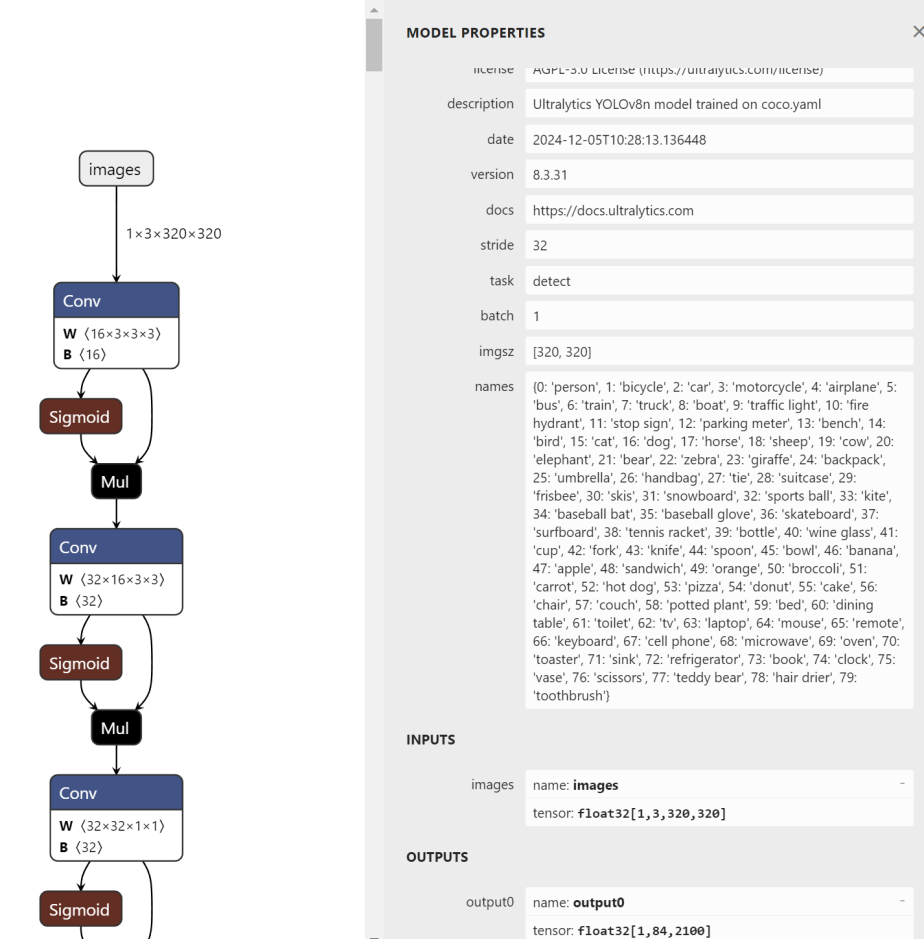
**注:**pth、onnx都支持动态输入,而K230的模型暂时不支持动态输入,所以导出onnx时,onnx输入shape固定。
- 执行步骤
- 在Ubuntu端新建终端,直接在终端输入:
conda activate py39_yolov8
- 进入yolov8模型存放目录
cd yolov8_model/

其中yolov8n.pt可通过下面的链接进行下载:
https://github.com/ultralytics/assets/releases/download/v8.2.0/yolov8n.pt
模型对应的代码可访问:ultralytics/ultralytics at v8.2.0
- 执行转换命令,将pytorch模型转换为onnx模型,并支持320*320像素的图像输入:
yolo export model=yolov8n.pt format=onnx imgsz=320
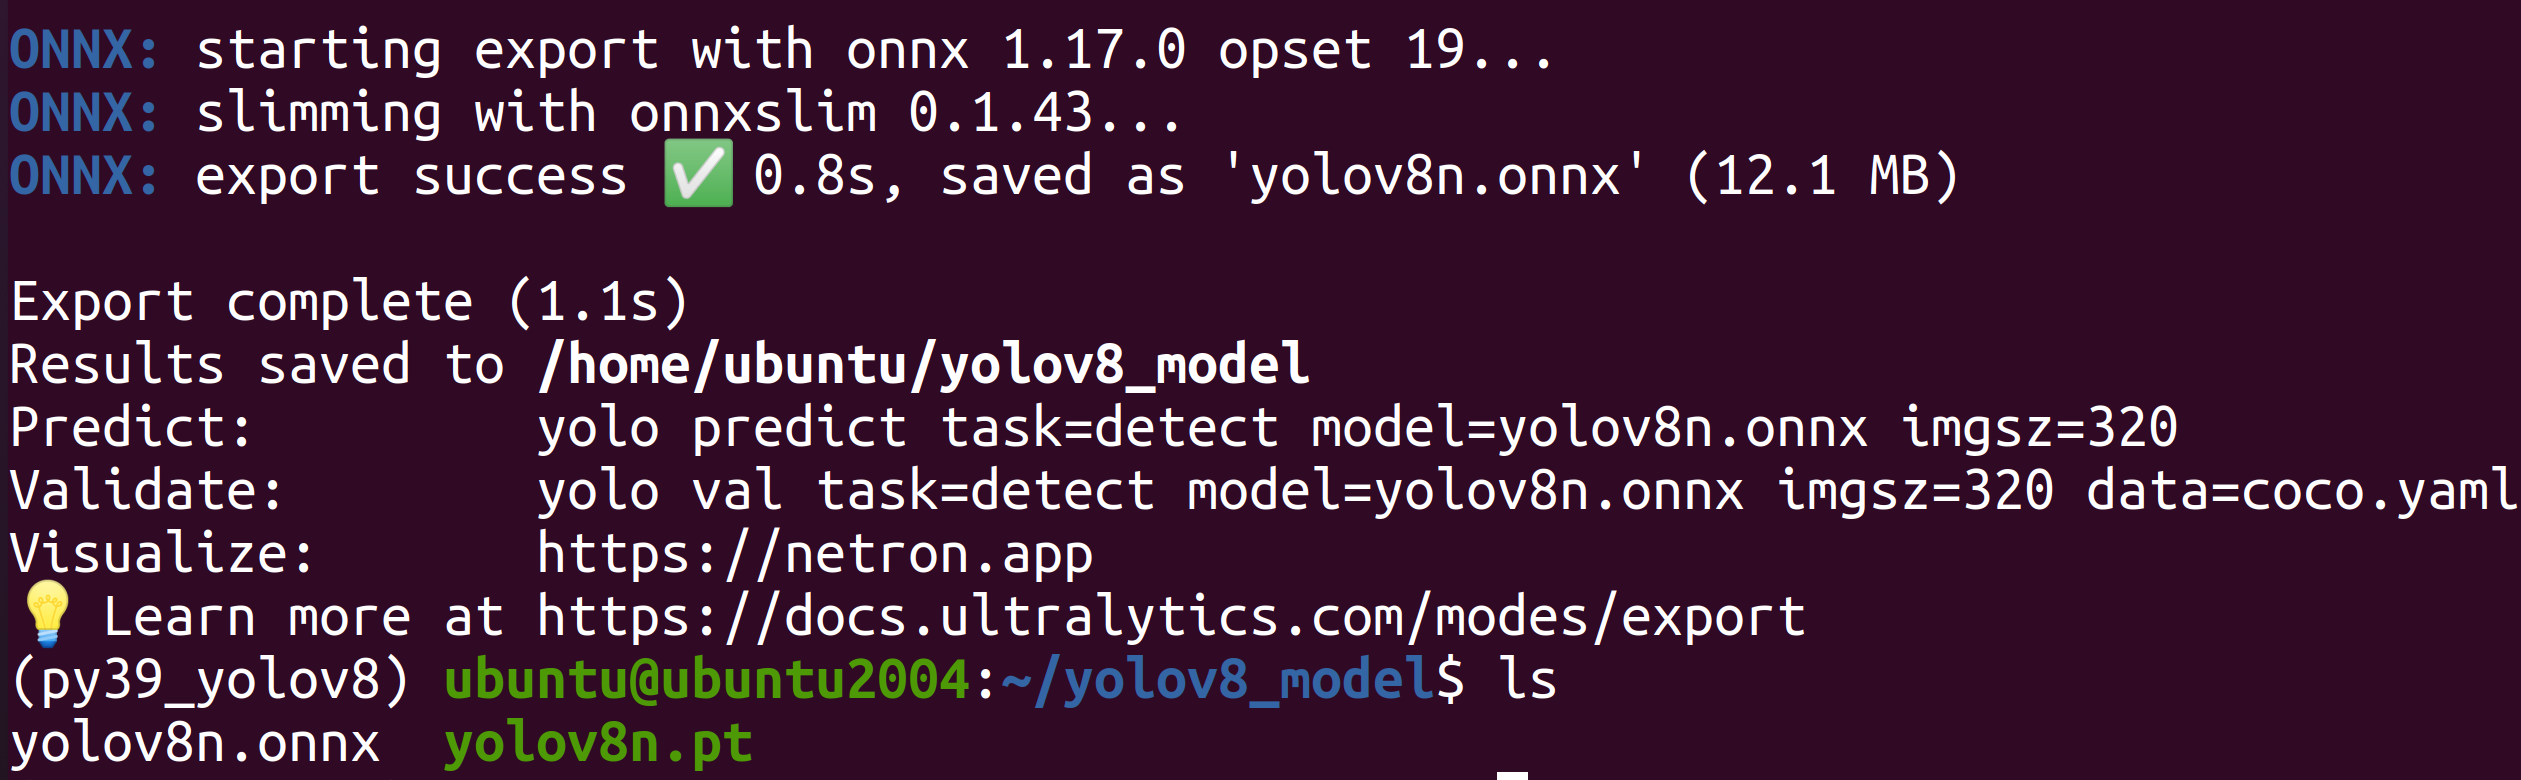
执行完成后可以在当前目录下查看生成的onnx模型文件。
使用ONNXRuntime进行推理
为了验证onnx正确性,我们需要使用ONNXRuntime对onnx进行推理,推理时保证读取图片、预处理、run、后处理、显示结果与pth/ckpt的推理流程一致。
- 读取图像
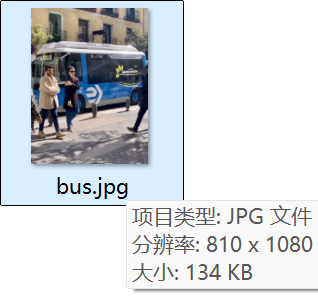
#ori_img(810,1080,3),opencv读入图片的默认格式为hwc,bgr
image = cv2.imread(image_path)
- 图像预处理
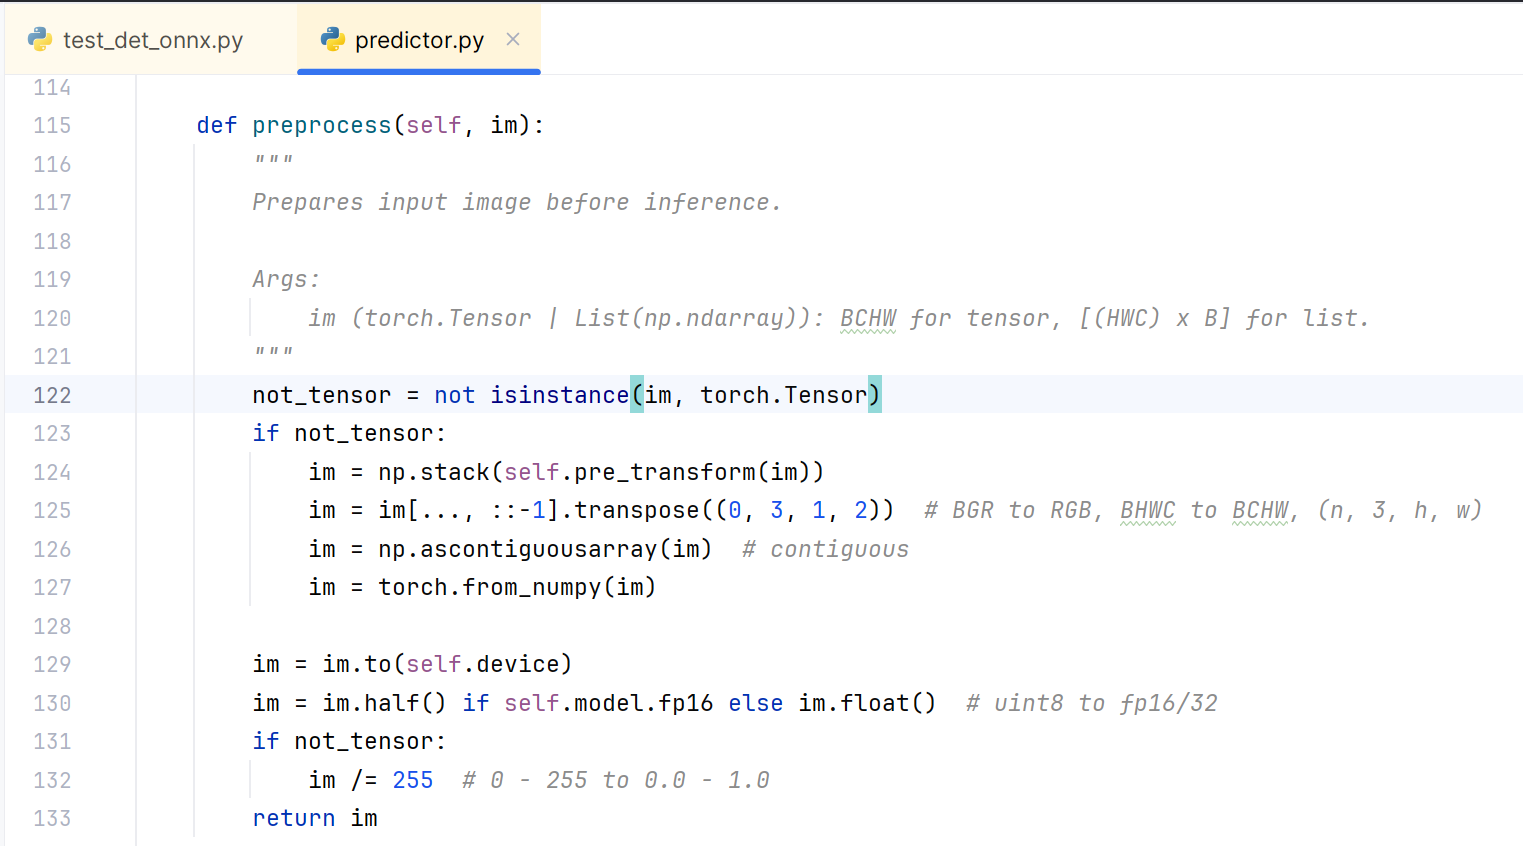
预处理构建(常用的方法:padding_resize,crop_resize,resize,affine、normalization):参考train.py,test.py、predict.py、现成的onnx推理脚本。
def preprocess(image,input_width=320, input_height=320,mean=[0,0,0],std=[1,1,1]):"""预处理输入图像,调整大小、归一化、转换通道顺序、添加批次维度。"""# 获取原始图像尺寸orig_h, orig_w = image.shape[:2]# 计算缩放比例,保持长宽比scale = min(input_width / orig_w, input_height / orig_h)new_w = int(orig_w * scale)new_h = int(orig_h * scale)# 缩放图像resized_image = cv2.resize(image, (new_w, new_h))# 创建一个背景图像canvas = np.ones((input_height, input_width, 3),dtype=np.uint8)*128# 将缩放后的图像粘贴到背景图像中canvas[0:new_h, 0:new_w, :] = resized_image# BGR 转 RGBimg = canvas[:, :, ::-1]# 转换为 float32img = img.astype(np.float32) / 255for i in range(3): img[:, :, i] -= mean[i] img[:, :, i] /= std[i]# HWC 转 CHWimg = np.transpose(img, (2, 0, 1))# 添加批次维度img = np.expand_dims(img, axis=0)onnx_input=img.copy()return onnx_input, scale
参考:(与pth预处理流程一致)人脸检测预处理代码参考predictor.py(k230模型的输入shape目前只支持固定输入,训练时都是批量固定输入的,因此可以借鉴)中调用的预处理,增加onnx推理时必要的pad_to_square、resize_subact_mean处理,保证onnx与pth预处理一致。
- onnx推理
将预处理好的数据,喂给模型,得到onnx推理结果
outputs = ort_session.run(None, {input_name: img_input})
- 后处理
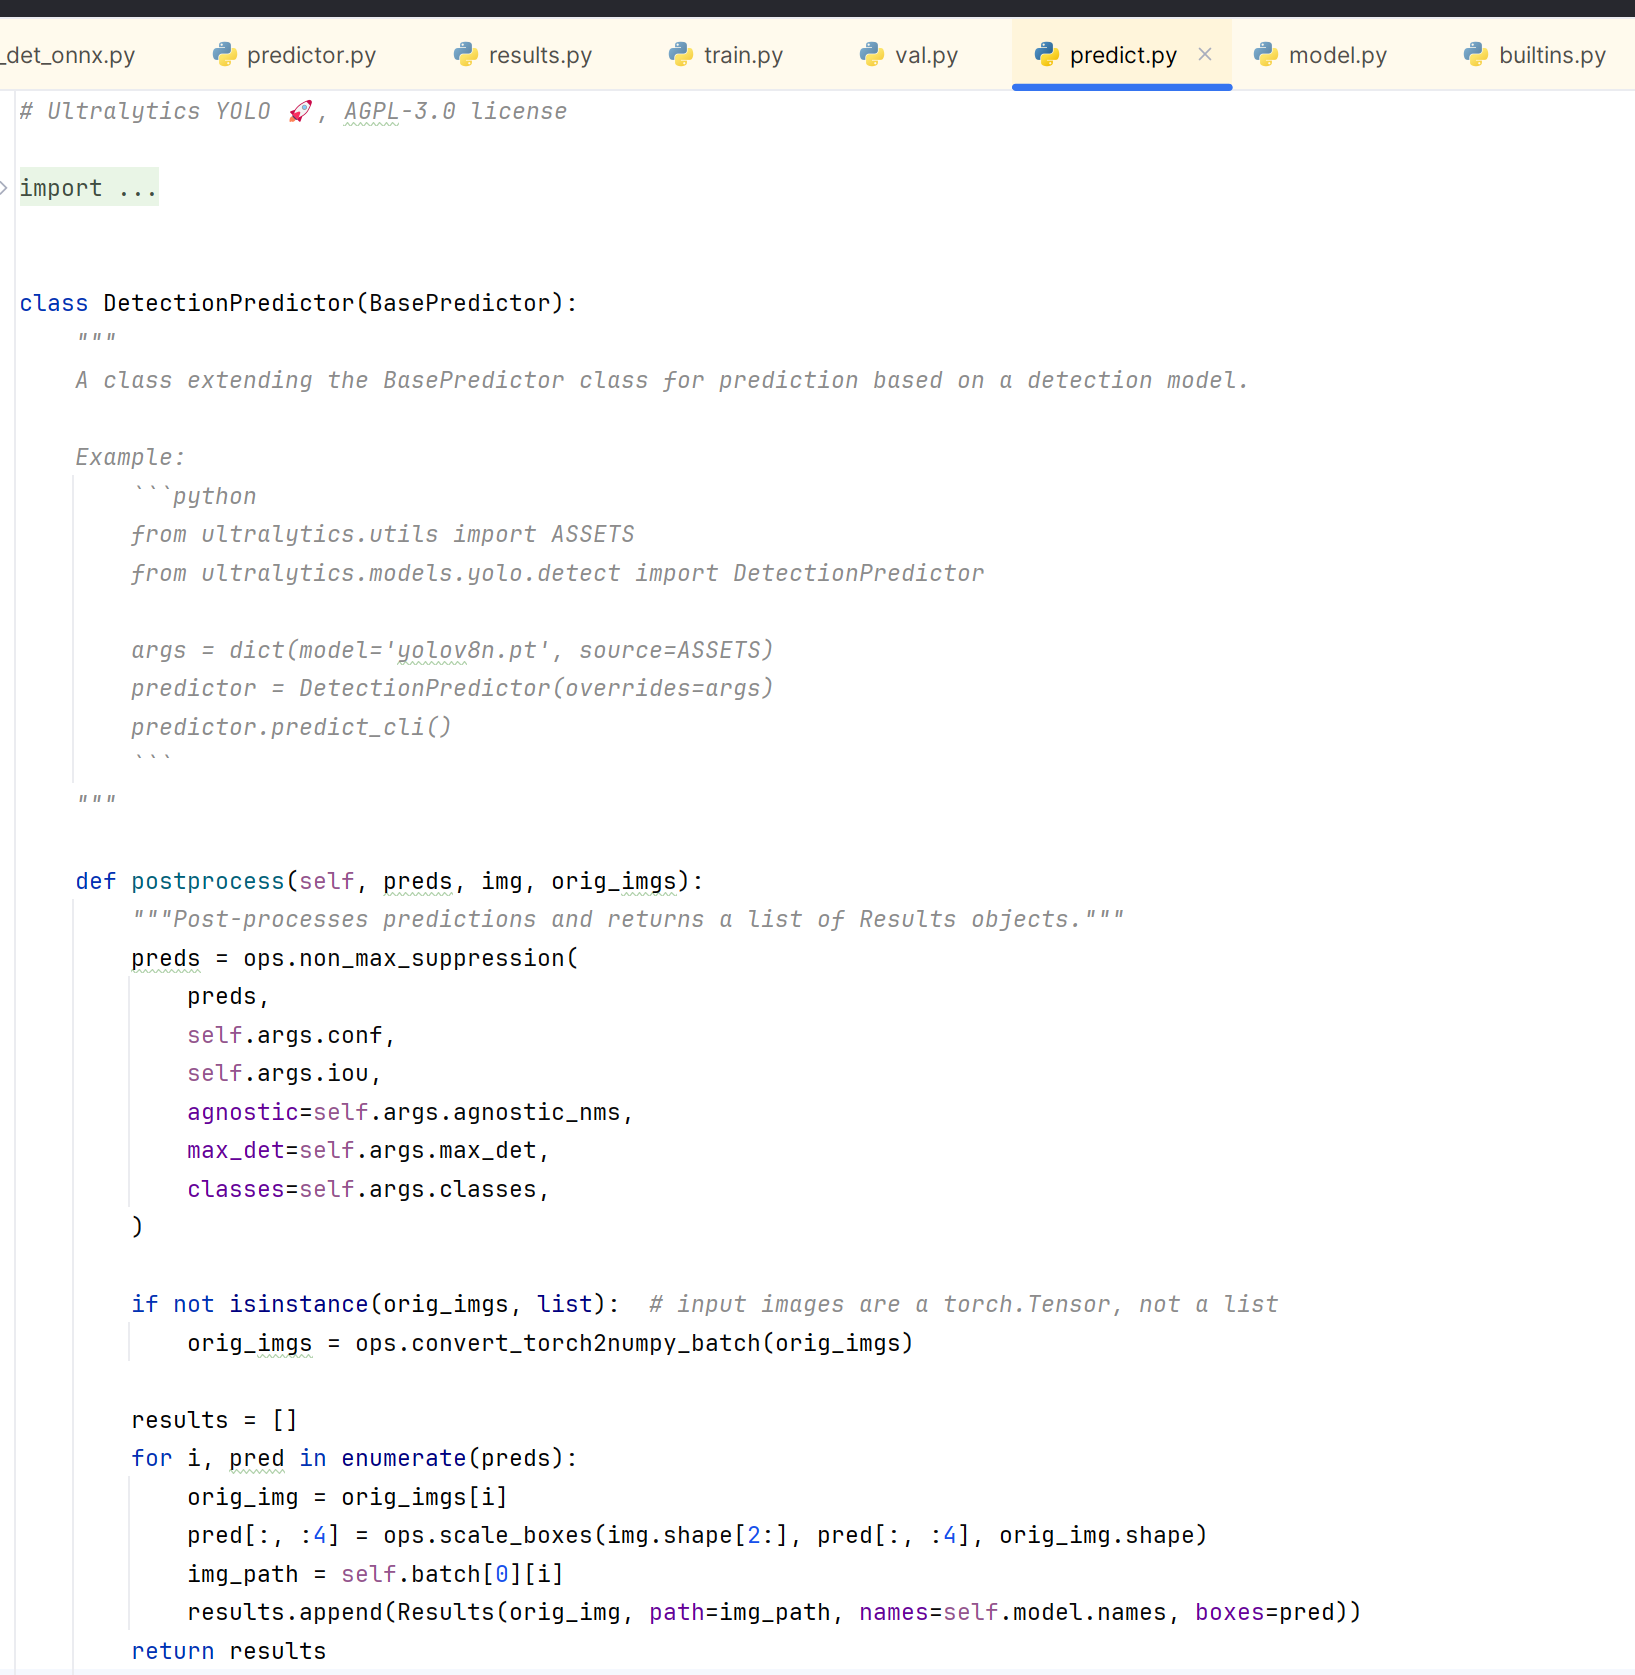
后处理构建(常用的方法:softmax、loc解码、nms等):参考predict.py等测试脚本、现成的onnx推理脚本。
def postprocess(predictions, scale, original_image, conf_threshold=0.25, iou_threshold=0.45, classes=None):"""后处理推理结果,进行非极大抑制(NMS),并将检测框映射回原始图像。"""predictions = predictions[0] # 移除批次维度predictions=np.transpose(predictions,(1,0))# 分离边界框、置信度和类别概率boxes = predictions[:, :4] # x_center, y_center, w, hclass_scores = predictions[:, 4:]scores=np.max(class_scores,axis=1)# 计算置信度class_ids = class_scores.argmax(axis=1)# 过滤低置信度的框mask = scores > conf_thresholdboxes = boxes[mask]scores = scores[mask]class_ids = class_ids[mask]# 转换边界框格式,从 (x_center, y_center, w, h) 转为 (x1, y1, x2, y2)boxes_xy = boxes[:, :2]boxes_wh = boxes[:, 2:4]boxes_xy -= boxes_wh / 2boxes_xy = boxes_xy/scaleboxes_wh = boxes_wh/scaleboxes_xy2 = boxes_xy + boxes_whboxes = np.concatenate([boxes_xy, boxes_xy2], axis=1)# 转换为 float32 类型boxes = boxes.astype(np.float32)scores = scores.astype(np.float32)# 使用 OpenCV 的 NMS 进行非极大抑制indices = cv2.dnn.NMSBoxes(boxes.tolist(), scores.tolist(), conf_threshold, iou_threshold)# 如果没有检测到目标,返回空列表if len(indices) == 0: return []indices = indices.flatten()detections = []for i in indices: box = boxes[i] score = scores[i] class_id = class_ids[i] detections.append({ "box": box, "score": score, "class_id": class_id })return detections
参考:目标检测源码中的predict.py,对模型输入结果:loc(边界框)、conf(得分)、坐标点等进行后处理,进而得到预测框、得分、坐标。
- 显示结果
显示结果:将后处理之后的结果画到原图。
def draw_boxes(image, detections, class_names,colors):"""在图像上绘制检测框和类别标签。"""for det in detections: box = det["box"] score = det["score"] class_id = det["class_id"] x1, y1, x2, y2 = map(int, box) label = f"{class_names[class_id]}: {score:.2f}" # 绘制边界框 cv2.rectangle(image, (x1, y1), (x2, y2), colors[class_id], 2) # 绘制标签 (text_width, text_height), _ = cv2.getTextSize(label, cv2.FONT_HERSHEY_SIMPLEX, 0.5, 1) cv2.putText(image, label, (x1, y1 - 5), cv2.FONT_HERSHEY_SIMPLEX, 0.5, colors[class_id], 1)return image
- 执行步骤
- 在Ubuntu端新建终端,直接在终端输入:
conda activate py39_yolov8
- 进入ONNX推理源码目录
cd k230_sdk/src/reference/yolov8_Analysis/detect/
- 拷贝ONNX模型至当前目录
cp ~/yolov8_model/yolov8n.onnx .

- 执行onnx推理程序
python test_det_onnx.py

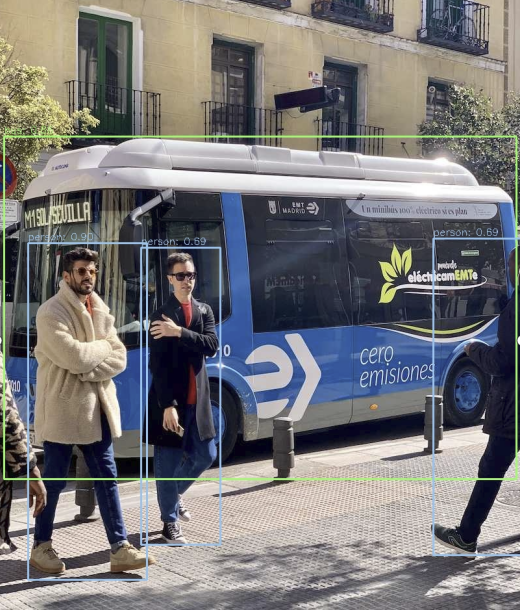
程序会去读取 ../test-images/bus.pg图像进行推理,推理后的图像会保存为当前目录下的onnx_det_result.jpg。推理结果图像如下所示:
ONNX到Kmodel转换
目标检测onnx模型经过nncase编译之后,可以生成在k230上推理的模型kmodel,生成kmodel需要调用nncase的编译模型APIs(Python)。
- 配置生成kmodel参数
1.1 编译参数:CompileOptions
| 参数类别 | 参数名称 |
|---|---|
| 编译目标参数 | target |
| 预处理参数 | input_shape、input_layout、 swapRB、input_type、input_range、mean、std等 |
| 后处理参数 | output_layout |
编译目标参数:
# 指定编译目标, 如'cpu', 'k230'
compile_options.target = args.target
- target = “cpu”,生成cpu上推理的kmodel,此时不进行量化;
- target = “k230”,生成在k230(kpu)上推理的kmodel,此时模型进行量化(默认uint8量化);
预处理参数:由于预处理参数比较复杂,接下来我们着重介绍下常用预处理参数。
# 是否开启前处理,默认为False
compile_options.preprocess = True
- 预处理参数(preprocess = False时,不进行任何预处理,kmodel ≈ onnx)
- 预处理参数(preprocess = True时,kmodel ≈ 预处理 + onnx,此时kmodel包含设置的预处理,这些预处理会在KPU计算,KPU计算较快,因此最好将尽可能多预处理放到kmodel上)
| 预处理操作类型 | 相关参数 |
|---|---|
| Transpose | input_shape、input_layout |
| SwapRB | swapRB |
| Dequantize | input_type、input_range |
| Normalization | mean、std |
Transpose参数:
# 输入图像的shape 320*320compile_options.input_shape = input_shape
compile_options.input_layout = "NCHW"
实际推理时,目标检测onnx输入layout:NCHW,shape是[1, 3, 320, 320],所以input_layout = "NCHW",input_shape=[1, 3, 320, 320]
SwapRB参数:
compile_options.swapRB = False
相关参数:swapRB:是否在 channel维度反转数据,默认为False
# 模型输入格式‘uint8’或者‘float32’compile_options.input_type = 'uint8'# 如果输入是‘uint8’格式,输入反量化之后的范围compile_options.input_range = [0, 1]
相关参数:
- input_type:与kmodel实际输入数据类型一致;当 preprocess为 True时,必须指定为”uint8”或者”float32。
- input_range:指定输入数据反量化后的浮点数范围;当 preprocess为 True且 input_type为 uint8时,必须指定。
- 分析说明:
- 若kmodel input_type为float32,不进行反量化
- 若kmodel input_type为uint8,range为[0,255],当input_range为[0,255]时,则反量化的作用只是进行类型转化,将uint8的数据转化为float32
- 若kmodel input_type为uint8,range为[0,255],当input_range为[0,1],则反量化会将定点数转化为[0.0,1.0]的浮点数
- 实际推理时,目标检测kmodel实际输入从sensor中获取,数据类型为uint8,所以input_type = 'uint8',input_range = [0,255]或[0,1]均可
Normalization参数:
compile_options.mean = [0, 0, 0] compile_options.std = [1, 1, 1]
- mean:预处理标准化参数均值,默认为[0,0,0]
- std:预处理标准化参数方差,默认为[1,1,1]
**1.2 导入参数:ImportOptions **ImportOptions类, 用于配置nncase导入选项,很少单独设置,使用默认参数即可。
model_content = read_model_file(model_file)import_options = nncase.ImportOptions()compiler.import_onnx(model_content, import_options)
1.3 训练后量化参数:PTQTensorOptions
训练后量化参数(Post Training Quantization,PTQ),PTQ是一种通过将模型权重从float32映射uint8或int16方法,保持模型的准确性的同时,减少推理所需的计算资源;当target = “k230”,PTQ是必选参数,默认uint8量化。
使用uint8量化可以满足目标检测精度要求,故使用默认uint8量化;校正集个数为100;假设使用100个校正集生成kmodel的时间很久,可以适当的减少校正集。
ptq_options = nncase.PTQTensorOptions()ptq_options.samples_count = 100
#ptq_options.set_tensor_data(generate_data_ramdom(input_shape, ptq_options.samples_count))ptq_options.set_tensor_data(generate_data(input_shape, ptq_options.samples_count, args.dataset))compiler.use_ptq(ptq_options)
- 校正集准备
因为生成kmodel时,使用了后处理量化,因此需要准备校正集。使用少量校正集计算量化因子,可以快速得到量化模型。使用该量化模型进行预测,可在保证模型准确性的同时,减少计算量、降低计算内存、减小模型大小。
校正集一般选用验证集的100张图片即可,目标检测模型的验证集coc128_val,故选用coco128_val的100张图像作为校正集。
注:
- 若是kmodel生成时间很久或者验证集数据很少,也可尝试少于100个数据
- generate_data函数,生成的数据格式,需要尽量保证与实际推理时喂给kmodel的数据格式一致,否则会导致生成kmodel有问题。
def generate_data(shape, batch, calib_dir):img_paths = [os.path.join(calib_dir, p) for p in os.listdir(calib_dir)]data = []for i in range(batch): assert i < len(img_paths), "calibration images not enough." img_data = Image.open(img_paths[i]).convert('RGB') img_data = img_data.resize((shape[3], shape[2]), Image.BILINEAR) img_data = np.asarray(img_data, dtype=np.uint8) img_data = np.transpose(img_data, (2, 0, 1)) data.append([img_data[np.newaxis, ...]])return np.array(data)
- 执行步骤
**注意:**若已经激活Kmodel模型转换环境,请忽略步骤①和步骤②。
在Ubuntu中新建终端,并进入k230_SDK目录下

激活Kmodel模型转换环境
sudo docker run -u root -it -v $(pwd):$(pwd) -v $(pwd)/toolchain:/opt/toolchain -w $(pwd) ghcr.io/kendryte/k230_sdk /bin/bash

进入kmodel转换程序源码目录
cd src/reference/yolov8_Analysis/detect/

安装nncase相关库
pip install nncase==2.9.0
pip install nncase-kpu==2.9.0
安装yolov8模型转换所需的额外的库
pip install -r requirements.txt
执行模型转换程序
python to_kmodel.py --target k230 --model ./yolov8n.onnx --dataset ../test --input_width 320 --input_height 320 --ptq_option 0
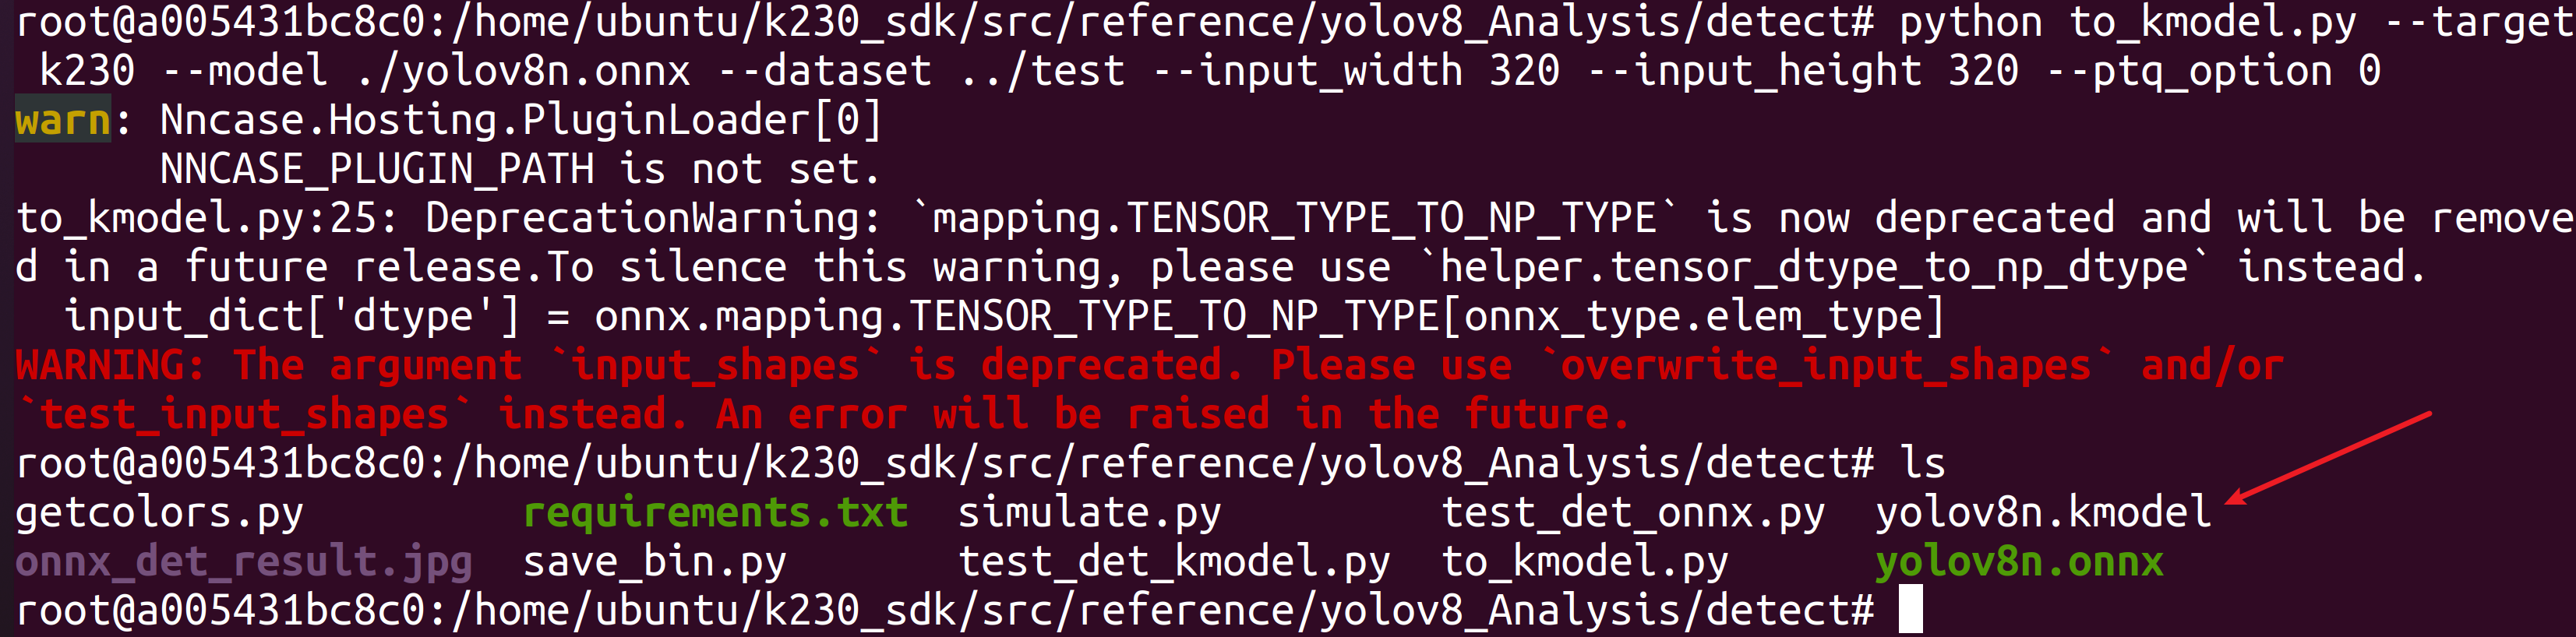
执行完成后,可在当前目录下看到生成的yolov8n.kmodel模型文件。生成的kmodel如下所示:
-rw-r--r-- 1 root root 3495944 Dec 5 15:56 yolov8n.kmodel
使用K230Runtime进行验证
- Simulator验证kmodel
Simulator:在PC端模拟kmodel在k230的推理过程,用于对比kmodel和onnx输出是否一致;
1.1 生成input.bin
在使用Simulator验证kmodel之前,需要先准备好输入文件。由于kmodel包括部分预处理,因此对于同一张图片,需要分别利用不同预处理生成onnx_input.bin、kmodel_input.bin。
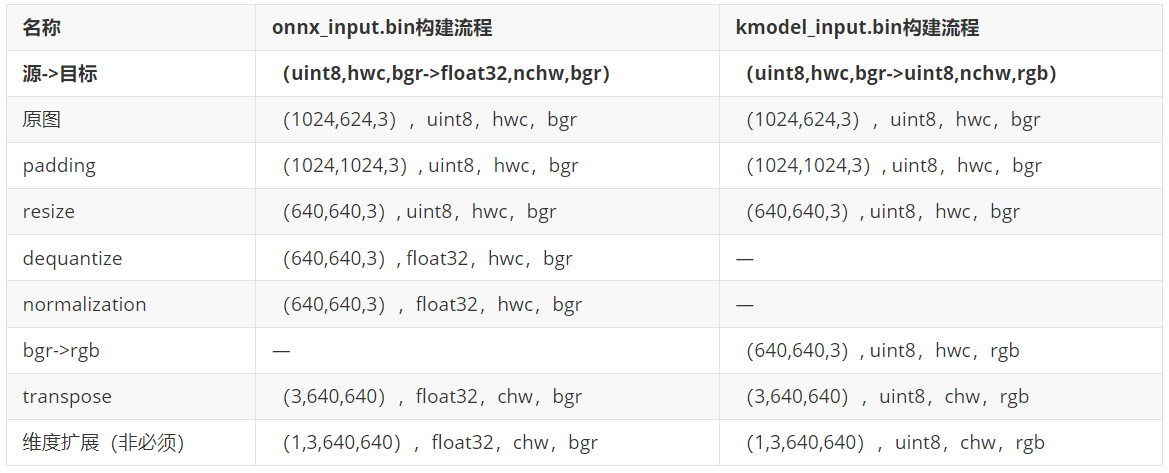
注:由于生成的kmodel中包含部分预处理,生成kmodel_input.bin需要的预处理 ≈ 生成onnx_input.bin需要的预处理 - kmodel中包含的预处理(人脸检测kmodel中预处理transpose、dequantize、normalization、swapRB)
- 维度扩展可以省略(读取时bin文件可以用reshape,生成bin时可以省略)。
- kmodel_input.bin为什么无需进行dequantize、normalization操作?dequantize、normalization已放到kmodel中。
- 为什么需要生成kmodel_input.bin需要bgr->rgb?生成人脸检测kmode时,由于实际需要,预处理打开了swapRB开关,用于rgb->bgr,对应的,生成kmodel_input.bin时,则需要先将数据转成rgb顺序;
- transpose也放到kmodel中,为什么生成kmodel_input.bin仍需transpose?由于生成kmodel,若是打开了预处理开关,transpose的相关参数必须设置,我们人脸检测kmodel的实际输入是`NCHW`,input_layout设置为`NCHW`,两者是一致的,因此transpose是NCHW2NCHW,实际上并没有转换。
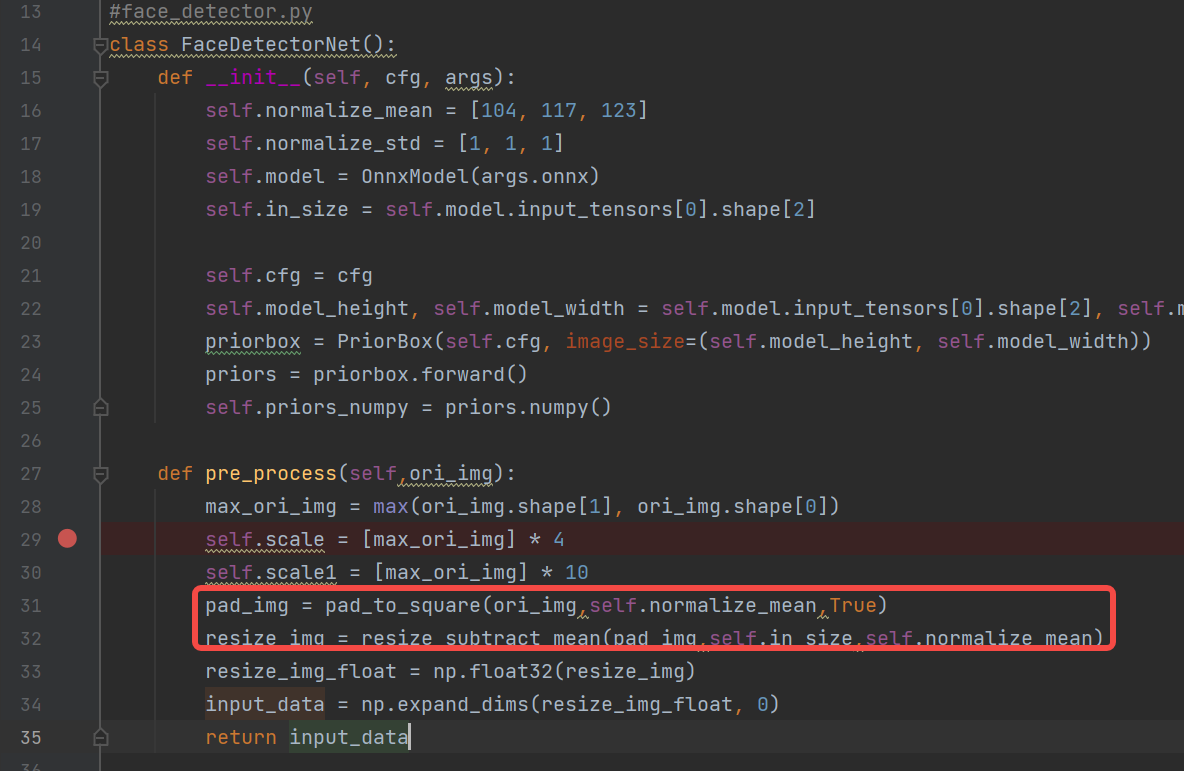
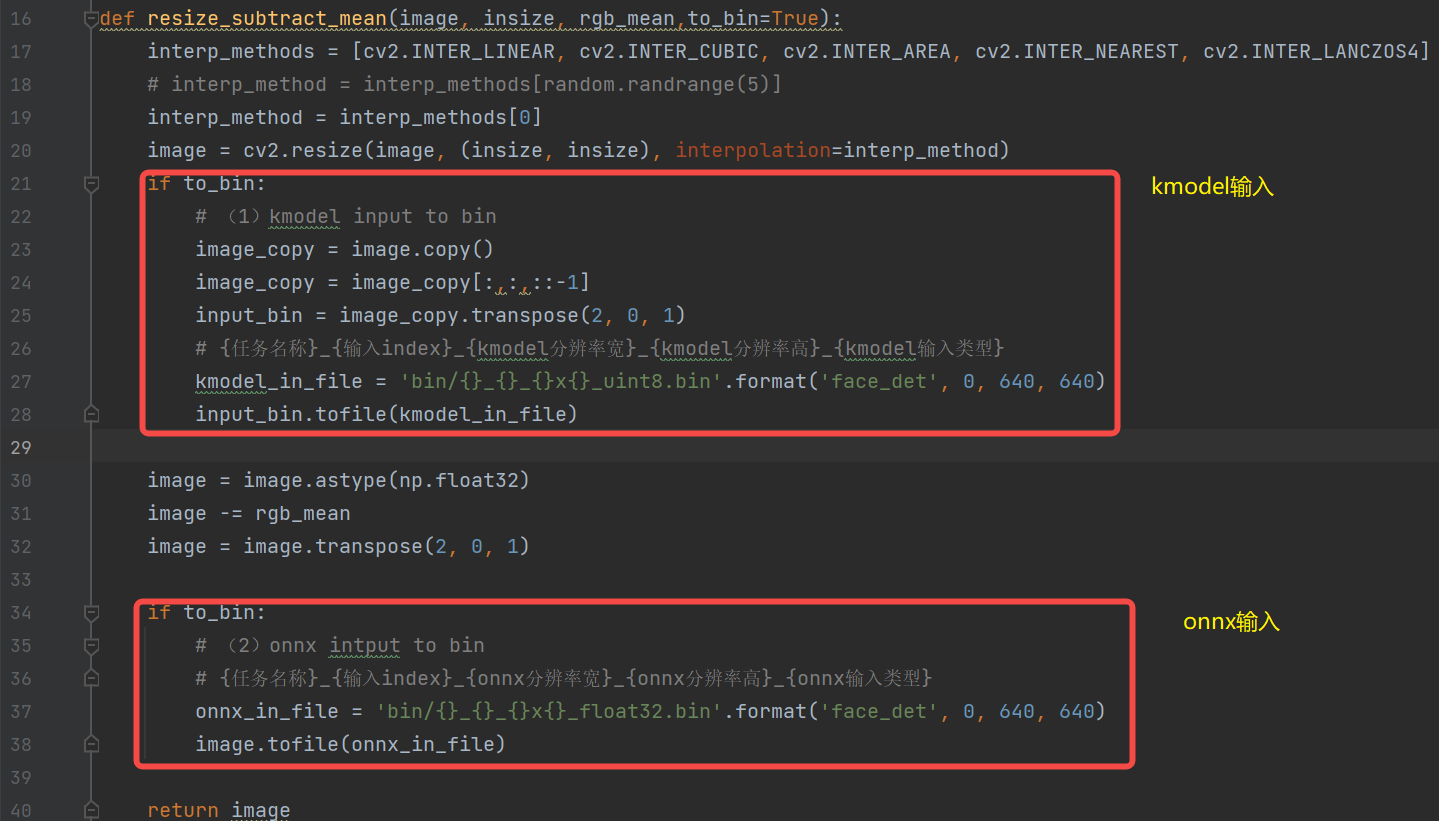
生成input.bin的过程:(放在onnx推理的预处理方法中)
代码位置:
k230_sdk/src/reference/K230_AI_Demo_Development_Process_Analysis/onnx_related/onnx_inference/face_detection/face_detector.py
1.2 Simulator验证
对于同一张图片,分别利用不同预处理生成不同的onnx_input.bin、kmodel_input.bin,
- 将onnx_input.bin喂给onnx,经过onnx推理得cpu_results;
- 将kmodel_input.bin喂给kmodel,经过Simulator推理得到nncase_results;
- 计算cpu_results和nncase_results的余弦相似度,通过相似度的大小来判断生成的kmodel是否正确。
# mobile_retinaface_onnx_simu_640.py
import os
import copy
import argparse
import numpy as np
import onnx
import onnxruntime as ort
import nncase
def read_model_file(model_file):
with open(model_file, 'rb') as f:
    model_content = f.read()
return model_content
def cosine(gt, pred):
return (gt @ pred) / (np.linalg.norm(gt, 2) * np.linalg.norm(pred, 2))
def main():
parser = argparse.ArgumentParser(prog="nncase")
parser.add_argument("--target", type=str, help='target to run')
parser.add_argument("--model", type=str, help='original model file')
parser.add_argument("--model_input", type=str, help='input bin file for original model')
parser.add_argument("--kmodel", type=str, help='kmodel file')
parser.add_argument("--kmodel_input", type=str, help='input bin file for kmodel')
args = parser.parse_args()
# 1. onnx推理,得到cpu_results
ort_session = ort.InferenceSession(args.model)
output_names = []
model_outputs = ort_session.get_outputs()
for i in range(len(model_outputs)):
    output_names.append(model_outputs[i].name)
model_input = ort_session.get_inputs()[0]

model_input_name = model_input.name
model_input_type = np.float32
model_input_shape = model_input.shape
print('onnx_input:',model_input_shape)
model_input_data = np.fromfile(args.model_input, model_input_type).reshape(model_input_shape)
cpu_results = []
cpu_results = ort_session.run(output_names, { model_input_name : model_input_data })

# 2. Simulator推理,得到nncase_results
# create Simulator
sim = nncase.Simulator()
# read kmodel
kmodel = read_model_file(args.kmodel)
# load kmodel
sim.load_model(kmodel)
# read input.bin
input_shape = [1, 3, 640, 640]
dtype = sim.get_input_desc(0).dtype
input = np.fromfile(args.kmodel_input, dtype).reshape(input_shape)
# set input for Simulator
sim.set_input_tensor(0, nncase.RuntimeTensor.from_numpy(input))
# Simulator inference
nncase_results = []
sim.run()
for i in range(sim.outputs_size):
    nncase_result = sim.get_output_tensor(i).to_numpy()
    # print("nncase_result:",nncase_result)
    input_bin_file = 'bin/face_det_{}_{}_simu.bin'.format(i,args.target)
    nncase_result.tofile(input_bin_file)
    nncase_results.append(copy.deepcopy(nncase_result))
# 3. 计算onnx和Simulator相似度
for i in range(sim.outputs_size):
    cos = cosine(np.reshape(nncase_results[i], (-1)), np.reshape(cpu_results[i], (-1)))
    print('output {0} cosine similarity : {1}'.format(i, cos))
if __name__ == '__main__':
main()
上边的脚本可以满足大部分onnx及其kmodel的对比验证,一般不用太多修改。只需根据模型实际输入大小修改`input_shape`即可。
- Simulator验证kmodel执行步骤
**注意:**若已经激活Kmodel模型转换环境,请忽略步骤①和步骤②。
- 在Ubuntu中新建终端,并进入k230_SDK目录下

- 激活Kmodel模型转换环境
sudo docker run -u root -it -v $(pwd):$(pwd) -v $(pwd)/toolchain:/opt/toolchain -w $(pwd) ghcr.io/kendryte/k230_sdk /bin/bash

- 进入kmodel验证程序源码目录
cd src/reference/yolov8_Analysis/detect/
- 安装nncase相关库与模型验证相关库
pip install nncase==2.9.0
pip install nncase-kpu==2.9.0
pip install opencv-python==4.10.0.82
pip install opencv-python-headless
pip install onnx
pip install onnxruntime
pip install onnxsim
pip install --upgrade onnxruntime
- 生成测试所需的bin文件
python save_bin.py --image ../test-images/bus.jpg --input_width 320 --input_height 320

- 添加Simulator环境变量
export NNCASE_PLUGIN_PATH=$NNCASE_PLUGIN_PATH:/usr/local/lib/python3.8/dist-packages/
export PATH=$PATH:/usr/local/lib/python3.8/dist-packages/
source /etc/profile
- 执行模型验证程序
python simulate.py --model yolov8n.onnx --model_input onnx_input_float32.bin --kmodel yolov8n.kmodel --kmodel_input kmodel_input_uint8.bin --input_width 320 --input_height 320

一般onnx和Simulator余弦相似度越高越好,一般0.99以上即可满足条件;若是达不到0.99,但是在0.96以上,可以通过进一步上板推理验证生成的kmodel是否满足实际效果需求。
使用K230Runtime进行推理
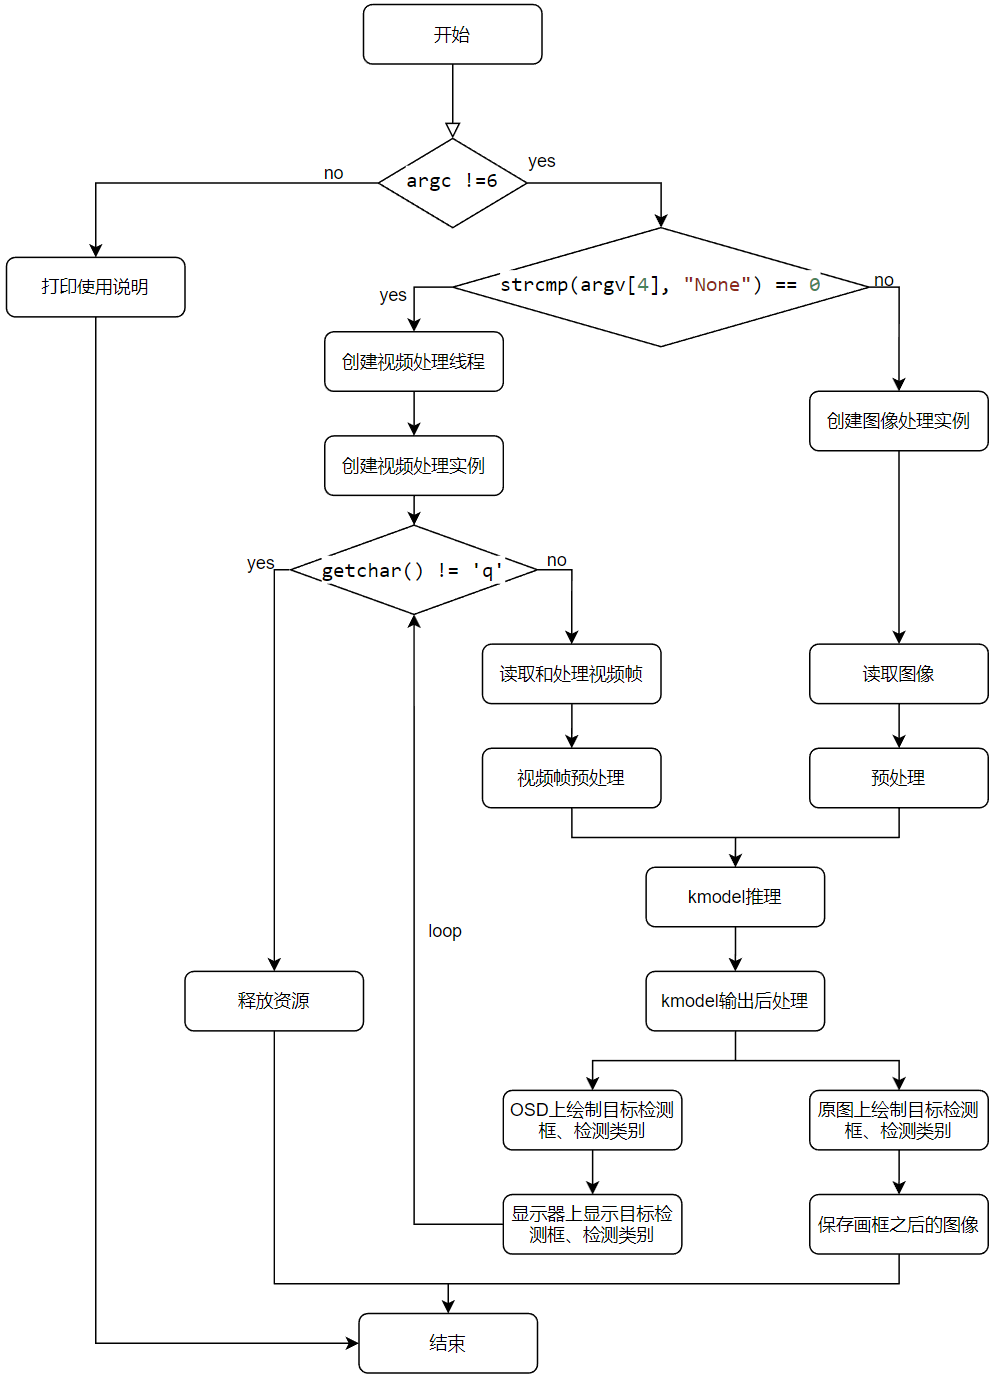
代码位置:
k230_sdk/src/reference/ai_poc/object_detect_yolov8n
├── ai_base.cc                  #AI基类,封装KPU(K230)运行时API,简化kmodel相关操作
├── ai_base.h
├── CMakeLists.txt
├── ob_det.cc           #yolov8目标检测demo,预处理,kmodel推理、后处理
├── ob_det.h
├── main.cc                     #yolov8目标检测demo主流程
├── README.md
├── scoped_timing.hpp           #计时类
├── utils.cc                    #工具类,封装常用函数及AI2D运行时APIs,简化预处理操作
使用K230Runtime推理kmodel需要详细了解K230Runtime的说明文档,为了简化推理流程,对K230Runtime的接口进行封装,其中ai_base.cc、scoped_timing.hpp、utils.cc、vi_vo.h是封装好的方法,无需修改;face_detection.cc已经在人脸检测demo中实现,直接拷贝即可;face_recognition.cc只需将face_detection.cc拷贝一份,修改对应构造函数、预处理(pre_process)、后处理(post_process)即可。
- 读取图片或视频帧
- 读取图片
cv::Mat ori_img = cv::imread(xxx);
- 读取视频帧
读取视频帧示例:
K230_AI_Demo_Development_Process_Analysis\kmodel_related\kmodel_inference\test_demo\test_vi_vo
- 图像预处理
**背景知识:**参数不变的情况下,`ai2d_builder_`可以反复调用;参数改变则需要创建新的`ai2d_builder_`。
对于图像预处理:由于不同图像的尺寸不同,对于padding_resize方法来说,AI2D的参数每次都会改变,需要重新调用Utils::padding_resize_one_side创建新的`ai2d_builder_`来进行预处理。

对于视频流预处理:由于不同帧的尺寸相同,padding的数值也未改变;故对于`padding_resize`方法来说,AI2D的参数一直不变,将新一帧的图像拷贝给`ai2d_in_tensor_`后,只需`ai2d_builder_->invoke`(目标检测构造函数中已经构造好`ai2d_builder_`)调用。
图像检测前处理示例:
void OBDet::pre_process(cv::Mat ori_img)
{
ScopedTiming st(model_name_ + " pre_process image", debug_mode_);
std::vector<uint8_t> chw_vec;
Utils::bgr2rgb_and_hwc2chw(ori_img, chw_vec); //将BGR图片从hwc转为chw
Utils::resize({ori_img.channels(), ori_img.rows, ori_img.cols}, chw_vec, ai2d_out_tensor_);//对chw数据进行resize
// auto vaddr_out_buf = ai2d_out_tensor_.impl()->to_host().unwrap()->buffer().as_host().unwrap().map(map_access_::map_read).unwrap().buffer();
// unsigned char *output = reinterpret_cast<unsigned char *>(vaddr_out_buf.data());
// Utils::dump_color_image("input_color.png", {input_shapes_[0][3],input_shapes_[0][2]},output);
}
视频流检测前处理示例:
void OBDet::pre_process()
{
ScopedTiming st(model_name_ + " pre_process video", debug_mode_);
size_t isp_size = isp_shape_.channel * isp_shape_.height * isp_shape_.width;
auto buf = ai2d_in_tensor_.impl()->to_host().unwrap()->buffer().as_host().unwrap().map(map_access_::map_write).unwrap().buffer();
memcpy(reinterpret_cast<char *>(buf.data()), (void *)vaddr_, isp_size);
hrt::sync(ai2d_in_tensor_, sync_op_t::sync_write_back, true).expect("sync write_back failed");
ai2d_builder_->invoke(ai2d_in_tensor_, ai2d_out_tensor_).expect("error occurred in ai2d running");
}
- kmodel端侧模型推理
背景知识:
**AIBase简介:**AIBase主要封装了KPU相关操作,包括在AI设备(如k230)加载kmodel,设置kmodel输入数据,执行kpu/cpu计算, 获取kmodel输出数据等,AIBase的封装简化了KPU调用过程。
目标检测kmode推理:
//ai_base.cc
void AIBase::run()
{
ScopedTiming st(model_name_ + " run", debug_mode_);
kmodel_interp_.run().expect("error occurred in running model");
}
void AIBase::get_output()
{
ScopedTiming st(model_name_ + " get_output", debug_mode_);
p_outputs_.clear();
for (int i = 0; i < kmodel_interp_.outputs_size(); i++)
{
    auto out = kmodel_interp_.output_tensor(i).expect("cannot get output tensor");
    auto buf = out.impl()->to_host().unwrap()->buffer().as_host().unwrap().map(map_access_::map_read).unwrap().buffer();
    float *p_out = reinterpret_cast<float *>(buf.data());
    p_outputs_.push_back(p_out);
}
}
//face_detection.cc
void FaceDetection::inference()
{
this->run();
this->get_output();
}
//main.cc,验证kmodel推理是否正确:我们使用simulator已经验证过
......
FaceDetection fd;
fd.inference();
......
- 推理结果后处理
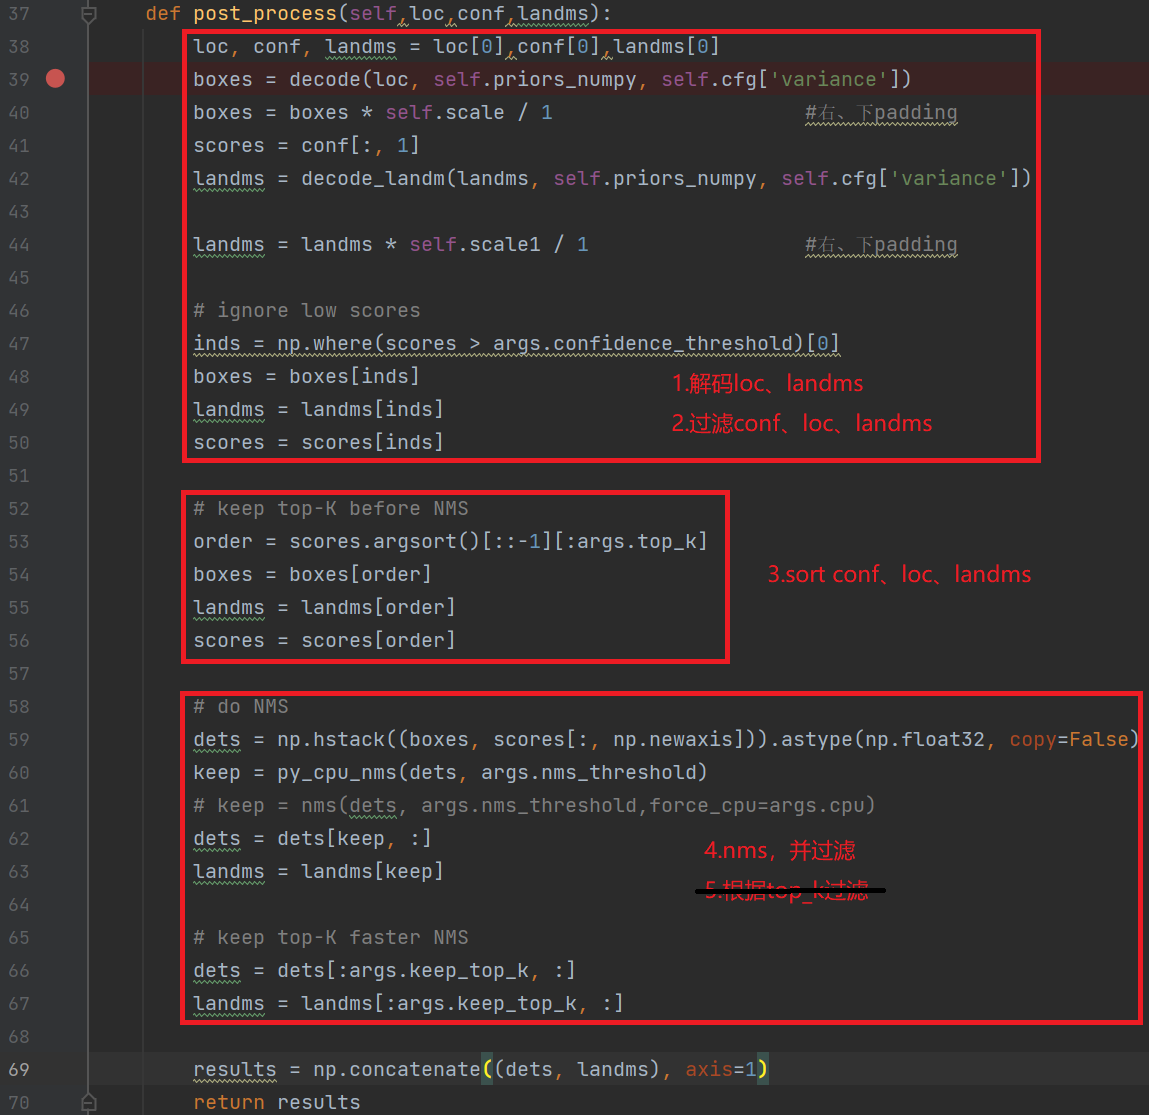
c++后处理(详情见代码):
//face_detection.cc
void FaceDetection::post_process(FrameSize frame_size, vector<FaceDetectionInfo> &results)
{
ScopedTiming st(model_name_ + " post_process", debug_mode_);
if (debug_mode_ > 3)
{
 //验证后处理流程是否正确:排除预处理、模型推理,直接拿Simulator kmodel数据,判断后处理代码正确性。
 ......
}
else
{
    filter_confs(p_outputs_[1]);
    filter_locs(p_outputs_[0]);
    filter_landms(p_outputs_[2]);
 }
std::sort(confs_.begin(), confs_.end(), nms_comparator);
nms(results);
transform_result_to_src_size(frame_size, results);
}
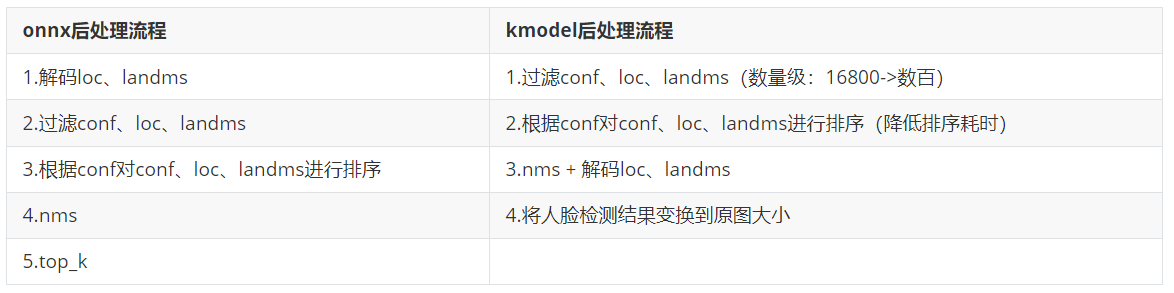
调整顺序之后的kmodel推理流程,更适合c++代码。
人脸检测后处理代码:
//face_detection.cc
void FaceDetection::post_process(FrameSize frame_size, vector<FaceDetectionInfo> &results)
{
ScopedTiming st(model_name_ + " post_process", debug_mode_);
if (debug_mode_ > 2)
{
    //验证后处理流程是否正确:排除预处理、模型推理,直接拿Simulator kmodel数据,判断后处理代码正确性。
    vector<float> out0 = Utils::read_binary_file<float>("../debug/face_det_0_k230_simu.bin");
    vector<float> out1 = Utils::read_binary_file<float>("../debug/face_det_1_k230_simu.bin");
    vector<float> out2 = Utils::read_binary_file<float>("../debug/face_det_2_k230_simu.bin");
    filter_confs(out1.data());
    filter_locs(out0.data());
    filter_landms(out2.data());
}
else
{
    filter_confs(p_outputs_[1]);
    filter_locs(p_outputs_[0]);
    ilter_landms(p_outputs_[2]);
}
std::sort(confs_.begin(), confs_.end(), nms_comparator);
nms(results);
transform_result_to_src_size(frame_size, results);
}
/********************根据检测阈值kmodel数据结果***********************/
void FaceDetection::filter_confs(float *conf)
{
NMSRoiObj inter_obj;
confs_.clear();
for (uint32_t roi_index = 0; roi_index < objs_num_; roi_index++)
{
    float score = conf[roi_index * CONF_SIZE + 1];
    if (score > obj_thresh_)
    {
        inter_obj.ori_roi_index = roi_index;
        inter_obj.before_sort_conf_index = confs_.size();
        inter_obj.confidence = score;
        confs_.push_back(inter_obj);
    }
}
}
void FaceDetection::filter_locs(float *loc)
{
boxes_.clear();
boxes_.resize(confs_.size());
int roi_index = 0;
for (uint32_t conf_index = 0; conf_index < boxes_.size(); conf_index++)
{
    roi_index = confs_[conf_index].ori_roi_index;
    int start = roi_index * LOC_SIZE;
    for (int i = 0; i < LOC_SIZE; ++i)
    {
        boxes_[conf_index][i] = loc[start + i];
    }
}
}
void FaceDetection::filter_landms(float *landms)
{
landmarks_.clear();
landmarks_.resize(confs_.size());
int roi_index = 0;
for (uint32_t conf_index = 0; conf_index < boxes_.size(); conf_index++)
{
    roi_index = confs_[conf_index].ori_roi_index;
    int start = roi_index * LAND_SIZE;
    for (int i = 0; i < LAND_SIZE; ++i)
    {
        landmarks_[conf_index][i] = landms[start + i];
    }
}
}
/********************根据anchor解码检测框、五官点***********************/
Bbox FaceDetection::decode_box(int obj_index)
{
float cx, cy, w, h;
int box_index = confs_[obj_index].before_sort_conf_index;
int anchor_index = confs_[obj_index].ori_roi_index;
cx = boxes_[box_index][0];
cy = boxes_[box_index][1];
w = boxes_[box_index][2];
h = boxes_[box_index][3];
cx = g_anchors[anchor_index][0] + cx * 0.1 * g_anchors[anchor_index][2];
cy = g_anchors[anchor_index][1] + cy * 0.1 * g_anchors[anchor_index][3];
w = g_anchors[anchor_index][2] * std::exp(w * 0.2);
h = g_anchors[anchor_index][3] * std::exp(h * 0.2);
Bbox box;
box.x = cx - w / 2;
box.y = cy - h / 2;
box.w = w;
box.h = h;
return box;
}
SparseLandmarks FaceDetection::decode_landmark(int obj_index)
{
SparseLandmarks landmark;
int landm_index = confs_[obj_index].before_sort_conf_index;
int anchor_index = confs_[obj_index].ori_roi_index;
for (uint32_t ll = 0; ll < 5; ll++)
{
    landmark.points[2 * ll + 0] = g_anchors[anchor_index][0] + landmarks_[landm_index][2 * ll + 0] * 0.1 * g_anchors[anchor_index][2];
    landmark.points[2 * ll + 1] = g_anchors[anchor_index][1] + landmarks_[landm_index][2 * ll + 1] * 0.1 * g_anchors[anchor_index][3];
}
return landmark;
}
/********************iou计算***********************/
float FaceDetection::overlap(float x1, float w1, float x2, float w2)
{
float l1 = x1 - w1 / 2;
float l2 = x2 - w2 / 2;
float left = l1 > l2 ? l1 : l2;
float r1 = x1 + w1 / 2;
float r2 = x2 + w2 / 2;
float right = r1 < r2 ? r1 : r2;
return right - left;
}
float FaceDetection::box_intersection(Bbox a, Bbox b)
{
float w = overlap(a.x, a.w, b.x, b.w);
float h = overlap(a.y, a.h, b.y, b.h);
if (w < 0 || h < 0)
    return 0;
return w * h;
}
float FaceDetection::box_union(Bbox a, Bbox b)
{
float i = box_intersection(a, b);
float u = a.w * a.h + b.w * b.h - i;
return u;
}
float FaceDetection::box_iou(Bbox a, Bbox b)
{
return box_intersection(a, b) / box_union(a, b);
}
/********************nms***********************/
void FaceDetection::nms(vector<FaceDetectionInfo> &results)
{
// nms
for (int conf_index = 0; conf_index < confs_.size(); ++conf_index)
{
    if (confs_[conf_index].confidence < 0)
        continue;
    FaceDetectionInfo obj;
    obj.bbox = decode_box(conf_index);
    obj.sparse_kps = decode_landmark(conf_index);
    obj.score = confs_[conf_index].confidence;
    results.push_back(obj);
    for (int j = conf_index + 1; j < confs_.size(); ++j)
    {
        if (confs_[j].confidence < 0)
            continue;
        Bbox b = decode_box(j);
        if (box_iou(obj.bbox, b) >= nms_thresh_) // iou大于nms阈值的,之后循环将会忽略
            confs_[j].confidence = -1;
    }
}
}
/********************将人脸检测结果变换到原图***********************/
void FaceDetection::transform_result_to_src_size(FrameSize &frame_size, vector<FaceDetectionInfo> &results)
{
// transform result to dispaly size
int max_src_size = std::max(frame_size.width, frame_size.height);
for (int i = 0; i < results.size(); ++i)
{
    auto &l = results[i].sparse_kps;
    for (uint32_t ll = 0; ll < 5; ll++)
    {
        l.points[2 * ll + 0] = l.points[2 * ll + 0] * max_src_size;
        l.points[2 * ll + 1] = l.points[2 * ll + 1] * max_src_size;
    }
    auto &b = results[i].bbox;
    float x0 = b.x * max_src_size;
    float x1 = (b.x + b.w) * max_src_size;
    float y0 = b.y * max_src_size;
    float y1 = (b.y + b.h) * max_src_size;
    x0 = std::max(float(0), std::min(x0, float(frame_size.width)));
    x1 = std::max(float(0), std::min(x1, float(frame_size.width)));
    y0 = std::max(float(0), std::min(y0, float(frame_size.height)));
    y1 = std::max(float(0), std::min(y1, float(frame_size.height)));
    b.x = x0;
    b.y = y0;
    b.w = x1 - x0;
        b.h = y1 - y0;
}
}
扩展:
检测后处理写起来比价复杂,因此对于常见的检测模型,我们给出了一些示例代码。
- - retinaface:人脸检测post_process
- - yolov5:摔倒检测post_process
- - yolov8:人头检测post_process
- 显示结果
显示结果示例:
K230_AI_Demo_Development_Process_Analysis\kmodel_related\kmodel_inference\test_demo\test_vi_vo
- 执行步骤
**注意:**若已经激活Kmodel模型转换环境,请忽略步骤①和步骤②。
- 在Ubuntu中新建终端,并进入k230_SDK目录下
cd k230_sdk/

- 激活Kmodel模型转换环境
sudo docker run -u root -it -v $(pwd):$(pwd) -v $(pwd)/toolchain:/opt/toolchain -w $(pwd) ghcr.io/kendryte/k230_sdk /bin/bash

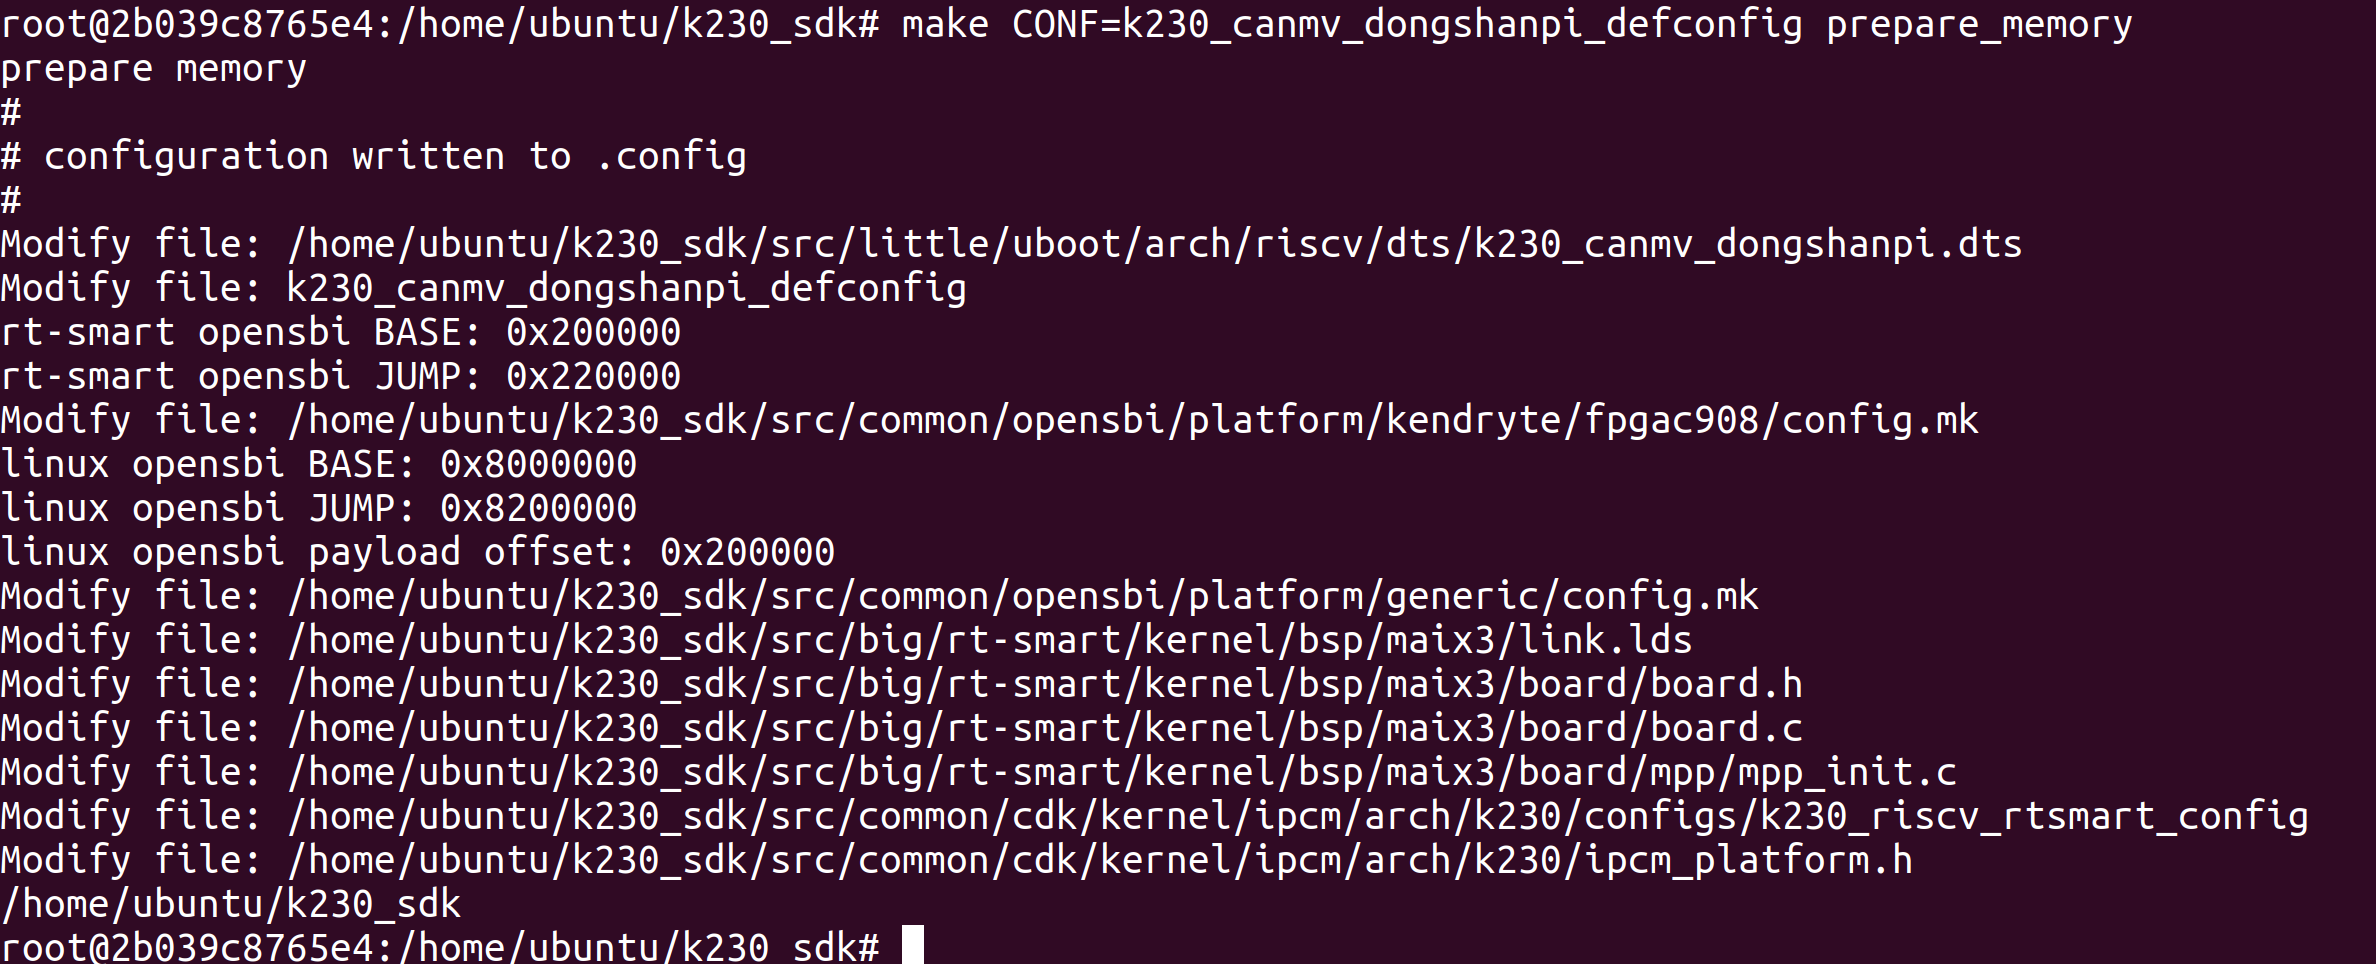
make CONF=k230_canmv_dongshanpi_defconfig prepare_memory
配置开发板环境变量
- 进入kmodel推理程序源码目录
cd src/reference/ai_poc/
- 执行编译脚本
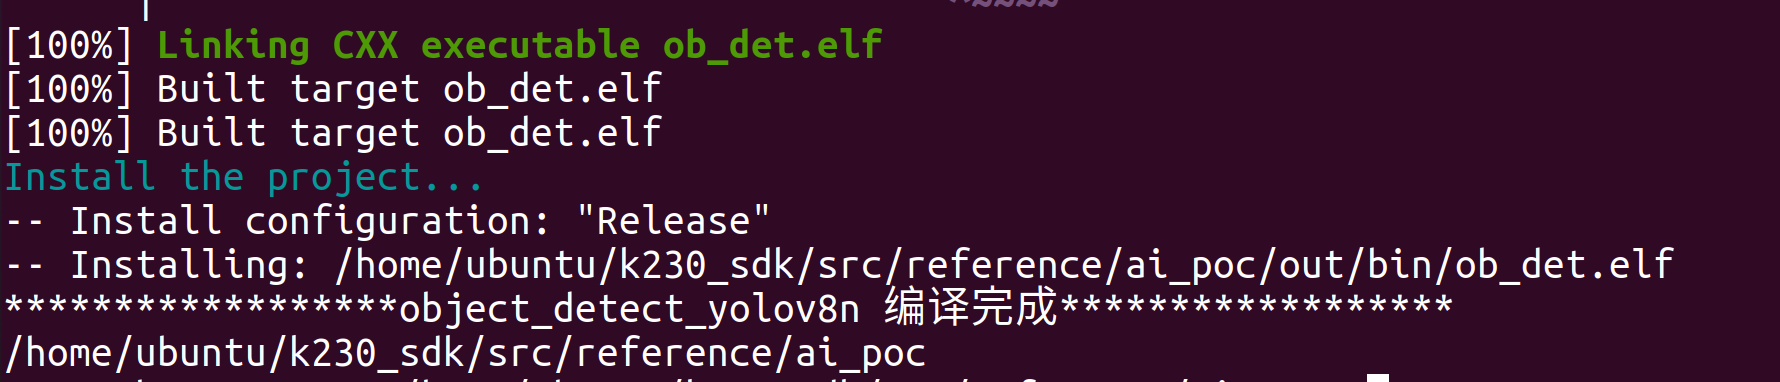
./build_app.sh object_detect_yolov8n
编译完成后,可在k230_bin/ object_detect_yolov8目录下看到可执行程序与配套测试文件。
- 退出docker环境
exit
- 将进入yolov8可执行文件目录并使用adb传输可执行文件至开发板端
cd src/reference/ai_poc/k230_bin/
adb push object_detect_yolov8n /sharefs

- 进入yolov8模型转换目录并将转换后的模型传输至开发板端
cd ../../yolov8_Analysis/detect/
adb push yolov8n.kmodel /sharefs/object_detect_yolov8n/

- 打开开发板的串口B ,访问rt-smart大核系统的串口。由于rt-smart系统有开机自启程序,可输入q + 回车键结束开机自启程序。
- 进入开发板中可执行文件目录
cd /sharefs/object_detect_yolov8n/

- 执行程序推理程序
1)单张图片推理
./ob_det.elf yolov8n_320.kmodel 0.5 0.6 bus.jpg 0

推理完成后,会在当前目录下生成推理结果图像object_det.jpg。可在Ubuntu端使用ADB获取开发板生成的推理结果图像:
adb pull /sharefs/object_detect_yolov8n/object_det.jpg

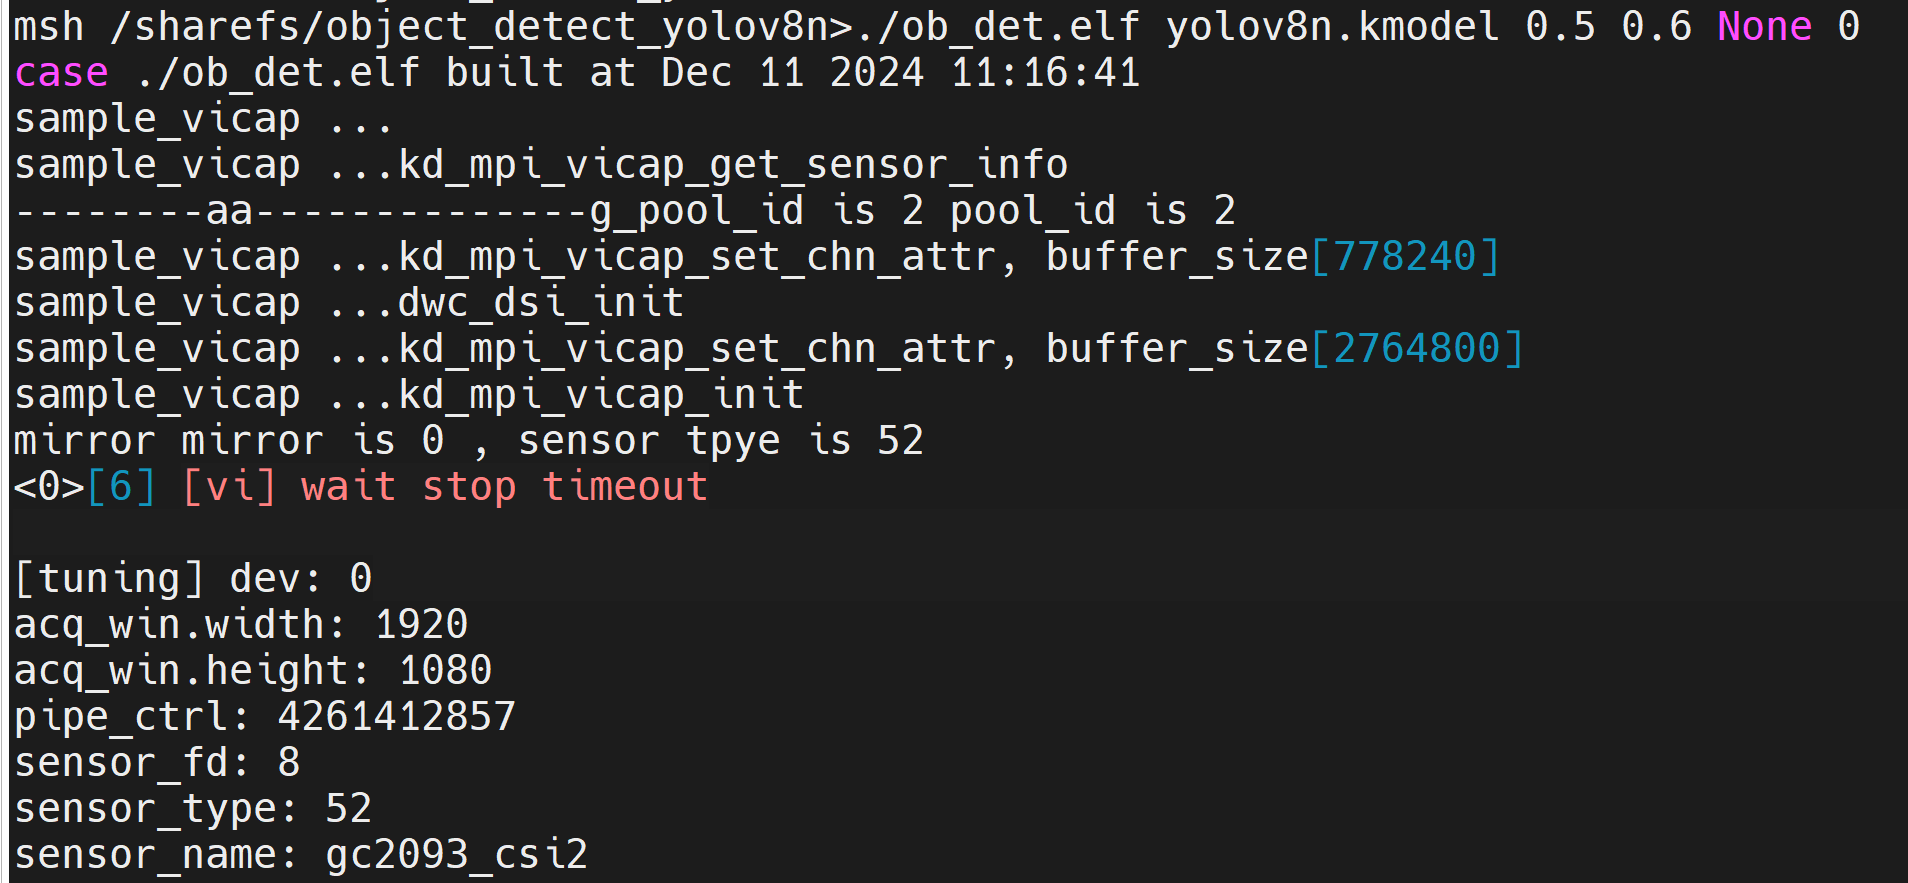
2)视频流推理
./ob_det.elf yolov8n.kmodel 0.5 0.6 None 0
执行程序之后可在显示屏看到视频流推理yolov8模型的画面。
版权所有:深圳百问网科技有限公司 未经授权不得拷贝、复制、修改、传播本文档,否则将追究法律责任。