人脸识别
1.实验目的
从原始图像中自动检测人脸、提取特征并完成身份识别。
2.核心流程
人脸检测:通过人脸检测算法(如Haar级联、MTCNN或RetinaFace等)从输入图像中自动定位人脸的位置和大小。检测不仅包括定位人脸区域的边界框,还会提取出五官关键点,如眼睛、鼻子和嘴巴等,作为后续特征提取的基础。
人脸对齐与特征提取:在人脸检测的基础上,对人脸进行仿射变换,使其五官位置标准化(即眼睛和嘴巴等关键点对齐)。接着,使用深度学习模型(如FaceNet、ArcFace等)提取人脸的特征向量。特征向量是一个固定长度的高维空间表示,能够有效地描述人脸的独特性。
人脸注册与数据库管理:将提取到的特征向量存储在本地数据库(通常是TF卡或其他存储介质)中,并与特定的身份信息(如姓名、ID等)关联。这一过程通常是在注册阶段进行,通过标识符(如员工ID或姓名)将每个人脸特征与其个人信息进行绑定。
人脸识别与匹配:在识别阶段,输入的图像经过人脸检测、对齐和特征提�取后,得到与数据库中已有特征向量进行比对。计算输入图像的人脸特征与数据库中各个注册特征向量之间的相似度,通常采用欧氏距离或余弦相似度等度量方式。如果某一特征的相似度超过预定的阈值(如0.75),则认为输入图像与数据库中的某个已知人物匹配;如果相似度低于阈值,则输出“unknown”,即未识别的身份。
3.示例代码
3.1 注册人脸
'''
本程序遵循GPL V3协议, 请遵循协议
实验平台: DshanPI CanMV
开发板文档站点 : https://eai.100ask.net/
百问网学习平台 : https://www.100ask.net
百问网官方B站 : https://space.bilibili.com/275908810
百问网官方淘宝 : https://100ask.taobao.com
'''
from libs.PipeLine import PipeLine, ScopedTiming
from libs.AIBase import AIBase
from libs.AI2D import Ai2d
import os
import ujson
from media.media import *
from time import *
import nncase_runtime as nn
import ulab.numpy as np
import time
import image
import aidemo
import random
import gc
import sys
import math
# 自定义人脸检测任务类
class FaceDetApp(AIBase):
def __init__(self,kmodel_path,model_input_size,anchors,confidence_threshold=0.25,nms_threshold=0.3,rgb888p_size=[1280,720],display_size=[1920,1080],debug_mode=0):
super().__init__(kmodel_path,model_input_size,rgb888p_size,debug_mode)
# kmodel路径
self.kmodel_path=kmodel_path
# 检测模型输入分辨率
self.model_input_size=model_input_size
# 置信度阈值
self.confidence_threshold=confidence_threshold
# nms阈值
self.nms_threshold=nms_threshold
self.anchors=anchors
# sensor给到AI的图像分辨率,宽16字节对齐
self.rgb888p_size=[ALIGN_UP(rgb888p_size[0],16),rgb888p_size[1]]
# 视频输出VO分辨率,宽16字节对齐
self.display_size=[ALIGN_UP(display_size[0],16),display_size[1]]
# debug模式
self.debug_mode=debug_mode
# 实例化Ai2d,用于实现模型预处理
self.ai2d=Ai2d(debug_mode)
# 设置Ai2d的输入输出格式和类型
self.ai2d.set_ai2d_dtype(nn.ai2d_format.NCHW_FMT,nn.ai2d_format.NCHW_FMT,np.uint8, np.uint8)
self.image_size=[]
# 配置预处理操作,这里使用了pad和resize,Ai2d支持crop/shift/pad/resize/affine,具体代码请打开/sdcard/app/libs/AI2D.py查看
def config_preprocess(self,input_image_size=None):
with ScopedTiming("set preprocess config",self.debug_mode > 0):
# 初始化ai2d预处理配置,默认为sensor给到AI的尺寸,可以通过设置input_image_size自行修改输入尺寸
ai2d_input_size=input_image_size if input_image_size else self.rgb888p_size
self.image_size=[input_image_size[1],input_image_size[0]]
# 计算padding参数,并设置padding预处理
self.ai2d.pad(self.get_pad_param(ai2d_input_size), 0, [104,117,123])
# 设置resize预处理
self.ai2d.resize(nn.interp_method.tf_bilinear, nn.interp_mode.half_pixel)
# 构建预处理流程,参数为预处理输入tensor的shape和预处理输出的tensor的shape
self.ai2d.build([1,3,ai2d_input_size[1],ai2d_input_size[0]],[1,3,self.model_input_size[1],self.model_input_size[0]])
# 自定义后处理,results是模型输出的array列表,这里使用了aidemo库的face_det_post_process接口
def postprocess(self,results):
with ScopedTiming("postprocess",self.debug_mode > 0):
res = aidemo.face_det_post_process(self.confidence_threshold,self.nms_threshold,self.model_input_size[0],self.anchors,self.image_size,results)
if len(res)==0:
return res
else:
return res[0],res[1]
def get_pad_param(self,image_input_size):
dst_w = self.model_input_size[0]
dst_h = self.model_input_size[1]
# 计算最小的缩放比例,等比例缩放
ratio_w = dst_w / image_input_size[0]
ratio_h = dst_h / image_input_size[1]
if ratio_w < ratio_h:
ratio = ratio_w
else:
ratio = ratio_h
new_w = (int)(ratio * image_input_size[0])
new_h = (int)(ratio * image_input_size[1])
dw = (dst_w - new_w) / 2
dh = (dst_h - new_h) / 2
top = (int)(round(0))
bottom = (int)(round(dh * 2 + 0.1))
left = (int)(round(0))
right = (int)(round(dw * 2 - 0.1))
return [0,0,0,0,top, bottom, left, right]
# 自定义人脸注册任务类
class FaceRegistrationApp(AIBase):
def __init__(self,kmodel_path,model_input_size,rgb888p_size=[1920,1080],display_size=[1920,1080],debug_mode=0):
super().__init__(kmodel_path,model_input_size,rgb888p_size,debug_mode)
# kmodel路径
self.kmodel_path=kmodel_path
# 人脸注册模型输入分辨率
self.model_input_size=model_input_size
# sensor给到AI的图像分辨率,宽16字节对齐
self.rgb888p_size=[ALIGN_UP(rgb888p_size[0],16),rgb888p_size[1]]
# 视频输出VO分辨率,宽16字节对齐
self.display_size=[ALIGN_UP(display_size[0],16),display_size[1]]
# debug模式
self.debug_mode=debug_mode
# 标准5官
self.umeyama_args_112 = [
38.2946 , 51.6963 ,
73.5318 , 51.5014 ,
56.0252 , 71.7366 ,
41.5493 , 92.3655 ,
70.7299 , 92.2041
]
self.ai2d=Ai2d(debug_mode)
self.ai2d.set_ai2d_dtype(nn.ai2d_format.NCHW_FMT,nn.ai2d_format.NCHW_FMT,np.uint8, np.uint8)
# 配置预处理操作,这里使用了affine,Ai2d支持crop/shift/pad/resize/affine,具体代码请打开/sdcard/app/libs/AI2D.py查看
def config_preprocess(self,landm,input_image_size=None):
with ScopedTiming("set preprocess config",self.debug_mode > 0):
ai2d_input_size=input_image_size if input_image_size else self.rgb888p_size
# 计算affine矩阵,并设置仿射变换预处理
affine_matrix = self.get_affine_matrix(landm)
self.ai2d.affine(nn.interp_method.cv2_bilinear,0, 0, 127, 1,affine_matrix)
# 构建预处理流程,参数为预处理输入tensor的shape和预处理输出的tensor的shape
self.ai2d.build([1,3,ai2d_input_size[1],ai2d_input_size[0]],[1,3,self.model_input_size[1],self.model_input_size[0]])
# 自定义后处理
def postprocess(self,results):
with ScopedTiming("postprocess",self.debug_mode > 0):
return results[0][0]
def svd22(self,a):
# svd
s = [0.0, 0.0]
u = [0.0, 0.0, 0.0, 0.0]
v = [0.0, 0.0, 0.0, 0.0]
s[0] = (math.sqrt((a[0] - a[3]) ** 2 + (a[1] + a[2]) ** 2) + math.sqrt((a[0] + a[3]) ** 2 + (a[1] - a[2]) ** 2)) / 2
s[1] = abs(s[0] - math.sqrt((a[0] - a[3]) ** 2 + (a[1] + a[2]) ** 2))
v[2] = math.sin((math.atan2(2 * (a[0] * a[1] + a[2] * a[3]), a[0] ** 2 - a[1] ** 2 + a[2] ** 2 - a[3] ** 2)) / 2) if \
s[0] > s[1] else 0
v[0] = math.sqrt(1 - v[2] ** 2)
v[1] = -v[2]
v[3] = v[0]
u[0] = -(a[0] * v[0] + a[1] * v[2]) / s[0] if s[0] != 0 else 1
u[2] = -(a[2] * v[0] + a[3] * v[2]) / s[0] if s[0] != 0 else 0
u[1] = (a[0] * v[1] + a[1] * v[3]) / s[1] if s[1] != 0 else -u[2]
u[3] = (a[2] * v[1] + a[3] * v[3]) / s[1] if s[1] != 0 else u[0]
v[0] = -v[0]
v[2] = -v[2]
return u, s, v
def image_umeyama_112(self,src):
# 使用Umeyama算法计算仿射变换矩阵
SRC_NUM = 5
SRC_DIM = 2
src_mean = [0.0, 0.0]
dst_mean = [0.0, 0.0]
for i in range(0,SRC_NUM * 2,2):
src_mean[0] += src[i]
src_mean[1] += src[i + 1]
dst_mean[0] += self.umeyama_args_112[i]
dst_mean[1] += self.umeyama_args_112[i + 1]
src_mean[0] /= SRC_NUM
src_mean[1] /= SRC_NUM
dst_mean[0] /= SRC_NUM
dst_mean[1] /= SRC_NUM
src_demean = [[0.0, 0.0] for _ in range(SRC_NUM)]
dst_demean = [[0.0, 0.0] for _ in range(SRC_NUM)]
for i in range(SRC_NUM):
src_demean[i][0] = src[2 * i] - src_mean[0]
src_demean[i][1] = src[2 * i + 1] - src_mean[1]
dst_demean[i][0] = self.umeyama_args_112[2 * i] - dst_mean[0]
dst_demean[i][1] = self.umeyama_args_112[2 * i + 1] - dst_mean[1]
A = [[0.0, 0.0], [0.0, 0.0]]
for i in range(SRC_DIM):
for k in range(SRC_DIM):
for j in range(SRC_NUM):
A[i][k] += dst_demean[j][i] * src_demean[j][k]
A[i][k] /= SRC_NUM
T = [[1, 0, 0], [0, 1, 0], [0, 0, 1]]
U, S, V = self.svd22([A[0][0], A[0][1], A[1][0], A[1][1]])
T[0][0] = U[0] * V[0] + U[1] * V[2]
T[0][1] = U[0] * V[1] + U[1] * V[3]
T[1][0] = U[2] * V[0] + U[3] * V[2]
T[1][1] = U[2] * V[1] + U[3] * V[3]
scale = 1.0
src_demean_mean = [0.0, 0.0]
src_demean_var = [0.0, 0.0]
for i in range(SRC_NUM):
src_demean_mean[0] += src_demean[i][0]
src_demean_mean[1] += src_demean[i][1]
src_demean_mean[0] /= SRC_NUM
src_demean_mean[1] /= SRC_NUM
for i in range(SRC_NUM):
src_demean_var[0] += (src_demean_mean[0] - src_demean[i][0]) * (src_demean_mean[0] - src_demean[i][0])
src_demean_var[1] += (src_demean_mean[1] - src_demean[i][1]) * (src_demean_mean[1] - src_demean[i][1])
src_demean_var[0] /= SRC_NUM
src_demean_var[1] /= SRC_NUM
scale = 1.0 / (src_demean_var[0] + src_demean_var[1]) * (S[0] + S[1])
T[0][2] = dst_mean[0] - scale * (T[0][0] * src_mean[0] + T[0][1] * src_mean[1])
T[1][2] = dst_mean[1] - scale * (T[1][0] * src_mean[0] + T[1][1] * src_mean[1])
T[0][0] *= scale
T[0][1] *= scale
T[1][0] *= scale
T[1][1] *= scale
return T
def get_affine_matrix(self,sparse_points):
# 获取affine变换矩阵
with ScopedTiming("get_affine_matrix", self.debug_mode > 1):
# 使用Umeyama算法计算仿射变换矩阵
matrix_dst = self.image_umeyama_112(sparse_points)
matrix_dst = [matrix_dst[0][0],matrix_dst[0][1],matrix_dst[0][2],
matrix_dst[1][0],matrix_dst[1][1],matrix_dst[1][2]]
return matrix_dst
# 人脸注册任务类
class FaceRegistration:
def __init__(self,face_det_kmodel,face_reg_kmodel,det_input_size,reg_input_size,database_dir,anchors,confidence_threshold=0.25,nms_threshold=0.3,rgb888p_size=[1280,720],display_size=[1920,1080],debug_mode=0):
# 人脸检测模型路径
self.face_det_kmodel=face_det_kmodel
# 人脸注册模型路径
self.face_reg_kmodel=face_reg_kmodel
# 人脸检测模型输入分辨率
self.det_input_size=det_input_size
# 人脸注册模型输入分辨率
self.reg_input_size=reg_input_size
self.database_dir=database_dir
# anchors
self.anchors=anchors
# 置信度阈值
self.confidence_threshold=confidence_threshold
# nms阈值
self.nms_threshold=nms_threshold
# sensor给到AI的图像分辨率,宽16字节对齐
self.rgb888p_size=[ALIGN_UP(rgb888p_size[0],16),rgb888p_size[1]]
# 视频输出VO分辨率,宽16字节对齐
self.display_size=[ALIGN_UP(display_size[0],16),display_size[1]]
# debug_mode模式
self.debug_mode=debug_mode
self.face_det=FaceDetApp(self.face_det_kmodel,model_input_size=self.det_input_size,anchors=self.anchors,confidence_threshold=self.confidence_threshold,nms_threshold=self.nms_threshold,debug_mode=0)
self.face_reg=FaceRegistrationApp(self.face_reg_kmodel,model_input_size=self.reg_input_size,rgb888p_size=self.rgb888p_size)
# run函数
def run(self,input_np,img_file):
self.face_det.config_preprocess(input_image_size=[input_np.shape[3],input_np.shape[2]])
det_boxes,landms=self.face_det.run(input_np)
if det_boxes:
if det_boxes.shape[0] == 1:
# 若是只检测到一张人脸,则将该人脸注册到数据库
db_i_name = img_file.split('.')[0]
for landm in landms:
self.face_reg.config_preprocess(landm,input_image_size=[input_np.shape[3],input_np.shape[2]])
reg_result = self.face_reg.run(input_np)
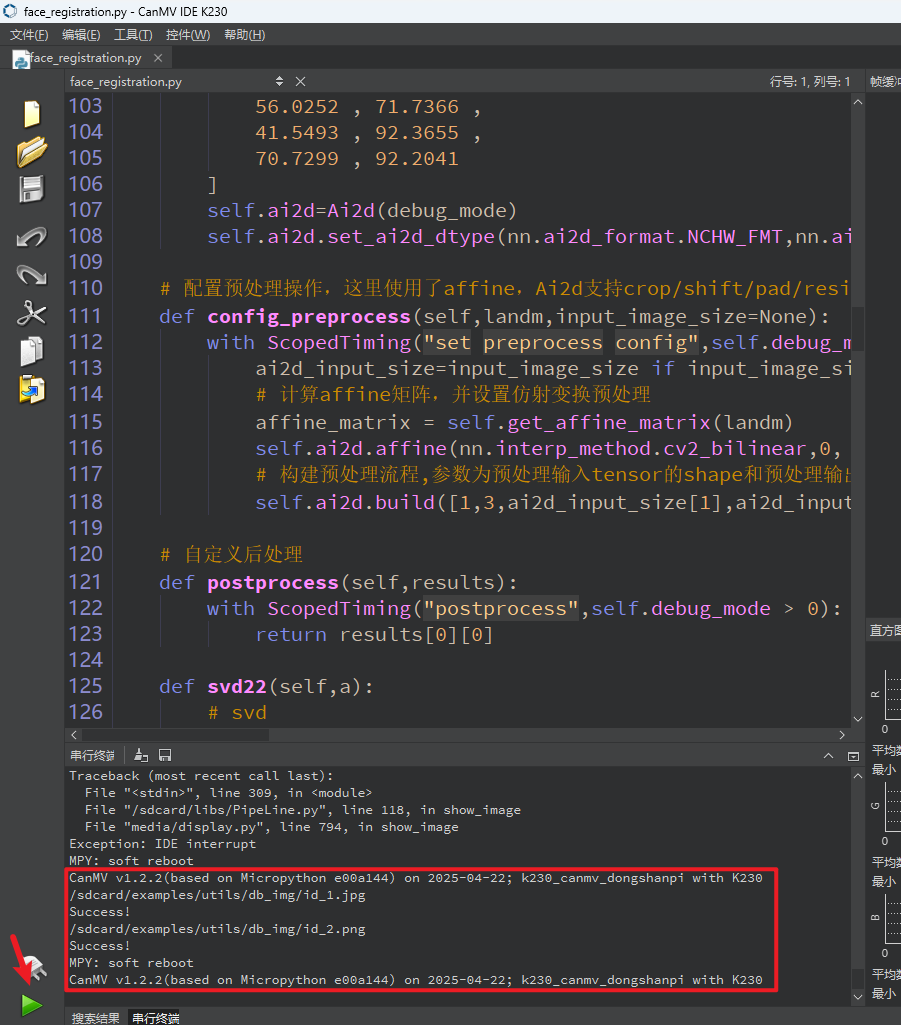
with open(self.database_dir+'{}.bin'.format(db_i_name), "wb") as file:
file.write(reg_result.tobytes())
print('Success!')
else:
print('Only one person in a picture when you sign up')
else:
print('No person detected')
def image2rgb888array(self,img): #4维
# 将Image转换为rgb888格式
with ScopedTiming("fr_kpu_deinit",self.debug_mode > 0):
img_data_rgb888=img.to_rgb888()
# hwc,rgb888
img_hwc=img_data_rgb888.to_numpy_ref()
shape=img_hwc.shape
img_tmp = img_hwc.reshape((shape[0] * shape[1], shape[2]))
img_tmp_trans = img_tmp.transpose()
img_res=img_tmp_trans.copy()
# chw,rgb888
img_return=img_res.reshape((1,shape[2],shape[0],shape[1]))
return img_return
if __name__=="__main__":
# 人脸检测模型路径
face_det_kmodel_path="/sdcard/examples/kmodel/face_detection_320.kmodel"
# 人脸注册模型路径
face_reg_kmodel_path="/sdcard/examples/kmodel/face_recognition.kmodel"
# 其它参数
anchors_path="/sdcard/examples/utils/prior_data_320.bin"
database_dir="/sdcard/examples/utils/db/"
database_img_dir="/sdcard/examples/utils/db_img/"
face_det_input_size=[320,320]
face_reg_input_size=[112,112]
confidence_threshold=0.5
nms_threshold=0.2
anchor_len=4200
det_dim=4
anchors = np.fromfile(anchors_path, dtype=np.float)
anchors = anchors.reshape((anchor_len,det_dim))
max_register_face = 100 #数据库最多人脸个数
feature_num = 128 #人脸识别特征维度
fr=FaceRegistration(face_det_kmodel_path,face_reg_kmodel_path,det_input_size=face_det_input_size,reg_input_size=face_reg_input_size,database_dir=database_dir,anchors=anchors,confidence_threshold=confidence_threshold,nms_threshold=nms_threshold)
try:
# 获取图像列表
img_list = os.listdir(database_img_dir)
for img_file in img_list:
#本地读取一张图像
full_img_file = database_img_dir + img_file
print(full_img_file)
img = image.Image(full_img_file)
img.compress_for_ide()
# 转rgb888的chw格式
rgb888p_img_ndarry = fr.image2rgb888array(img)
# 人脸注册
fr.run(rgb888p_img_ndarry,img_file)
gc.collect()
except Exception as e:
sys.print_exception(e)
finally:
fr.face_det.deinit()
fr.face_reg.deinit()
3.2 人脸识别
'''
本程序遵循GPL V3协议, 请遵循协议
实验平台: DshanPI CanMV
开发板文档站点 : https://eai.100ask.net/
百问网学习平台 : https://www.100ask.net
百问网官方B站 : https://space.bilibili.com/275908810
百问网官方淘宝 : https://100ask.taobao.com
'''
from libs.PipeLine import PipeLine
from libs.AIBase import AIBase
from libs.AI2D import Ai2d
from libs.Utils import *
import os,sys,ujson,gc,math
from media.media import *
import nncase_runtime as nn
import ulab.numpy as np
import image
import aidemo
# 自定义人脸检测任务类
class FaceDetApp(AIBase):
def __init__(self,kmodel_path,model_input_size,anchors,confidence_threshold=0.25,nms_threshold=0.3,rgb888p_size=[1920,1080],display_size=[1920,1080],debug_mode=0):
super().__init__(kmodel_path,model_input_size,rgb888p_size,debug_mode)
# kmodel路径
self.kmodel_path=kmodel_path
# 检测模型输入分辨率
self.model_input_size=model_input_size
# 置信度阈值
self.confidence_threshold=confidence_threshold
# nms阈值
self.nms_threshold=nms_threshold
self.anchors=anchors
# sensor给到AI的图像分辨率,宽16字节对齐
self.rgb888p_size=[ALIGN_UP(rgb888p_size[0],16),rgb888p_size[1]]
# 视频输出VO分辨率,宽16字节对齐
self.display_size=[ALIGN_UP(display_size[0],16),display_size[1]]
# debug模式
self.debug_mode=debug_mode
# 实例化Ai2d,用于实现模型预处理
self.ai2d=Ai2d(debug_mode)
# 设置Ai2d的输入输出格式和类型
self.ai2d.set_ai2d_dtype(nn.ai2d_format.NCHW_FMT,nn.ai2d_format.NCHW_FMT,np.uint8, np.uint8)
# 配置预处理操作,这里使用了pad和resize,Ai2d支持crop/shift/pad/resize/affine,具体代码请打开/sdcard/app/libs/AI2D.py查看
def config_preprocess(self,input_image_size=None):
with ScopedTiming("set preprocess config",self.debug_mode > 0):
# 初始化ai2d预处理配置,默认为sensor给到AI的尺寸,可以通��过设置input_image_size自行修改输入尺寸
ai2d_input_size=input_image_size if input_image_size else self.rgb888p_size
top, bottom, left, right,_ =letterbox_pad_param(self.rgb888p_size,self.model_input_size)
self.ai2d.pad([0, 0, 0, 0, top, bottom, left, right], 0, [104, 117, 123]) # 填充边缘
# 设置resize预处理
self.ai2d.resize(nn.interp_method.tf_bilinear, nn.interp_mode.half_pixel)
# 构建预处理流程,参数为预处理输入tensor的shape和预处理输出的tensor的shape
self.ai2d.build([1,3,ai2d_input_size[1],ai2d_input_size[0]],[1,3,self.model_input_size[1],self.model_input_size[0]])
# 自定义后处理,results是模型输出的array列表,这里使用了aidemo库的face_det_post_process接口
def postprocess(self,results):
with ScopedTiming("postprocess",self.debug_mode > 0):
res = aidemo.face_det_post_process(self.confidence_threshold,self.nms_threshold,self.model_input_size[0],self.anchors,self.rgb888p_size,results)
if len(res)==0:
return res,res
else:
return res[0],res[1]
# 自定义人脸注册任务类
class FaceRegistrationApp(AIBase):
def __init__(self,kmodel_path,model_input_size,rgb888p_size=[1920,1080],display_size=[1920,1080],debug_mode=0):
super().__init__(kmodel_path,model_input_size,rgb888p_size,debug_mode)
# kmodel路径
self.kmodel_path=kmodel_path
# 检测模型输入分辨率
self.model_input_size=model_input_size
# sensor给到AI的图像分辨率,宽16字节��对齐
self.rgb888p_size=[ALIGN_UP(rgb888p_size[0],16),rgb888p_size[1]]
# 视频输出VO分辨率,宽16字节对齐
self.display_size=[ALIGN_UP(display_size[0],16),display_size[1]]
# debug模式
self.debug_mode=debug_mode
# 标准5官
self.umeyama_args_112 = [
38.2946 , 51.6963 ,
73.5318 , 51.5014 ,
56.0252 , 71.7366 ,
41.5493 , 92.3655 ,
70.7299 , 92.2041
]
self.ai2d=Ai2d(debug_mode)
self.ai2d.set_ai2d_dtype(nn.ai2d_format.NCHW_FMT,nn.ai2d_format.NCHW_FMT,np.uint8, np.uint8)
# 配置预处理操作,这里使用了affine,Ai2d支持crop/shift/pad/resize/affine,具体代码请打开/sdcard/app/libs/AI2D.py查看
def config_preprocess(self,landm,input_image_size=None):
with ScopedTiming("set preprocess config",self.debug_mode > 0):
ai2d_input_size=input_image_size if input_image_size else self.rgb888p_size
# 计算affine矩阵,并设置仿射变换预处理
affine_matrix = self.get_affine_matrix(landm)
self.ai2d.affine(nn.interp_method.cv2_bilinear,0, 0, 127, 1,affine_matrix)
# 构建预处理流程,参数为预处理输入tensor的shape和预处理输出的tensor的shape
self.ai2d.build([1,3,ai2d_input_size[1],ai2d_input_size[0]],[1,3,self.model_input_size[1],self.model_input_size[0]])
# 自定义后处理
def postprocess(self,results):
with ScopedTiming("postprocess",self.debug_mode > 0):
return results[0][0]
def svd22(self,a):
# svd
s = [0.0, 0.0]
u = [0.0, 0.0, 0.0, 0.0]
v = [0.0, 0.0, 0.0, 0.0]
s[0] = (math.sqrt((a[0] - a[3]) ** 2 + (a[1] + a[2]) ** 2) + math.sqrt((a[0] + a[3]) ** 2 + (a[1] - a[2]) ** 2)) / 2
s[1] = abs(s[0] - math.sqrt((a[0] - a[3]) ** 2 + (a[1] + a[2]) ** 2))
v[2] = math.sin((math.atan2(2 * (a[0] * a[1] + a[2] * a[3]), a[0] ** 2 - a[1] ** 2 + a[2] ** 2 - a[3] ** 2)) / 2) if \
s[0] > s[1] else 0
v[0] = math.sqrt(1 - v[2] ** 2)
v[1] = -v[2]
v[3] = v[0]
u[0] = -(a[0] * v[0] + a[1] * v[2]) / s[0] if s[0] != 0 else 1
u[2] = -(a[2] * v[0] + a[3] * v[2]) / s[0] if s[0] != 0 else 0
u[1] = (a[0] * v[1] + a[1] * v[3]) / s[1] if s[1] != 0 else -u[2]
u[3] = (a[2] * v[1] + a[3] * v[3]) / s[1] if s[1] != 0 else u[0]
v[0] = -v[0]
v[2] = -v[2]
return u, s, v
def image_umeyama_112(self,src):
# 使用Umeyama算法计算仿射变换矩阵
SRC_NUM = 5
SRC_DIM = 2
src_mean = [0.0, 0.0]
dst_mean = [0.0, 0.0]
for i in range(0,SRC_NUM * 2,2):
src_mean[0] += src[i]
src_mean[1] += src[i + 1]
dst_mean[0] += self.umeyama_args_112[i]
dst_mean[1] += self.umeyama_args_112[i + 1]
src_mean[0] /= SRC_NUM
src_mean[1] /= SRC_NUM
dst_mean[0] /= SRC_NUM
dst_mean[1] /= SRC_NUM
src_demean = [[0.0, 0.0] for _ in range(SRC_NUM)]
dst_demean = [[0.0, 0.0] for _ in range(SRC_NUM)]
for i in range(SRC_NUM):
src_demean[i][0] = src[2 * i] - src_mean[0]
src_demean[i][1] = src[2 * i + 1] - src_mean[1]
dst_demean[i][0] = self.umeyama_args_112[2 * i] - dst_mean[0]
dst_demean[i][1] = self.umeyama_args_112[2 * i + 1] - dst_mean[1]
A = [[0.0, 0.0], [0.0, 0.0]]
for i in range(SRC_DIM):
for k in range(SRC_DIM):
for j in range(SRC_NUM):
A[i][k] += dst_demean[j][i] * src_demean[j][k]
A[i][k] /= SRC_NUM
T = [[1, 0, 0], [0, 1, 0], [0, 0, 1]]
U, S, V = self.svd22([A[0][0], A[0][1], A[1][0], A[1][1]])
T[0][0] = U[0] * V[0] + U[1] * V[2]
T[0][1] = U[0] * V[1] + U[1] * V[3]
T[1][0] = U[2] * V[0] + U[3] * V[2]
T[1][1] = U[2] * V[1] + U[3] * V[3]
scale = 1.0
src_demean_mean = [0.0, 0.0]
src_demean_var = [0.0, 0.0]
for i in range(SRC_NUM):
src_demean_mean[0] += src_demean[i][0]
src_demean_mean[1] += src_demean[i][1]
src_demean_mean[0] /= SRC_NUM
src_demean_mean[1] /= SRC_NUM
for i in range(SRC_NUM):
src_demean_var[0] += (src_demean_mean[0] - src_demean[i][0]) * (src_demean_mean[0] - src_demean[i][0])
src_demean_var[1] += (src_demean_mean[1] - src_demean[i][1]) * (src_demean_mean[1] - src_demean[i][1])
src_demean_var[0] /= SRC_NUM
src_demean_var[1] /= SRC_NUM
scale = 1.0 / (src_demean_var[0] + src_demean_var[1]) * (S[0] + S[1])
T[0][2] = dst_mean[0] - scale * (T[0][0] * src_mean[0] + T[0][1] * src_mean[1])
T[1][2] = dst_mean[1] - scale * (T[1][0] * src_mean[0] + T[1][1] * src_mean[1])
T[0][0] *= scale
T[0][1] *= scale
T[1][0] *= scale
T[1][1] *= scale
return T
def get_affine_matrix(self,sparse_points):
# 获取affine变换矩阵
with ScopedTiming("get_affine_matrix", self.debug_mode > 1):
# 使用Umeyama算法计算仿射变换矩阵
matrix_dst = self.image_umeyama_112(sparse_points)
matrix_dst = [matrix_dst[0][0],matrix_dst[0][1],matrix_dst[0][2],
matrix_dst[1][0],matrix_dst[1][1],matrix_dst[1][2]]
return matrix_dst
# 人脸识别任务类
class FaceRecognition:
def __init__(self,face_det_kmodel,face_reg_kmodel,det_input_size,reg_input_size,database_dir,anchors,confidence_threshold=0.25,nms_threshold=0.3,face_recognition_threshold=0.75,rgb888p_size=[1280,720],display_size=[1920,1080],debug_mode=0):
# 人脸检测模型路径
self.face_det_kmodel=face_det_kmodel
# 人脸识别模型路径
self.face_reg_kmodel=face_reg_kmodel
# 人脸检测模型输入分辨率
self.det_input_size=det_input_size
# 人脸识别模型输入分辨率
self.reg_input_size=reg_input_size
self.database_dir=database_dir
# anchors
self.anchors=anchors
# 置信度阈值
self.confidence_threshold=confidence_threshold
# nms阈值
self.nms_threshold=nms_threshold
self.face_recognition_threshold=face_recognition_threshold
# sensor给到AI的图像分辨率,宽16字节对齐
self.rgb888p_size=[ALIGN_UP(rgb888p_size[0],16),rgb888p_size[1]]
# 视频输出VO分辨率,宽16字节对齐
self.display_size=[ALIGN_UP(display_size[0],16),display_size[1]]
# debug_mode模式
self.debug_mode=debug_mode
self.max_register_face = 100 # 数据库最多人脸个数
self.feature_num = 128 # 人脸识别特征维度
self.valid_register_face = 0 # 已注册人脸数
self.db_name= []
self.db_data= []
self.face_det=FaceDetApp(self.face_det_kmodel,model_input_size=self.det_input_size,anchors=self.anchors,confidence_threshold=self.confidence_threshold,nms_threshold=self.nms_threshold,rgb888p_size=self.rgb888p_size,display_size=self.display_size,debug_mode=0)
self.face_reg=FaceRegistrationApp(self.face_reg_kmodel,model_input_size=self.reg_input_size,rgb888p_size=self.rgb888p_size,display_size=self.display_size)
self.face_det.config_preprocess()
# 人脸数据库初始化
self.database_init()
# run函数
def run(self,input_np):
# 执行人脸检测
det_boxes,landms=self.face_det.run(input_np)
recg_res = []
for landm in landms:
# 针对每个人脸五官点,推理得到人脸特征,并计算�特征在数据库中相似度
self.face_reg.config_preprocess(landm)
feature=self.face_reg.run(input_np)
res = self.database_search(feature)
recg_res.append(res)
return det_boxes,recg_res
def database_init(self):
# 数据初始化,构建数据库人名列表和数据库特征列表
with ScopedTiming("database_init", self.debug_mode > 1):
db_file_list = os.listdir(self.database_dir)
for db_file in db_file_list:
if not db_file.endswith('.bin'):
continue
if self.valid_register_face >= self.max_register_face:
break
valid_index = self.valid_register_face
full_db_file = self.database_dir + db_file
with open(full_db_file, 'rb') as f:
data = f.read()
feature = np.frombuffer(data, dtype=np.float)
self.db_data.append(feature)
name = db_file.split('.')[0]
self.db_name.append(name)
self.valid_register_face += 1
def database_reset(self):
# 数据库清空
with ScopedTiming("database_reset", self.debug_mode > 1):
print("database clearing...")
self.db_name = []
self.db_data = []
self.valid_register_face = 0
print("database clear Done!")
def database_search(self,feature):
# 数据库查询
with ScopedTiming("database_search", self.debug_mode > 1):
v_id = -1
v_score_max = 0.0
# 将当前人脸特征归一化
feature /= np.linalg.norm(feature)
# 遍历当前人脸数据库,统计最高得分
for i in range(self.valid_register_face):
db_feature = self.db_data[i]
db_feature /= np.linalg.norm(db_feature)
# 计算数据库特征与当前人脸特征相似度
v_score = np.dot(feature, db_feature)/2 + 0.5
if v_score > v_score_max:
v_score_max = v_score
v_id = i
if v_id == -1:
# 数据库中无人脸
return 'unknown'
elif v_score_max < self.face_recognition_threshold:
# 小于人脸识别阈值,未识别
return 'unknown'
else:
# 识别成功
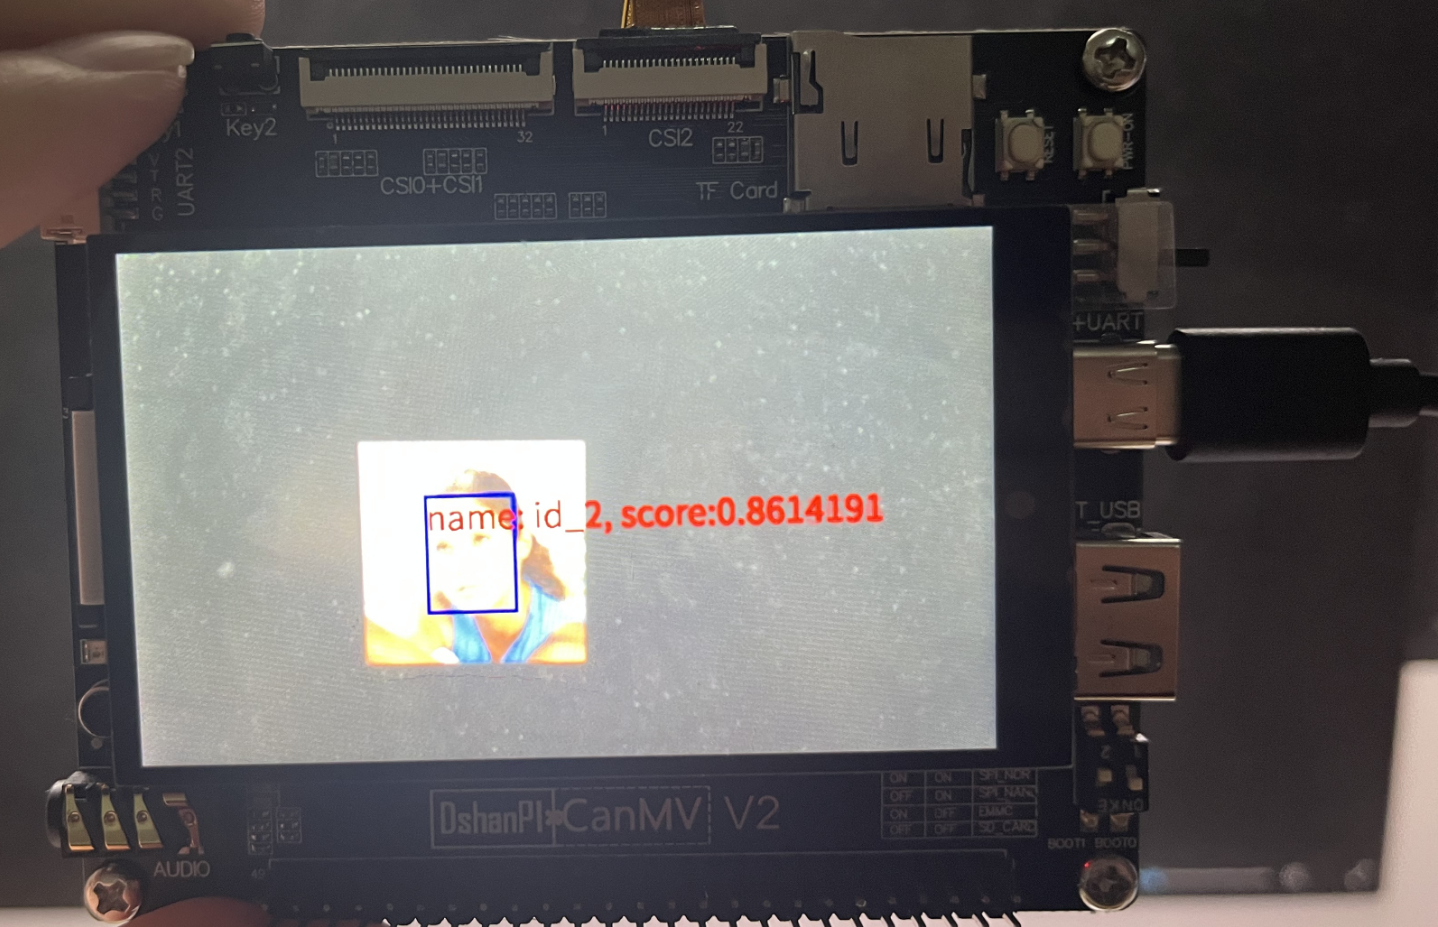
result = 'name: {}, score:{}'.format(self.db_name[v_id],v_score_max)
return result
# 绘制识别结果
def draw_result(self,pl,dets,recg_results):
pl.osd_img.clear()
if dets:
for i,det in enumerate(dets):
# (1)画人脸框
x1, y1, w, h = map(lambda x: int(round(x, 0)), det[:4])
x1 = x1 * self.display_size[0]//self.rgb888p_size[0]
y1 = y1 * self.display_size[1]//self.rgb888p_size[1]
w = w * self.display_size[0]//self.rgb888p_size[0]
h = h * self.display_size[1]//self.rgb888p_size[1]
pl.osd_img.draw_rectangle(x1,y1, w, h, color=(255,0, 0, 255), thickness = 4)
# (2)�写人脸识别结果
recg_text = recg_results[i]
pl.osd_img.draw_string_advanced(x1,y1,32,recg_text,color=(255, 255, 0, 0))
if __name__=="__main__":
# 注意:执行人脸识别任务之前,需要先执行人脸注册任务进行人脸身份注册生成feature数据库
# 添加显示模式,默认hdmi,可选hdmi/lcd/lt9611/st7701/hx8399,其中hdmi默认置为lt9611,分辨率1920*1080;lcd默认置为st7701,分辨率800*480
display_mode="lcd"
# k230保持不变,k230d可调整为[640,360]
rgb888p_size = [1280, 720]
# 人脸检测模型路径
face_det_kmodel_path="/sdcard/examples/kmodel/face_detection_320.kmodel"
# 人脸识别模型路径
face_reg_kmodel_path="/sdcard/examples/kmodel/face_recognition.kmodel"
# 其它参数
anchors_path="/sdcard/examples/utils/prior_data_320.bin"
database_dir ="/sdcard/examples/utils/db/"
face_det_input_size=[320,320]
face_reg_input_size=[112,112]
confidence_threshold=0.5
nms_threshold=0.2
anchor_len=4200
det_dim=4
anchors = np.fromfile(anchors_path, dtype=np.float)
anchors = anchors.reshape((anchor_len,det_dim))
face_recognition_threshold = 0.75 # 人脸识别阈值
# 初始化PipeLine,只关注传给AI的图像分辨率,显示的分辨率
pl=PipeLine(rgb888p_size=rgb888p_size,display_mode=display_mode)
pl.create()
display_size=pl.get_display_size()
fr=FaceRecognition(face_det_kmodel_path,face_reg_kmodel_path,det_input_size=face_det_input_size,reg_input_size=face_reg_input_size,database_dir=database_dir,anchors=anchors,confidence_threshold=confidence_threshold,nms_threshold=nms_threshold,face_recognition_threshold=face_recognition_threshold,rgb888p_size=rgb888p_size,display_size=display_size)
while True:
with ScopedTiming("total", 1):
img=pl.get_frame() # 获取当前帧
det_boxes,recg_res=fr.run(img) # 推理当前帧
fr.draw_result(pl,det_boxes,recg_res) # 绘制推理结果
pl.show_image() # 展示推理效果
gc.collect()
fr.face_det.deinit()
fr.face_reg.deinit()
pl.destroy()
4.实验结果
4.1 运行人脸注册
请运行 人脸注册(Face Register) 程序。该程序会自动扫描并识别开发板内置路径 /sdcard/examples/utils/db_img/ 下的所有人脸图像,并完成人脸特征的注册。
该目录中默认预置了两张人脸图片作为示例,您也可以将自己的照片添加到该目录中,用于注册和后续识别。
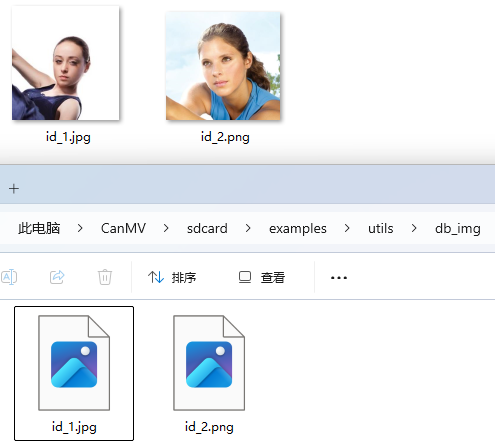
运行程序之后会在\sdcard\examples\utils\db目录下看到注册好的人脸数据库。
4.2 运行人脸识别程序
运行人脸识别程序:
识别效果如下: