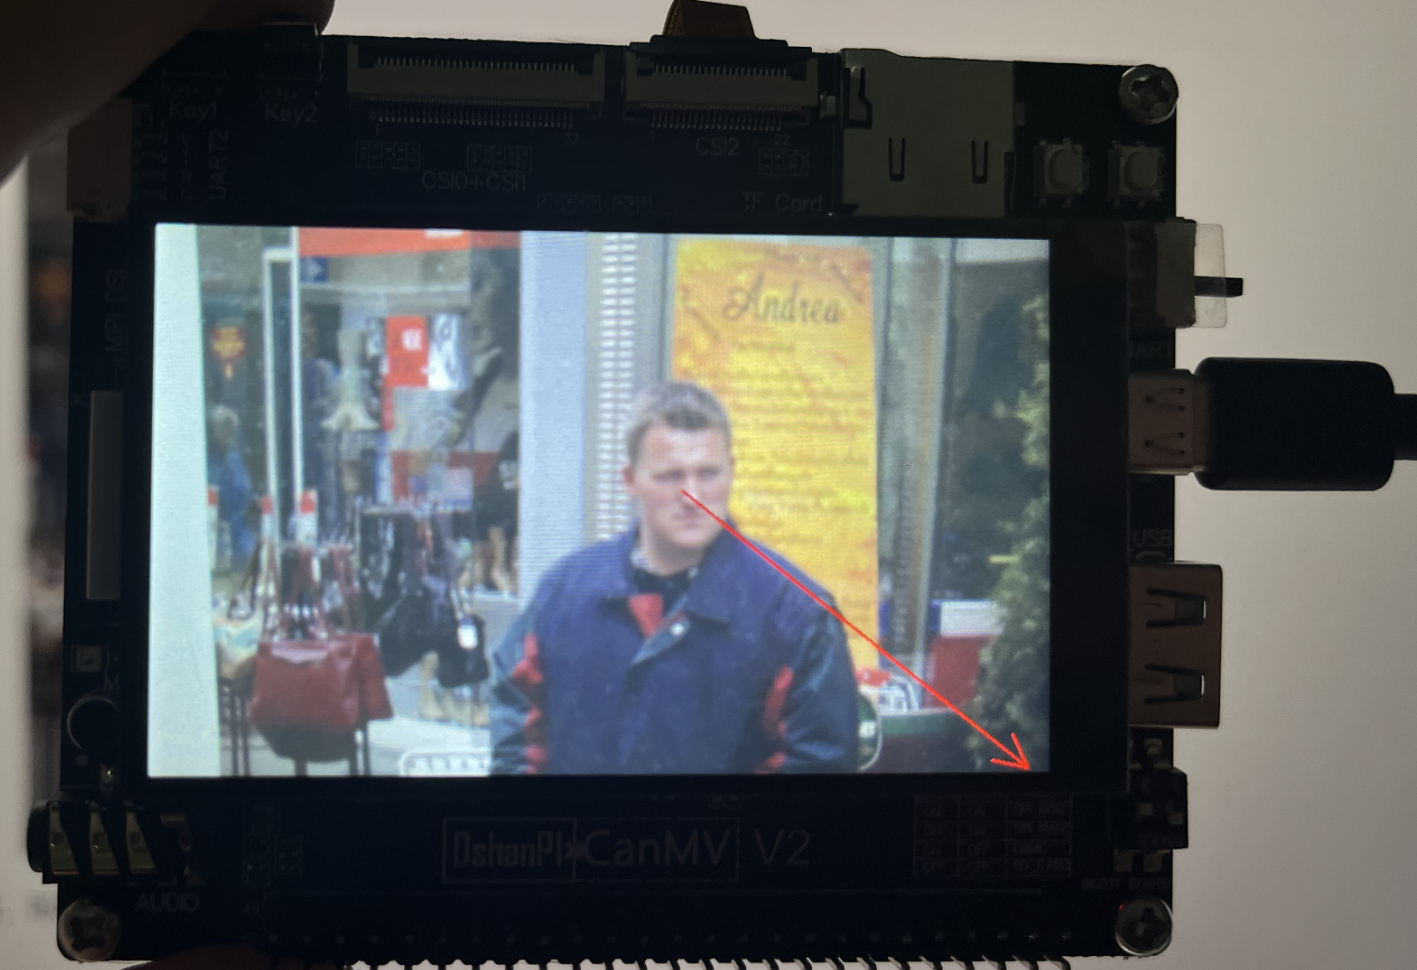
人脸注视方向检测
1.实验目的
通过人脸和眼睛的特征来确定人的注视方向。
2.核心代码
          +-----------------+
          |    PipeLine     |  ← 图像采集、显示、OSD图像管理
          +-----------------+
                   |
                   v
       +------------------------+
       |      face_app.run()    |  ← 人脸检测 (YOLOv8 模型)
       +------------------------+
                   |
        人脸框 dets: [x, y, w, h]
                   |
                   v
       +------------------------+
       |     eye_app.run()      |  ← 注视方向估计 (gaze 模型)
       +------------------------+
                   |
        注视角度 gaze_res: [yaw, pitch]
                   |
                   v
       +------------------------+
       | eye_app.draw_result() |  ← OSD 图像上绘制方向箭头
       +------------------------+
3.示例代码
'''
本程序遵循GPL V3协议, 请遵循协议
实验平台: DshanPI CanMV
开发板文档站点 : https://eai.100ask.net/
百问网学习平台 : https://www.100ask.net
百问网官方B站 : https://space.bilibili.com/275908810
百问网官方淘宝 : https://100ask.taobao.com
'''
from libs.PipeLine import PipeLine, ScopedTiming
from libs.AIBase import AIBase
from libs.AI2D import Ai2d
import os
import ujson
from media.media import *
from time import *
import nncase_runtime as nn
import ulab.numpy as np
import time
import image
import aidemo
import random
import gc
import sys
import math
# 自定义人脸检测任务类
class FaceDetApp(AIBase):
def __init__(self,kmodel_path,model_input_size,anchors,confidence_threshold=0.25,nms_threshold=0.3,rgb888p_size=[1280,720],display_size=[1920,1080],debug_mode=0):
super().__init__(kmodel_path,model_input_size,rgb888p_size,debug_mode)
# kmodel路径
self.kmodel_path=kmodel_path
# 检测模型输入分辨率
self.model_input_size=model_input_size
# 置信度阈值
self.confidence_threshold=confidence_threshold
# nms阈值
self.nms_threshold=nms_threshold
self.anchors=anchors
# sensor给到AI的图像分辨率,宽16字节对齐
self.rgb888p_size=[ALIGN_UP(rgb888p_size[0],16),rgb888p_size[1]]
# 视频输出VO分辨率,宽16字节对齐
self.display_size=[ALIGN_UP(display_size[0],16),display_size[1]]
# debug模式
self.debug_mode=debug_mode
# Ai2d实��例,用于实现模型预处理
self.ai2d=Ai2d(debug_mode)
# 设置Ai2d的输入输出格式和类型
self.ai2d.set_ai2d_dtype(nn.ai2d_format.NCHW_FMT,nn.ai2d_format.NCHW_FMT,np.uint8, np.uint8)
# 配置预处理操作,这里使用了padding和resize,Ai2d支持crop/shift/pad/resize/affine,具体代码请打开/sdcard/app/libs/AI2D.py查看
def config_preprocess(self,input_image_size=None):
with ScopedTiming("set preprocess config",self.debug_mode > 0):
# 初始化ai2d预处理配置,默认为sensor给到AI的尺寸,可以通过设置input_image_size自行修改输入尺寸
ai2d_input_size=input_image_size if input_image_size else self.rgb888p_size
# 设置padding预处理
self.ai2d.pad(self.get_pad_param(), 0, [104,117,123])
# 设置resize预处理
self.ai2d.resize(nn.interp_method.tf_bilinear, nn.interp_mode.half_pixel)
# 构建预处理流程,参数为预处理输入tensor的shape和预处理输出的tensor的shape
self.ai2d.build([1,3,ai2d_input_size[1],ai2d_input_size[0]],[1,3,self.model_input_size[1],self.model_input_size[0]])
# 自定义任务后处理,这里使用了aidemo库的face_det_post_process接口
def postprocess(self,results):
with ScopedTiming("postprocess",self.debug_mode > 0):
res = aidemo.face_det_post_process(self.confidence_threshold,self.nms_threshold,self.model_input_size[0],self.anchors,self.rgb888p_size,results)
if len(res)==0:
return res
else:
return res[0]
# 计算padding参数
def get_pad_param(self):
dst_w = self.model_input_size[0]
dst_h = self.model_input_size[1]
# 计算最小的缩放比例,等比例缩放
ratio_w = dst_w / self.rgb888p_size[0]
ratio_h = dst_h / self.rgb888p_size[1]
if ratio_w < ratio_h:
ratio = ratio_w
else:
ratio = ratio_h
new_w = (int)(ratio * self.rgb888p_size[0])
new_h = (int)(ratio * self.rgb888p_size[1])
dw = (dst_w - new_w) / 2
dh = (dst_h - new_h) / 2
top = (int)(round(0))
bottom = (int)(round(dh * 2 + 0.1))
left = (int)(round(0))
right = (int)(round(dw * 2 - 0.1))
return [0,0,0,0,top, bottom, left, right]
# 自定义注视估计任务类
class EyeGazeApp(AIBase):
def __init__(self,kmodel_path,model_input_size,rgb888p_size=[1920,1080],display_size=[1920,1080],debug_mode=0):
super().__init__(kmodel_path,model_input_size,rgb888p_size,debug_mode)
# kmodel路径
self.kmodel_path=kmodel_path
# 注视估计模型输入分辨率
self.model_input_size=model_input_size
# sensor给到AI的图像分辨率,宽16字节对齐
self.rgb888p_size=[ALIGN_UP(rgb888p_size[0],16),rgb888p_size[1]]
# 视频输出VO分辨率,宽16字节对齐
self.display_size=[ALIGN_UP(display_size[0],16),display_size[1]]
# debug模式
self.debug_mode=debug_mode
# Ai2d实例,用于实现模型预处理
self.ai2d=Ai2d(debug_mode)
# 设置Ai2d的输入输出格式和类型
self.ai2d.set_ai2d_dtype(nn.ai2d_format.NCHW_FMT,nn.ai2d_format.NCHW_FMT,np.uint8, np.uint8)
# 配置预处理操作,这里使用了crop和resize,Ai2d支持crop/shift/pad/resize/affine,具体代码请打开/sdcard/app/libs/AI2D.py查看
def config_preprocess(self,det,input_image_size=None):
with ScopedTiming("set preprocess config",self.debug_mode > 0):
# 初始化ai2d预处理配置
ai2d_input_size=input_image_size if input_image_size else self.rgb888p_size
# 计算crop预处理参数
x, y, w, h = map(lambda x: int(round(x, 0)), det[:4])
# 设置crop预处理
self.ai2d.crop(x,y,w,h)
# 设置resize预处理
self.ai2d.resize(nn.interp_method.tf_bilinear, nn.interp_mode.half_pixel)
# 构建预处理流程,参数为预处理输入tensor的shape和预处理输出的tensor的shape
self.ai2d.build([1,3,ai2d_input_size[1],ai2d_input_size[0]],[1,3,self.model_input_size[1],self.model_input_size[0]])
# 自定义后处理,results是模型输出的array列表,这里调用了aidemo库的eye_gaze_post_process接口
def postprocess(self,results):
with ScopedTiming("postprocess",self.debug_mode > 0):
post_ret = aidemo.eye_gaze_post_process(results)
return post_ret[0],post_ret[1]
# 自定义注视估计类
class EyeGaze:
def __init__(self,face_det_kmodel,eye_gaze_kmodel,det_input_size,eye_gaze_input_size,anchors,confidence_threshold=0.25,nms_threshold=0.3,rgb888p_size=[1920,1080],display_size=[1920,1080],debug_mode=0):
# 人脸检测模型路径
self.face_det_kmodel=face_det_kmodel
# 人脸注视估计模型路径
self.eye_gaze_kmodel=eye_gaze_kmodel
# 人脸检测模型输入分辨率
self.det_input_size=det_input_size
# 人脸注视估计模型输入分辨率
self.eye_gaze_input_size=eye_gaze_input_size
# anchors
self.anchors=anchors
# 置信度阈值
self.confidence_threshold=confidence_threshold
# nms阈值
self.nms_threshold=nms_threshold
# sensor给到AI的图像分辨率,宽16字节对齐
self.rgb888p_size=[ALIGN_UP(rgb888p_size[0],16),rgb888p_size[1]]
# 视频输出VO分辨率,宽16字节对齐
self.display_size=[ALIGN_UP(display_size[0],16),display_size[1]]
# debug_mode模式
self.debug_mode=debug_mode
# 人脸检测实例
self.face_det=FaceDetApp(self.face_det_kmodel,model_input_size=self.det_input_size,anchors=self.anchors,confidence_threshold=self.confidence_threshold,nms_threshold=self.nms_threshold,rgb888p_size=self.rgb888p_size,display_size=self.display_size,debug_mode=0)
# 注视估计实例
self.eye_gaze=EyeGazeApp(self.eye_gaze_kmodel,model_input_size=self.eye_gaze_input_size,rgb888p_size=self.rgb888p_size,display_size=self.display_size)
# 人脸检测配置预处理
self.face_det.config_preprocess()
#run方法
def run(self,input_np):
# 先进行人脸检测
det_boxes=self.face_det.run(input_np)
eye_gaze_res=[]
for det_box in det_boxes:
# 对每一个检测到的人脸做注视估计
self.eye_gaze.config_preprocess(det_box)
pitch,yaw=self.eye_gaze.run(input_np)
eye_gaze_res.append((pitch,yaw))
return det_boxes,eye_gaze_res
# 绘制注视估计效果
def draw_result(self,pl,dets,eye_gaze_res):
pl.osd_img.clear()
if dets:
for det,gaze_ret in zip(dets,eye_gaze_res):
pitch , yaw = gaze_ret
length = self.display_size[0]/ 2
x, y, w, h = map(lambda x: int(round(x, 0)), det[:4])
x = x * self.display_size[0] // self.rgb888p_size[0]
y = y * self.display_size[1] // self.rgb888p_size[1]
w = w * self.display_size[0] // self.rgb888p_size[0]
h = h * self.display_size[1] // self.rgb888p_size[1]
center_x = (x + w / 2.0)
center_y = (y + h / 2.0)
dx = -length * math.sin(pitch) * math.cos(yaw)
target_x = int(center_x + dx)
dy = -length * math.sin(yaw)
target_y = int(center_y + dy)
pl.osd_img.draw_arrow(int(center_x), int(center_y), target_x, target_y, color = (255,255,0,0), size = 30, thickness = 2)
if __name__=="__main__":
# 显示模式,默认"hdmi",可以选择"hdmi"和"lcd",k230d受限于内存不支持
display_mode="lcd"
if display_mode=="hdmi":
display_size=[1920,1080]
else:
display_size=[800,480]
# 人脸检测模型路径
face_det_kmodel_path="/sdcard/examples/kmodel/face_detection_320.kmodel"
# 人脸注视估计模型路径
eye_gaze_kmodel_path="/sdcard/examples/kmodel/eye_gaze.kmodel"
# 其他参数
anchors_path="/sdcard/examples/utils/prior_data_320.bin"
rgb888p_size=[1920,1080]
face_det_input_size=[320,320]
eye_gaze_input_size=[448,448]
confidence_threshold=0.5
nms_threshold=0.2
anchor_len=4200
det_dim=4
anchors = np.fromfile(anchors_path, dtype=np.float)
anchors = anchors.reshape((anchor_len,det_dim))
# 初始化PipeLine,只关注传给AI的图像分辨率,显示的分辨率
pl=PipeLine(rgb888p_size=rgb888p_size,display_size=display_size,display_mode=display_mode)
pl.create()
eg=EyeGaze(face_det_kmodel_path,eye_gaze_kmodel_path,det_input_size=face_det_input_size,eye_gaze_input_size=eye_gaze_input_size,anchors=anchors,confidence_threshold=confidence_threshold,nms_threshold=nms_threshold,rgb888p_size=rgb888p_size,display_size=display_size)
try:
while True:
os.exitpoint()
with ScopedTiming("total",1):
img=pl.get_frame() # 获取当前帧
det_boxes,eye_gaze_res=eg.run(img) # 推理当前帧
eg.draw_result(pl,det_boxes,eye_gaze_res) # 绘制推理效果
pl.show_image() # 展示推理效果
gc.collect()
except Exception as e:
sys.print_exception(e)
finally:
eg.face_det.deinit()
eg.eye_gaze.deinit()
pl.destroy()
4.实验结果

点击运行代码后,可以在显示屏上看到人脸注视方向检测的结果。如下所示:
