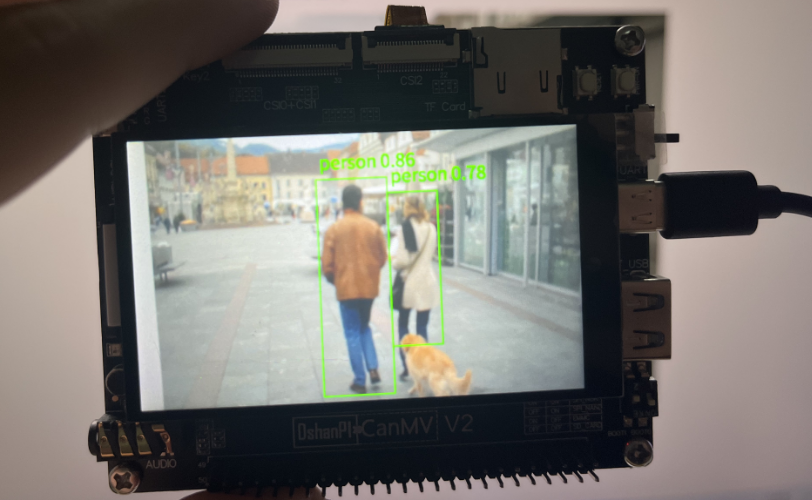
人形检测
1.实验目的
基于YOLOv5n 模型,实现对人体的实时检测,图像获取、AI 预处理、推理、后处理和显示完整串联。
2.代码解析
核心类解析
PersonDetectionApp:自定义人体检测类
继承自 AIBase,封装了以下功能:
- 模型初始化、加载
- Ai2d 图像预处理配置(pad + resize)
- YOLO 输出的后处理(调用
aicube.anchorbasedet_post_process) - 绘制检测框及标签到显示屏
person_det = PersonDetectionApp(
    kmodel_path="/sdcard/examples/kmodel/person_detect_yolov5n.kmodel",
    model_input_size=[640,640],
    labels=["person"],
    anchors=[...],
    ...
)
图像采集与显示
pl = PipeLine(rgb888p_size=[1920, 1080], display_size=[800, 480], display_mode="lcd")
封装了图像传感器的初始化、帧获取、OSD 图层绘制、图像显示等功能。
图像处理流程
1.预处理:config_preprocess()
通过 Ai2d 统一设置输入图像格式、类型和尺寸,常见操作包括:
- Pad:填充边缘,防止图像失真
- Resize:缩放到模型输入尺寸(如 640x640)
self.ai2d.pad([...])
self.ai2d.resize(...)
self.ai2d.build(...)
2.推理:run()(继承自 AIBase)
res = person_det.run(img)
会内部调用:
self.preprocess(img)self.interpreter.run(...)self.postprocess(results)
3.后处理:postprocess()
使用 aicube.anchorbasedet_post_process() 实现 anchor-based 检测结果转换,返回检测框信息 [cls_id, score, x1, y1, x2, y2]。
绘制结果
将检测框按比例缩放绘制到 OSD 层:
pl.osd_img.draw_rectangle(...)
pl.osd_img.draw_string_advanced(...)
排除了太小、靠边的干扰框,提升检测体验。
主循环
while True:
    img = pl.get_frame()
    res = person_det.run(img)
    person_det.draw_result(pl, res)
    pl.show_image()
    gc.collect()
每帧执行完整流程:
- 获取帧
- 图像预处理 + 推理
- 后处理解析
- 绘制结果
- 显示到屏幕
3.示例代码
'''
本程序遵循GPL V3协议, 请遵循协议
实验平台: DshanPI CanMV
开发板文档站点	: https://eai.100ask.net/
百问网学习平台   : https://www.100ask.net
百问网官方B站    : https://space.bilibili.com/275908810
百问网官方淘宝   : https://100ask.taobao.com
'''
from libs.PipeLine import PipeLine, ScopedTiming  # 图像处理管线类(图像采集、显示)和计时器类
from libs.AIBase import AIBase                    # AI推理基础类(封装模型加载、推理等基础操作)
from libs.AI2D import Ai2d                        # 图像预处理类(图像pad、resize等)
import os
import ujson                                      # 轻量级JSON库,用于配置读取(未在此处使用)
from media.media import *                         # 媒体库(摄像头获取图像、显示图像等)
from time import *                                # 时间模块(包含sleep、time等)
import nncase_runtime as nn                       # NNCase推理引擎库,进行模型加载与执行
import ulab.numpy as np                           # ulab库:兼容numpy的轻量数组库,适合MCU等资源受限平台
import time
import utime                                      # 更轻量的时间库(适用于MCU)
import image                                      # 图像处理相关API(例如绘制、图像信息提取等)
import random                                     # 随机数库(未在此代码中使用)
import gc                                          # 垃圾回收模块,用于手动释放内存
import sys
import aicube                                     # 自定义aicube库,包含anchor-based目标检测后处理

# 定义人体检测应用类,继承自 AIBase(通用模型推理基类)
class PersonDetectionApp(AIBase):
    def __init__(self, kmodel_path, model_input_size, labels, anchors,
                 confidence_threshold=0.2, nms_threshold=0.5, nms_option=False,
                 strides=[8, 16, 32], rgb888p_size=[224, 224], display_size=[1920, 1080], debug_mode=0):
        super().__init__(kmodel_path, model_input_size, rgb888p_size, debug_mode)
        # 参数保存
        self.kmodel_path = kmodel_path
        self.model_input_size = model_input_size         # 模型输入大小(通常为正方形,如640x640)
        self.labels = labels                             # 类别标签列表,如["person"]
        self.anchors = anchors                           # 锚框参数
        self.strides = strides                           # 每层输出特征图的步长
        self.confidence_threshold = confidence_threshold # 用于过滤低置信度框
        self.nms_threshold = nms_threshold               # 非极大值抑制的IOU阈值
        self.nms_option = nms_option                     # 是否使用NMS优化加速
        self.rgb888p_size = [ALIGN_UP(rgb888p_size[0], 16), rgb888p_size[1]]  # 图像采集分辨率,宽度对齐到16
        self.display_size = [ALIGN_UP(display_size[0], 16), display_size[1]] # 显示图像分辨率
        self.debug_mode = debug_mode

        # 创建图像预处理对象
        self.ai2d = Ai2d(debug_mode)
        self.ai2d.set_ai2d_dtype(nn.ai2d_format.NCHW_FMT, nn.ai2d_format.NCHW_FMT, np.uint8, np.uint8)

    # 配置图像预处理流程,包括padding与resize策略
    def config_preprocess(self, input_image_size=None):
        with ScopedTiming("set preprocess config", self.debug_mode > 0):
            ai2d_input_size = input_image_size if input_image_size else self.rgb888p_size
            # 获取上下左右padding数值
            top, bottom, left, right = self.get_padding_param()
            self.ai2d.pad([0, 0, 0, 0, top, bottom, left, right], 0, [0, 0, 0])  # 用黑色填充
            self.ai2d.resize(nn.interp_method.tf_bilinear, nn.interp_mode.half_pixel)  # 缩放方法
            self.ai2d.build([1, 3, ai2d_input_size[1], ai2d_input_size[0]],
                            [1, 3, self.model_input_size[1], self.model_input_size[0]])

    # 推理结果后处理(坐标反算、NMS、过滤)
    def postprocess(self, results):
        with ScopedTiming("postprocess", self.debug_mode > 0):
            dets = aicube.anchorbasedet_post_process(
                results[0], results[1], results[2],
                self.model_input_size, self.rgb888p_size,
                self.strides, len(self.labels),
                self.confidence_threshold, self.nms_threshold,
                self.anchors, self.nms_option
            )
            return dets

    # 绘制检测结果到屏幕
    def draw_result(self, pl, dets):
        with ScopedTiming("display_draw", self.debug_mode > 0):
            if dets:
                pl.osd_img.clear()
                for det_box in dets:
                    # 反归一化为实际坐标
                    x1, y1, x2, y2 = det_box[2], det_box[3], det_box[4], det_box[5]
                    w = float(x2 - x1) * self.display_size[0] // self.rgb888p_size[0]
                    h = float(y2 - y1) * self.display_size[1] // self.rgb888p_size[1]
                    x1 = int(x1 * self.display_size[0] // self.rgb888p_size[0])
                    y1 = int(y1 * self.display_size[1] // self.rgb888p_size[1])
                    x2 = int(x2 * self.display_size[0] // self.rgb888p_size[0])
                    y2 = int(y2 * self.display_size[1] // self.rgb888p_size[1])

                    # 过滤异常检测框(靠边界、小框等)
                    if (h < 0.1 * self.display_size[0]):
                        continue
                    if (w < 0.25 * self.display_size[0] and (x1 < 0.03 * self.display_size[0] or x2 > 0.97 * self.display_size[0])):
                        continue
                    if (w < 0.15 * self.display_size[0] and (x1 < 0.01 * self.display_size[0] or x2 > 0.99 * self.display_size[0])):
                        continue

                    # 绘制检测框及文字
                    pl.osd_img.draw_rectangle(x1, y1, int(w), int(h), color=(255, 0, 255, 0), thickness=2)
                    pl.osd_img.draw_string_advanced(x1, y1 - 50, 32, " " + self.labels[det_box[0]] + " " + str(round(det_box[1], 2)), color=(255, 0, 255, 0))
            else:
                pl.osd_img.clear()

    # 计算padding值,使图像按模型输入比例居中
    def get_padding_param(self):
        dst_w, dst_h = self.model_input_size
        input_width, input_high = self.rgb888p_size
        ratio_w = dst_w / input_width
        ratio_h = dst_h / input_high
        ratio = min(ratio_w, ratio_h)
        new_w = int(ratio * input_width)
        new_h = int(ratio * input_high)
        dw = (dst_w - new_w) / 2
        dh = (dst_h - new_h) / 2
        top = int(round(dh - 0.1))
        bottom = int(round(dh + 0.1))
        left = int(round(dw - 0.1))
        right = int(round(dw - 0.1))
        return top, bottom, left, right

# 主程序入口:初始化系统并持续检测
if __name__ == "__main__":
    display_mode = "lcd"  # 显示设备类型
    rgb888p_size = [1920, 1080]  # 摄像头采集分辨率

    # 根据显示设备选择输出尺寸
    display_size = [1920, 1080] if display_mode == "hdmi" else [640, 480]

    # 模型配置
    kmodel_path = "/sdcard/examples/kmodel/person_detect_yolov5n.kmodel"
    confidence_threshold = 0.2
    nms_threshold = 0.6
    labels = ["person"]
    anchors = [10, 13, 16, 30, 33, 23, 30, 61, 62, 45, 59, 119, 116, 90, 156, 198, 373, 326]

    # 初始化图像处理管线
    pl = PipeLine(rgb888p_size=rgb888p_size, display_size=display_size, display_mode=display_mode)
    pl.create()

    # 初始化人体检测应用
    person_det = PersonDetectionApp(
        kmodel_path,
        model_input_size=[640, 640],
        labels=labels,
        anchors=anchors,
        confidence_threshold=confidence_threshold,
        nms_threshold=nms_threshold,
        nms_option=False,
        strides=[8, 16, 32],
        rgb888p_size=rgb888p_size,
        display_size=display_size,
        debug_mode=0
    )
    person_det.config_preprocess()

    try:
        while True:
            os.exitpoint()  # 检查是否退出循环
            with ScopedTiming("total", 1):
                img = pl.get_frame()              # 获取图像帧
                res = person_det.run(img)         # 执行推理
                person_det.draw_result(pl, res)   # 绘制检测结果
                pl.show_image()                   # 刷新显示
                gc.collect()                      # 释放无用内存
    except Exception as e:
        sys.print_exception(e)                   # 打印异常堆栈
    finally:
        person_det.deinit()                      # 释放模型资源
        pl.destroy()                             # 销毁图像处理管线
4.实验结果
点击运行代码后,可以在显示屏上看到人形检测的结果。如下所示: